There are lots of ways to contribute to Kubernetes. You can work on designs for new features,
you can document the code we already have, you can write for our blogs.
There's more: you can implement those new features or fix bugs. You can help people join our
contributor community, or support existing contributors.
With all these different ways to make a difference to the project, we - Kubernetes - have made
a dedicated website: https://k8s.dev/. You can go there to learn more about
contributing to Kubernetes.
To learn more about contributing to Kubernetes in general, see the general
contributor documentation site.
Getting started
Anyone can open an issue about documentation, or contribute a change with a
pull request (PR) to the
kubernetes/website GitHub repository.
You need to be comfortable with
git and
GitHub
to work effectively in the Kubernetes community.
flowchart TB
subgraph third[Open PR]
direction TB
U[ ] -.-
Q[Improve content] --- N[Create content]
N --- O[Translate docs]
O --- P[Manage/publish docs parts of K8s release cycle]
end
subgraph second[Review]
direction TB
T[ ] -.-
D[Look over the kubernetes/website repository] --- E[Check out the Hugo static site generator]
E --- F[Understand basic GitHub commands]
F --- G[Review open PR and change review processes]
end
subgraph first[Sign up]
direction TB
S[ ] -.-
B[Sign the CNCF Contributor License Agreement] --- C[Join sig-docs Slack channel]
C --- V[Join kubernetes-sig-docs mailing list]
V --- M[Attend weekly sig-docs calls or slack meetings]
end
A([fa:fa-user New Contributor]) --> first
A --> second
A --> third
A --> H[Ask Questions!!!]
classDef grey fill:#dddddd,stroke:#ffffff,stroke-width:px,color:#000000, font-size:15px;
classDef white fill:#ffffff,stroke:#000,stroke-width:px,color:#000,font-weight:bold
classDef spacewhite fill:#ffffff,stroke:#fff,stroke-width:0px,color:#000
class A,B,C,D,E,F,G,H,M,Q,N,O,P,V grey
class S,T,U spacewhite
class first,second,third white
Figure 1. Getting started for a new contributor.
Figure 1 outlines a roadmap for new contributors. You can follow some or all of
the steps for Sign up and Review. Now you are ready to open PRs that achieve
your contribution objectives with some listed under Open PR. Again, questions
are always welcome!
Some tasks require more trust and more access in the Kubernetes organization.
See Participating in SIG Docs for more details about
roles and permissions.
Your first contribution
You can prepare for your first contribution by reviewing several steps beforehand.
Figure 2 outlines the steps and the details follow.
flowchart LR
subgraph second[First Contribution]
direction TB
S[ ] -.-
G[Review PRs from other K8s members] -->
A[Check kubernetes/website issues list for good first PRs] --> B[Open a PR!!]
end
subgraph first[Suggested Prep]
direction TB
T[ ] -.-
D[Read contribution overview] -->E[Read K8s content and style guides]
E --> F[Learn about Hugo page content types and shortcodes]
end
first ----> second
classDef grey fill:#dddddd,stroke:#ffffff,stroke-width:px,color:#000000, font-size:15px;
classDef white fill:#ffffff,stroke:#000,stroke-width:px,color:#000,font-weight:bold
classDef spacewhite fill:#ffffff,stroke:#fff,stroke-width:0px,color:#000
class A,B,D,E,F,G grey
class S,T spacewhite
class first,second white
Figure 2. Preparation for your first contribution.
Read the Contribution overview to
learn about the different ways you can contribute.
Making your first contribution can be overwhelming. The
New Contributor Ambassadors
are there to walk you through making your first few contributions. You can reach out to them in the
Kubernetes Slack preferably in the #sig-docs channel. There is also the
New Contributors Meet and Greet call
that happens on the first Tuesday of every month. You can interact with the New Contributor Ambassadors
and get your queries resolved here.
Get involved with SIG Docs
SIG Docs is the group of contributors who
publish and maintain Kubernetes documentation and the website. Getting
involved with SIG Docs is a great way for Kubernetes contributors (feature
development or otherwise) to have a large impact on the Kubernetes project.
Join the SIG Docs async Slack standup meeting on those weeks when the in-person Zoom
video meeting does not take place. Meetings are always announced on #sig-docs.
You can contribute to any one of the threads up to 24 hours after meeting announcement.
Other ways to contribute
Visit the Kubernetes community site. Participate on Twitter or Stack Overflow,
learn about local Kubernetes meetups and events, and more.
There are two official Kubernetes blogs, and the CNCF has its own blog where you can cover Kubernetes too.
For the main Kubernetes blog, we (the Kubernetes project) like to publish articles with different perspectives and special focuses, that have a link to Kubernetes.
With only a few special case exceptions, we only publish content that hasn't been submitted or published anywhere else.
The main Kubernetes blog is used by the project to communicate new features, community reports, and any
news that might be relevant to the Kubernetes community. This includes end users and developers.
Most of the blog's content is about things happening in the core project, but Kubernetes
as a project encourages you to submit about things happening elsewhere in the ecosystem too!
Anyone can write a blog post and submit it for publication. With only a few special case exceptions, we only publish content that hasn't been submitted or published anywhere else.
Contributor blog
The Kubernetes contributor blog is aimed at an audience of people who
work on Kubernetes more than people who work with Kubernetes. The Kubernetes project
deliberately publishes some articles to both blogs.
Anyone can write a blog post and submit it for review.
Article updates and maintenance
The Kubernetes project does not maintain older articles for its blogs. This means that any
published article more than one year old will normally not be eligible for issues or pull
requests that ask for changes. To avoid establishing precedent, even technically correct pull
requests are likely to be rejected.
removing or correcting articles giving advice that is now wrong and dangerous to follow
fixes to ensure that an existing article still renders correctly
For any article that is over a year old and not marked as evergreen, the website automatically
displays a notice that the content may be stale.
Evergreen articles
You can mark an article as evergreen by setting evergreen: true in the front matter.
We only mark blog articles as maintained (evergreen: true in front matter) if the Kubernetes project
can commit to maintaining them indefinitely. Some blog articles absolutely merit this; for example, the release comms team always marks official release announcements as evergreen.
There are two official Kubernetes blogs, and the CNCF has its own blog where you
can cover Kubernetes too. For the
main Kubernetes blog, we (the Kubernetes project) like
to publish articles with different perspectives and special focuses, that have a
link to Kubernetes.
With only a few special case exceptions, we only publish content that hasn't
been submitted or published anywhere else.
Writing for the Kubernetes blog(s)
As an author, you have three different routes towards publication.
Recommended route
The approach the Kubernetes project recommends is: pitch your article by
contacting the blog team. You can do that via Kubernetes Slack
(#sig-docs-blog). For
articles that you want to publish to the contributor blog only, you can also
pitch directly to
SIG ContribEx comms.
Unless there's a problem with your submission, the blog team / SIG ContribEx
will pair you up with:
a blog editor
your writing buddy (another blog author)
When the team pairs you up with another author, the idea is that you both
support each other by reviewing the other author's draft article. You don't need
to be a subject matter expert; most of the people who read the article also
won't be experts. We, the Kubernetes blog team, call the other author a writing
buddy.
The editor is there to help you along the journey from draft to publication.
They will either be directly able to approve your article for publication, or
can arrange for the approval to happen.
The second route to writing for our blogs is to start directly with a pull
request in GitHub. The blog team actually don't recommend this; GitHub is quite
useful for collaborating on code, but isn't an ideal fit for prose text.
It's absolutely fine to open a placeholder pull request with just an empty
commit, and then work elsewhere before returning to your placeholder PR.
Similar to the recommended route, we'll try to pair you up with a
writing buddy and a blog editor. They'll help you get the article ready for
publication.
Post-release blog article process
The third route is for blog articles about changes in Kubernetes relating to a
release. Each time there is a release, the Release Comms team takes over the
blog publication schedule. People adding features to a release, or who are
planning other changes that the project needs to announce, can liaise with
Release Comms to get their article planned, drafted, edited, and eventually
published.
Article scheduling
For the Kubernetes blog, the blog team usually schedules blog articles to
publish on weekdays (Gregorian calendar, as used in the USA and other
countries). When it's important to publish on a specific date that falls on a
weekend, the blog team try to accommodate that.
however, do set the article as draft (put draft: true in the front matter)
When the Prow bot merges the PR you write, it will be a draft and won't be set
to publish. A Kubernetes contributor (either you, your writing buddy or someone
from the blog team) then opens a small follow-up PR that marks it for
publication. Merging that second PR releases the previously-draft article so
that it can automatically publish.
On the day the article is scheduled to publish, automation triggers a website
build and your article becomes visible.
Authoring an article
After you've pitched, we'll encourage you to use either HackMD (a web Markdown
editor) or a Google doc, to share an editable version of the article text. Your
writing buddy can read your draft text and then either directly make suggestions
or provide other feedback. They should also let you know if what you're drafting
feedback isn't in line with the
blog guidelines.
At the same time, you'll normally be their writing buddy and can follow our
guide about supporting their work.
Initial administrative steps
You should sign the CLA if
you have not yet done so. It is best to make sure you start this early on; if
you are writing as part of your job, you may need to check with the workplace
legal team or with your manager, to make sure that you are allowed to sign.
Initial drafting
The blog team recommends that you either use HackMD (a web Markdown editor) or a
Google doc, to prepare and share an initial, live-editable version of the
article text.
Note:
If you choose to use Google Docs, you can set your document into
Markdown mode.
Your writing buddy can provide comments and / or feedback for your draft text
and will (or should) check that it's in line with the guidelines. At the same
time, you'll be their writing buddy and can follow the
guide that explains how you'll be
supporting their work.
Don't worry too much at this stage about getting the Markdown formatting exactly
right, though.
If you have images, you can paste in a bitmap copy for early feedback. The blog
team can help you (later in the process), to get illustrations ready for final
publication.
Markdown for publication
Have a look at the Markdown format for existing blog posts in the
website repository
in GitHub.
If you're not already familiar, read
contributing basics. This
section of the page assumes that you don't have a local clone of your fork and
that you are working within the GitHub web UI. You do need to make a remote fork
of the website repository if you haven't already done so.
In the GitHub repository, click the Create new file button. Name the file
with the blog post in the format
/content/en/blog/_posts/YYYY/abbreviated-post-title.md, where
…/YYYY/… is the subfolder containing posts for the corresponding year. In case you
need to add additional images, charts, etc. to your blog post, create a folder
/content/blog/en/blog/_posts/YYYY/abbreviated-post-title/ with the
file index.md and additional files for your post.
Copy your existing content from HackMD or Google Docs, then paste it into the
editor. There are more details later in the section about what goes into that
file. Name the file to match the proposed title of the blog post, but don’t put
the date in the file name. The blog reviewers will work with you to set the
final file name and the date when the article will be published.
When you save the file, GitHub will walk you through the pull request
process.
Your writing buddy can review your submission and work with you on feedback
and final details. A blog editor approves your pull request to merge, as a
draft that is not yet scheduled.
Front matter
The Markdown file you write should use YAML-format Hugo
front matter.
Here's an example:
---layout:blogtitle:"Your Title Here"draft: true # will be changed to date:YYYY-MM-DD before publicationslug:lowercase-text-for-link-goes-here-no-spaces# optionalauthor:> Author-1 (Affiliation),
Author-2 (Affiliation),
Author-3 (Affiliation)---
initially, don't specify a date for the article or put any date placeholder
into front matter (DON'T DO LIKE THIS date: XXXX-XX-XX)
however, do set the article as draft (put draft: true in the article
front matter)
Article content
Make sure to use second-level Markdown headings (## not #) as the topmost
heading level in the article. The title you set in the front matter becomes
the first-level heading for that page.
You should follow the
style guide, but
with the following exceptions:
we are OK to have authors write an article in their own writing style, so long
as most readers would follow the point being made
it is OK to use “we“ in a blog article that has multiple authors, or where the
article introduction clearly indicates that the author is writing on behalf of
a specific group. As you'll notice from this section, although we
avoid using “we” in our
documentation, it's OK to make justifiable exceptions.
we avoid using Kubernetes shortcodes for callouts (such as
{{< caution >}}). This is because callouts are aimed at documentation
readers, and blog articles aren't documentation.
statements about the future are OK, albeit we use them with care in official
announcements on behalf of Kubernetes
code samples used in blog articles don't need to use the
{{< code_sample >}} shortcode, and often it is better (easier to
maintain) if they do not
Diagrams and illustrations
For illustrations, diagrams or charts, use the
figure shortcode can
be used where feasible. You should set an alt attribute for accessibility.
For illustrations and technical diagrams, try to use vector graphics. The blog
team recommend SVG over raster (bitmap / pixel) diagram formats, and also
recommend SVG rather than Mermaid (you can still capture the Mermaid source in a
comment). The preference for SVG over Mermaid is because when maintainers
upgrade Mermaid or make changes to diagram rendering, they may not have an easy
way to contact the original blog article author to check that the changes are
OK.
The diagram guide is aimed at
Kubernetes documentation, not blog articles. It is still good to align with it
but:
there is no need to caption diagrams as Figure 1, Figure 2, etc.
The requirement for scalable (vector) images makes the process more difficult
for less-familiar folks to submit articles; Kubernetes SIG Docs continues to
look for ways to lower this bar. If you have ideas on how to lower the barrier,
please volunteer to help out.
For other images (such as photos), the blog team strongly encourages use of
alt attributes. It is OK to use an empty alt attribute if accessibility
software should not mention the image at all, but this is a rare situation.
Commit messages
At the point you mark your pull request ready for review, each commit message
should be a short summary of the work being done. The first commit message
should make sense as an overall description of the blog post.
Examples of a good commit message:
Add blog post on the foo kubernetes feature
blog: foobar announcement
Examples of bad commit messages:
Placeholder commit for announcement about foo
Add blog post
asdf
initial commit
draft post
Squashing
Once you think the article is ready to merge, you should
squash the commits in
your pull request; if you're not sure how to, it's OK to ask the blog team for
help.
2.2 - Blog guidelines
These guidelines cover the main Kubernetes blog and the Kubernetes
contributor blog.
All blog content must also adhere to the overall policy in the
content guide.
Before you begin
Make sure you are familiar with the introduction sections of
contributing to Kubernetes blogs, not just to learn about
the two official blogs and the differences between them, but also to get an overview
of the process.
Original content
The Kubernetes project accepts original content only, in English.
Note:
The Kubernetes project cannot accept content for the blog if it has already been submitted
or published outside of the Kubernetes project.
The official blogs are not available as a medium to repurpose existing content from any third
party as new content.
This restriction even carries across to promoting other Linux Foundation and CNCF projects.
Many CNCF projects have their own blog. These are often a better choice for posts about a specific
project, even if that other project is designed specifically to work with Kubernetes (or with Linux,
etc).
Relevant content
Articles must contain content that applies broadly to the Kubernetes community. For example, a
submission should focus on upstream Kubernetes as opposed to vendor-specific configurations.
For articles submitted to the main blog that are not
mirror articles, hyperlinks in the article should commonly
be to the official Kubernetes documentation. When making external references, links should be
diverse - for example, a submission shouldn't contain only links back to a single company's blog.
The official Kubernetes blogs are not the place for vendor pitches or for articles that promote
a specific solution from outside Kubernetes.
Sometimes this is a delicate balance. You can ask in Slack (#sig-docs-blog)
for guidance on whether a post is appropriate for the Kubernetes blog and / or contributor blog -
don't hesitate to reach out.
The content guide applies unconditionally to blog articles
and the PRs that add them. Bear in mind that some restrictions in the guide state that they are only relevant to documentation; those marked restrictions don't apply to blog articles.
Localization
The website is localized into many languages; English is the “upstream” for all the other
localizations. Even if you speak another language and would be happy to provide a localization,
that should be in a separate pull request (see languages per PR).
Copyright and reuse
You must write original content and you must have permission to license
that content to the Cloud Native Computing Foundation (so that the Kubernetes project can
legally publish it).
This means that not only is direct plagiarism forbidden, you cannot write a blog article if
you don't have permission to meet the CNCF copyright license conditions (for example, if your
employer has a policy about intellectual property that restricts what you are allowed to do).
The license for the blog allows
commercial use of the content for commercial purposes, but not the other way around.
Special interest groups and working groups
Topics related to participation in or results of Kubernetes SIG activities are always on
topic (see the work in the Contributor Comms Team
for support on these posts).
The project typically mirrors these articles to both blogs.
National restrictions on content
The Kubernetes website has an Internet Content Provider (ICP) licence from the government of China. Although it's unlikely to be a problem, Kubernetes cannot publish articles that would be blocked by the Chinese government's official filtering of internet content.
The remainder of this page is additional guidance; these are not strict rules that articles
must follow, but reviewers are likely to (and should) ask for edits to articles that are
obviously not aligned with the recommendations here.
Diagrams and illustrations
For illustrations - including diagrams or charts - use the figure shortcode
where feasible. You should set an alt attribute for accessibility.
Use vector images for illustrations, technical diagrams and similar graphics; SVG format is recommended as a strong preference.
Articles that use raster images for illustrations are more difficult to maintain and in some
cases the blog team may ask authors to revise the article before it could be published.
Timelessness
Blog posts should aim to be future proof
Given the development velocity of the project, SIG Docs prefers timeless writing: content that
won't require updates to stay accurate for the reader.
It can be a better choice to add a tutorial or update official documentation than to write a
high level overview as a blog post.
Consider concentrating the long technical content as a call to action of the blog post, and
focus on the problem space or why readers should care.
Content examples
Here are some examples of content that is appropriate for the
main Kubernetes blog:
Announcements about new Kubernetes capabilities
Explanations of how to achieve an outcome using Kubernetes; for example, tell us about your
low-toil improvement on the basic idea of a rolling deploy
Comparisons of several different software options that have a link to Kubernetes and cloud native. It's
OK to have a link to one of these options so long as you fully disclose your conflict of
interest / relationship.
Stories about problems or incidents, and how you resolved them
Articles discussing building a cloud native platform for specific use cases
Your opinion about the good or bad points about Kubernetes
Announcements and stories about non-core Kubernetes, such as the Gateway API
Messages about important Kubernetes security vulnerabilities
Kubernetes projects updates
Tutorials and walkthroughs
Thought leadership around Kubernetes and cloud native
The components of Kubernetes are purposely modular, so writing about existing integration
points like CNI and CSI are on topic. Provided you don't write a vendor pitch, you can also write
about what is on the other end of these integrations.
Here are some examples of content that is appropriate for the Kubernetes
contributor blog:
articles about how to test your change to Kubernetes code
content around non-code contribution
discussions about alpha features where the design is still under discussion
"Meet the team" articles about working groups, special interest groups, etc.
a guide about how to write secure code that will become part of Kubernetes itself
articles about maintainer summits and the outcome of those summits
Examples of content that wouldn't be accepted
However, the project will not publish:
vendor pitches
an article you've published elsewhere, even if only to your own low-traffic blog
large chunks of example source code with only a minimal explanation
updates about an external project that works with our relies on Kubernetes (put those on
the external project's own blog)
articles about using Kubernetes with a specific cloud provider
articles that criticise specific people, groups of people, or businesses
articles that have important technical mistakes or misleading details (for example: if you
recommend turning off an important security control in production clusters, because it can
be inconvenient, the Kubernetes project is likely to reject the article).
2.3 - Blog article mirroring
There are two official Kubernetes blogs, and the CNCF has its own blog where you can cover Kubernetes too.
For the main Kubernetes blog, we (the Kubernetes project) like to publish articles with different perspectives and special focuses, that have a link to Kubernetes.
Some articles appear on both blogs: there is a primary version of the article, and
a mirror article on the other blog.
This page describes the criteria for mirroring, the motivation for mirroring, and
explains what you should do to ensure that an article publishes to both blogs.
Before you begin
Make sure you are familiar with the introduction sections of
contributing to Kubernetes blogs, not just to learn about
the two official blogs and the differences between them, but also to get an overview
of the process.
Why we mirror
Mirroring is nearly always from the contributor blog to the main blog. The project does this
for articles that are about the contributor community, or a part of it, but are also relevant
to the wider set of readers for Kubernetes' main blog.
As an author (or reviewer), consider the target audience and whether the blog post is appropriate for the main blog.
For example: if the target audience are Kubernetes contributors only, then the
contributor blog.
may be more appropriate;
if the blog post is about open source in general then it may be more suitable on another site outside the Kubernetes project.
This consideration about target audience applies to original and mirrored articles equally.
The Kubernetes project is willing to mirror any blog article that was published to https://kubernetes.dev/blog/
(the contributor blog), provided that all of the following criteria are met:
the mirrored article has the same publication date as the original (it should have the same publication time too,
but you can also set a time stamp up to 12 hours later for special cases)
For PRs that add a mirrored article to the main blog after the original article has merged into the contributor blog, ensure that all of the following criteria are met:
No articles were published to the main blog after the original article was published to the contributor blog.
There are no main blog articles scheduled for publication between the publication time of the original article and the publication time of your mirrored article.
This is because the Kubernetes project doesn't want to add articles to people's feeds, such as RSS, except at the very end of their feed.
the original article doesn't contravene any strongly recommended review guidelines or community norms
the mirrored article will have canonicalUrl set correctly in its
front matter
the audience for the original article would find it relevant
the article content is not off-topic for the target blog where the mirror article would
appear
Mirroring from the main blog to the contributor blog is rare, but could feasibly happen.
How to mirror
You make a PR against the other Git repository (usually,
https://github.com/kubernetes/website) that adds
the article. You do this before the articles merge.
As the article author, you should set the canonical URL for the mirrored article, to the URL of the original article
(you can use a preview to predict the URL and fill this in ahead of actual publication). Use the canonicalUrl
field in front matter for this.
2.4 - Post-release communications
The Kubernetes Release Comms team (part of
SIG Release)
looks after release announcements, which go onto the
main project blog.
After each release, the Release Comms team take over the main blog for a period
and publish a series of additional articles to explain or announce changes related to
that release. These additional articles are termed post-release comms.
Opting in to post-release comms
During a release cycle, as a contributor, you can opt in to post-release comms about an
upcoming change to Kubernetes.
To opt in you open a draft, placeholderpull request (PR)
against k/website. Initially, this can be an
empty commit. Mention the KEP issue or other Kubernetes improvement issue in the description
of your placeholder PR.
When you open the draft pull request, you open it against main as the base branch
and not against the dev-1.36 branch. This is different from
the process for upcoming release changes and new features.
You should also leave a comment on the related kubernetes/enhancements
issue with a link to the PR to notify the Release Comms team managing this release. Your comment
helps the team see that the change needs announcing and that your SIG has opted in.
As well as the above, you should ideally contact the Release Comms team via Slack
(channel #release-comms) to let them
know that you have done this and would like to opt in.
Preparing the article content
You should follow the usual article submission
process to turn your placeholder PR into something ready for review. However, for
post-release comms, you may not have a writing buddy; instead, the Release Comms team
may assign a member of the team to help guide what you're doing.
You should squash the commits
in your pull request; if you're not sure how to, it's absolutely OK to ask Release Comms or
the blog team for help.
Provided that your article is flagged as a draft (draft: true) in the
front matter, the PR can merge at any
time during the release cycle.
Publication
Ahead of the actual release, the Release Comms team check what content is ready (if it's
not ready by the deadline, and you didn't get an exception, then the announcement won't
be included). They build a schedule for the articles that will go out and open new
pull requests to turn those articles from draft to published.
Caution:
All these pull requests to actually publish post-release articles must be held
(Prow command /hold) until the release has actually happened.
The blog team approvers still provide final sign off on promoting the content from draft
to accepted for publication. Ahead of release day, the PR (or PRs) for publishing these
announcements should have LGTM (“looks good to me”) and approved labels, along with the
do-not-merge/hold label to ensure the PR doesn't merge too early.
Release Comms / the Release Team can then unhold that PR (or set of PRs) as soon as the
website Git repository is unfrozen after the actual release.
On the day each article is scheduled to publish, automation triggers a website build and that
article becomes visible.
2.5 - Helping as a blog writing buddy
There are two official Kubernetes blogs, and the CNCF has its own blog where you can cover Kubernetes too.
Read contributing to Kubernetes blogs to learn about these two blogs.
When people contribute to either blog as an author, the Kubernetes project pairs up authors
as writing buddies. This page explains how to fulfil the buddy role.
You should make sure that you have at least read an outline of article submission
before you read on within this page.
Buddy responsibilities
As a writing buddy, you:
help the blog team get articles ready to merge and to publish
support your buddy to produce content that is good to merge
provide a review on the article that your buddy has written
When the team pairs you up with another author, the idea is that you both support each other by
reviewing the other author's draft article.
Most people reading articles on the Kubernetes blog are not experts; the content should
try to make sense for that audience, or at least to support non-expert readers appropriately.
The blog team are also there to help you both along the journey from draft to publication.
They will either be directly able to approve your article for publication, or can arrange for
the approval to happen.
Supporting the blog team
Your main responsibility here is to communicate about your capacity, availability and progress
in a reasonable timeline. If many weeks go by and your buddy hasn't heard from you, it makes
the overall work take more time.
The blog team recommend that the main author for the article sets up collaborative editing
using either a Google Doc or HackMD (their choice). The main author then shares that document
with the following people:
Any co-authors
You (their writing buddy)
Ideally, with a nominated
person from the blog team.
As a writing buddy, you then read the draft text and either directly make suggestions or provide
feedback in a different way. The author of the blog is very commonly also your writing buddy in turn, so they will provide the
same kind of feedback on the draft for your blog article.
Your role here is to recommend the smallest set of changes that will get the article look good
for publication. If there's a diagram that really doesn't make sense, or the writing is really
unclear: provide feedback. If you have a slight different of opinion about wording or punctuation,
skip it. Let the article author(s) write in their own style, provided that they align to
the blog guidelines.
After this is ready, the lead author will open a pull request and use Markdown to submit the
article. You then provide a review.
Some authors prefer to start with
collaborative editing; others like to go straight into
GitHub.
Whichever route they take, your role is to provide feedback that lets the blog team provide
a simple signoff and confirm that the article can merge as a draft. See
submitting articles to Kubernetes blogs for what the authors
need to do.
Use GitHub suggestions to point out any required changes.
Once the Markdown and other content (such as images) look right, you provide a
formal review.
Pull request review
Follow the blog section of Reviewing pull requests.
When you think that the open blog pull request is good enough to merge, add the /lgtm comment to the pull request.
This indicates to the repository automation tooling (Prow) that the content "looks good to me". Prow moves things forward. The /lgtm command lets you add your opinion to the record whether or not you are formally a member of the Kubernetes project.
Either you or the article author(s) should let the blog team know that there is an article
ready for signoff. It should already be marked as draft: true in the front matter, as
explained in the submission guidance.
Subsequent steps
For you as a writing buddy, there is no step four. Once the pull request is good to merge,
the blog team (or, for the contributor site, the contributor comms team) take things from there.
It's possible that you'll need to return to an earlier step based on feedback, but you can usually expect that your work as a buddy is done.
3 - Suggesting content improvements
If you notice an issue with Kubernetes documentation or have an idea for new content, then open an issue. All you need is a GitHub account and a web browser.
In most cases, new work on Kubernetes documentation begins with an issue in GitHub. Kubernetes contributors
then review, categorize and tag issues as needed. Next, you or another member
of the Kubernetes community open a pull request with changes to resolve the issue.
Opening an issue
If you want to suggest improvements to existing content or notice an error, then open an issue.
Click the Create an issue link on the right sidebar. This redirects you
to a GitHub issue page pre-populated with some headers.
Describe the issue or suggestion for improvement. Provide as many details as you can.
Click Submit new issue.
After submitting, check in on your issue occasionally or turn on GitHub notifications.
Reviewers and other community members might ask questions before
they can take action on your issue.
Suggesting new content
If you have an idea for new content, but you aren't sure where it should go, you can
still file an issue. Either:
Choose an existing page in the section you think the content belongs in and click Create an issue.
Provide a clear issue description. Describe what specifically is missing, out of date,
wrong, or needs improvement.
Explain the specific impact the issue has on users.
Limit the scope of a given issue to a reasonable unit of work. For problems
with a large scope, break them down into smaller issues. For example, "Fix the security docs"
is too broad, but "Add details to the 'Restricting network access' topic" is specific enough
to be actionable.
Search the existing issues to see if there's anything related or similar to the
new issue.
If the new issue relates to another issue or pull request, refer to it
either by its full URL or by the issue or pull request number prefixed
with a # character. For example, Introduced by #987654.
Follow the Code of Conduct. Respect your
fellow contributors. For example, "The docs are terrible" is not
helpful or polite feedback.
4 - Contributing new content
This section contains information you should know before contributing new
content.
flowchart LR
subgraph second[Before you begin]
direction TB
S[ ] -.-
A[Sign the CNCF CLA] --> B[Choose Git branch]
B --> C[One language per PR]
C --> F[Check out contributor tools]
end
subgraph first[Contributing Basics]
direction TB
T[ ] -.-
D[Write docs in markdown and build site with Hugo] --- E[source in GitHub]
E --- G['/content/../docs' folder contains docs for multiple languages]
G --- H[Review Hugo page content types and shortcodes]
end
first ----> second
classDef grey fill:#dddddd,stroke:#ffffff,stroke-width:px,color:#000000, font-size:15px;
classDef white fill:#ffffff,stroke:#000,stroke-width:px,color:#000,font-weight:bold
classDef spacewhite fill:#ffffff,stroke:#fff,stroke-width:0px,color:#000
class A,B,C,D,E,F,G,H grey
class S,T spacewhite
class first,second white
Figure - Contributing new content preparation
The figure above depicts the information you should know
prior to submitting new content. The information details follow.
Contributing basics
Write Kubernetes documentation in Markdown and build the Kubernetes site
using Hugo.
Kubernetes documentation uses CommonMark as its flavor of Markdown.
The source is in GitHub. You can find
Kubernetes documentation at /content/en/docs/. Some of the reference
documentation is automatically generated from scripts in
the update-imported-docs/ directory.
Page content types describe the
presentation of documentation content in Hugo.
In addition to the standard Hugo shortcodes, we use a number of
custom Hugo shortcodes in our
documentation to control the presentation of content.
Documentation source is available in multiple languages in /content/. Each
language has its own folder with a two-letter code determined by the
ISO 639-1 standard
. For example, English documentation source is stored in /content/en/docs/.
For more information about contributing to documentation in multiple languages
or starting a new translation,
see localization.
Pull requests from contributors who haven't signed the CLA fail the automated
tests. The name and email you provide must match those found in
your git config, and your git name and email must match those used for the
CNCF CLA.
Choose which Git branch to use
When opening a pull request, you need to know in advance which branch to base
your work on.
Scenario
Branch
Existing or new English language content for the current release
main
Content for a feature change release
The branch which corresponds to the major and minor version the feature change is in, using the pattern dev-<version>. For example, if a feature changes in the v1.36 release, then add documentation changes to the dev-1.36 branch.
If you're still not sure which branch to choose, ask in #sig-docs on Slack.
Note:
If you already submitted your pull request and you know that the
base branch was wrong, you (and only you, the submitter) can change it.
Languages per PR
Limit pull requests to one language per PR. If you need to make an identical
change to the same code sample in multiple languages, open a separate PR for
each language.
Tools for contributors
The doc contributors tools
directory in the kubernetes/website repository contains tools to help your
contribution journey go more smoothly.
Code developers: If you are documenting a new feature for an
upcoming Kubernetes release, see
Document a new feature.
To contribute new content pages or improve existing content pages, open a pull request (PR).
Make sure you follow all the requirements in the
Before you begin section.
If your change is small, or you're unfamiliar with git, read
Changes using GitHub to learn how to edit a page.
If your changes are large, read Work from a local fork to learn how to make
changes locally on your computer.
Changes using GitHub
If you're less experienced with git workflows, here's an easier method of
opening a pull request. Figure 1 outlines the steps and the details follow.
flowchart LR
A([fa:fa-user New Contributor]) --- id1[(kubernetes/website GitHub)]
subgraph tasks[Changes using GitHub]
direction TB
0[ ] -.-
1[1. Edit this page] --> 2[2. Use GitHub markdown editor to make changes]
2 --> 3[3. Select Commit changes...]
end
subgraph tasks2[ ]
direction TB
4[4. Select Propose changes] --> 5[5. Select Create pull request] --> 6[6. Fill in Open a pull request]
6 --> 7[7. Select Create pull request]
end
id1 --> tasks --> tasks2
classDef grey fill:#dddddd,stroke:#ffffff,stroke-width:px,color:#000000, font-size:15px;
classDef white fill:#ffffff,stroke:#000,stroke-width:px,color:#000,font-weight:bold
classDef k8s fill:#326ce5,stroke:#fff,stroke-width:1px,color:#fff;
classDef spacewhite fill:#ffffff,stroke:#fff,stroke-width:0px,color:#000
class A,1,2,3,4,5,6,7 grey
class 0 spacewhite
class tasks,tasks2 white
class id1 k8s
Figure 1. Steps for opening a PR using GitHub.
On the page where you see the issue, select the Edit this page option in the right-hand side navigation panel.
Make your changes in the GitHub markdown editor.
On the right above the editor, Select Commit changes.
In the first field, give your commit message a title.
In the second field, provide a description.
Note:
Do not use any GitHub Keywords
in your commit message. You can add those to the pull request description later.
Select Propose changes.
Select Create pull request.
The Open a pull request screen appears. Fill in the form:
The Add a title field of the pull request defaults to the commit summary.
You can change it if needed.
The Add a description field contains your extended commit message, if you have one,
and some template text. Add the
details the template text asks for, then delete the extra template text.
Leave the Allow edits from maintainers checkbox selected.
Note:
PR descriptions are a great way to help reviewers understand your change.
For more information, see Opening a PR.
Select Create pull request.
Addressing feedback in GitHub
Before merging a pull request, Kubernetes community members review and
approve it. The k8s-ci-robot suggests reviewers based on the nearest
owner mentioned in the pages. If you have someone specific in mind,
leave a comment with their GitHub username in it.
If a reviewer asks you to make changes:
Go to the Files changed tab.
Select the pencil (edit) icon on any files changed by the pull request.
Make the changes requested.
Commit the changes.
If you are waiting on a reviewer, reach out once every 7 days. You can also post a message in the
#sig-docs Slack channel.
When your review is complete, a reviewer merges your PR and your changes go live a few minutes later.
Work from a local fork
If you're more experienced with git, or if your changes are larger than a few lines,
work from a local fork.
Make sure you have git installed
on your computer. You can also use a git UI application.
Figure 2 shows the steps to follow when you work from a local fork. The details for each step follow.
flowchart LR
1[Fork the kubernetes/website repository] --> 2[Create local clone and set upstream]
subgraph changes[Your changes]
direction TB
S[ ] -.-
3[Create a branch example: my_new_branch] --> 3a[Make changes using text editor] --> 4["Preview your changes locally using Hugo (localhost:1313) or build container image"]
end
subgraph changes2[Commit / Push]
direction TB
T[ ] -.-
5[Commit your changes] --> 6[Push commit to origin/my_new_branch]
end
2 --> changes --> changes2
classDef grey fill:#dddddd,stroke:#ffffff,stroke-width:px,color:#000000, font-size:15px;
classDef white fill:#ffffff,stroke:#000,stroke-width:px,color:#000,font-weight:bold
classDef k8s fill:#326ce5,stroke:#fff,stroke-width:1px,color:#fff;
classDef spacewhite fill:#ffffff,stroke:#fff,stroke-width:0px,color:#000
class 1,2,3,3a,4,5,6 grey
class S,T spacewhite
class changes,changes2 white
Figure 2. Working from a local fork to make your changes.
Fetch commits from your fork's origin/main and kubernetes/website's upstream/main:
git fetch origin
git fetch upstream
This makes sure your local repository is up to date before you start making changes.
Note:
This workflow is different than the
Kubernetes Community GitHub Workflow.
You do not need to merge your local copy of main with upstream/main before pushing updates
to your fork.
Create a branch
Decide which branch to base your work on:
For improvements to existing content, use upstream/main.
For new content about existing features, use upstream/main.
For new features in an upcoming Kubernetes release, use the feature branch. For more
information, see documenting for a release.
For long-running efforts that multiple SIG Docs contributors collaborate on,
like content reorganization, use a specific feature branch created for that effort.
If you need help choosing a branch, ask in the #sig-docs Slack channel.
Create a new branch based on the branch identified in step 1. This example assumes the base
branch is upstream/main:
git checkout -b <my_new_branch> upstream/main
Make your changes using a text editor.
At any time, use the git status command to see what files you've changed.
Commit your changes
When you are ready to submit a pull request, commit your changes.
In your local repository, check which files you need to commit:
git status
Output is similar to:
On branch <my_new_branch>
Your branch is up to date with 'origin/<my_new_branch>'.

Changes not staged for commit:
(use "git add <file>..." to update what will be committed)
(use "git checkout -- <file>..." to discard changes in working directory)

modified:   content/en/docs/contribute/new-content/contributing-content.md

no changes added to commit (use "git add" and/or "git commit -a")
Add the files listed under Changes not staged for commit to the commit:
git add <your_file_name>
Repeat this for each file.
After adding all the files, create a commit:
git commit -m "Your commit message"
Note:
Do not use any GitHub Keywords
in your commit message. You can add those to the pull request
description later.
Push your local branch and its new commit to your remote fork:
git push origin <my_new_branch>
Preview your changes locally
It's a good idea to preview your changes locally before pushing them or
opening a pull request. The Previewing locally
article explains how you can run a website locally and preview
the suggested changes.
Open a pull request from your fork to kubernetes/website
Figure 3 shows the steps to open a PR from your fork to the kubernetes/website. The details follow.
Please, note that contributors can mention kubernetes/website as k/website.
flowchart LR
subgraph first[ ]
direction TB
1[1. Go to kubernetes/website repository] --> 2[2. Select New Pull Request]
2 --> 3[3. Select compare across forks]
3 --> 4[4. Select your fork from head repository drop-down menu]
end
subgraph second [ ]
direction TB
5[5. Select your branch from the compare drop-down menu] --> 6[6. Select Create Pull Request]
6 --> 7[7. Add a description to your PR]
7 --> 8[8. Select Create pull request]
end
first --> second
classDef grey fill:#dddddd,stroke:#ffffff,stroke-width:px,color:#000000, font-size:15px;
classDef white fill:#ffffff,stroke:#000,stroke-width:px,color:#000,font-weight:bold
class 1,2,3,4,5,6,7,8 grey
class first,second white
From the head repository drop-down menu, select your fork.
From the compare drop-down menu, select your branch.
Select Create Pull Request.
Add a description for your pull request:
Title (50 characters or less): Summarize the intent of the change.
Description: Describe the change in more detail.
If there is a related GitHub issue, include Fixes #12345 or Closes #12345 in the
description. GitHub's automation closes the mentioned issue after merging the PR if used.
If there are other related PRs, link those as well.
If you want advice on something specific, include any questions you'd like reviewers to
think about in your description.
Select the Create pull request button.
Congratulations! Your pull request is available in Pull requests.
After opening a PR, GitHub runs automated tests and tries to deploy a preview using
Netlify.
If the Netlify build fails, select Details for more information.
If the Netlify build succeeds, select Details opens a staged version of the Kubernetes
website with your changes applied. This is how reviewers check your changes.
GitHub also automatically assigns labels to a PR, to help reviewers. You can add them too, if
needed. For more information, see Adding and removing issue labels.
Addressing feedback locally
After making your changes, amend your previous commit:
git commit -a --amend
-a: commits all changes
--amend: amends the previous commit, rather than creating a new one
Update your commit message if needed.
Use git push origin <my_new_branch> to push your changes and re-run the Netlify tests.
Note:
If you use git commit -m instead of amending, you must squash your commits
before merging.
Changes from reviewers
Sometimes reviewers commit to your pull request. Before making any other changes, fetch those commits.
Fetch commits from your remote fork and rebase your working branch:
git fetch origin
git rebase origin/<your-branch-name>
After rebasing, force-push new changes to your fork:
If another contributor commits changes to the same file in another PR, it can create a merge
conflict. You must resolve all merge conflicts in your PR.
Update your fork and rebase your local branch:
git fetch origin
git rebase origin/<your-branch-name>
If your PR has multiple commits, you must squash them into a single commit before merging your PR.
You can check the number of commits on your PR's Commits tab or by running the git log
command locally.
Note:
This topic assumes vim as the command line text editor.
Start an interactive rebase:
git rebase -i HEAD~<number_of_commits_in_branch>
Squashing commits is a form of rebasing. The -i switch tells git you want to rebase interactively.
HEAD~<number_of_commits_in_branch indicates how many commits to look at for the rebase.
Output is similar to:
pick d875112ca Original commit
pick 4fa167b80 Address feedback 1
pick 7d54e15ee Address feedback 2

# Rebase 3d18sf680..7d54e15ee onto 3d183f680 (3 commands)

...

# These lines can be re-ordered; they are executed from top to bottom.
The first section of the output lists the commits in the rebase. The second section lists the
options for each commit. Changing the word pick changes the status of the commit once the rebase
is complete.
For the purposes of rebasing, focus on squash and pick.
This squashes commits 4fa167b80 Address feedback 1 and 7d54e15ee Address feedback 2 into
d875112ca Original commit, leaving only d875112ca Original commit as a part of the timeline.
Save and exit your file.
Push your squashed commit:
git push --force-with-lease origin <branch_name>
Contribute to other repos
The Kubernetes project contains 50+ repositories. Many of these
repositories contain documentation: user-facing help text, error messages, API references or code
comments.
If you see text you'd like to improve, use GitHub to search all repositories in the Kubernetes
organization. This can help you figure out where to submit your issue or PR.
Each repository has its own processes and procedures. Before you file an issue or submit a PR,
read that repository's README.md, CONTRIBUTING.md, and code-of-conduct.md, if they exist.
Most repositories use issue and PR templates. Have a look through some open issues and PRs to get
a feel for that team's processes. Make sure to fill out the templates with as much detail as
possible when you file issues or PRs.
What's next
Read Reviewing to learn more about the review process.
4.2 - Previewing locally
Before you're going to open a new PR,
previewing your changes is recommended. A preview lets you catch build
errors or markdown formatting problems.
Preview your changes locally
You can either build the website's container image or run Hugo locally. Building the container
image is slower but displays Hugo shortcodes, which can
be useful for debugging.
In a terminal, go to your Kubernetes website repository and start the Hugo server:
cd <path_to_your_repo>/website
make serve
If you're on a Windows machine or unable to run the make command, use the following command:
hugo server --buildFuture
In a web browser, navigate to http://localhost:1313. Hugo watches the
changes and rebuilds the site as needed.
To stop the local Hugo instance, go back to the terminal and type Ctrl+C,
or close the terminal window.
Troubleshooting
error: failed to transform resource: TOCSS: failed to transform "scss/main.scss" (text/x-scss): this feature is not available in your current Hugo version
Hugo is shipped in two set of binaries for technical reasons. The current
website runs based on the Hugo Extended version only. In the release page
look for archives with extended in the name. To confirm, run hugo version
and look for the word extended.
Troubleshooting macOS for too many open files
If you run make serve on macOS and receive the following error:
ERROR 2020/08/01 19:09:18 Error: listen tcp 127.0.0.1:1313: socket: too many open files
make: *** [serve] Error 1
#!/bin/sh
# These are the original gist links, linking to my gists now.# curl -O https://gist.githubusercontent.com/a2ikm/761c2ab02b7b3935679e55af5d81786a/raw/ab644cb92f216c019a2f032bbf25e258b01d87f9/limit.maxfiles.plist# curl -O https://gist.githubusercontent.com/a2ikm/761c2ab02b7b3935679e55af5d81786a/raw/ab644cb92f216c019a2f032bbf25e258b01d87f9/limit.maxproc.plistcurl -O https://gist.githubusercontent.com/tombigel/d503800a282fcadbee14b537735d202c/raw/ed73cacf82906fdde59976a0c8248cce8b44f906/limit.maxfiles.plist
curl -O https://gist.githubusercontent.com/tombigel/d503800a282fcadbee14b537735d202c/raw/ed73cacf82906fdde59976a0c8248cce8b44f906/limit.maxproc.plist
sudo mv limit.maxfiles.plist /Library/LaunchDaemons
sudo mv limit.maxproc.plist /Library/LaunchDaemons
sudo chown root:wheel /Library/LaunchDaemons/limit.maxfiles.plist
sudo chown root:wheel /Library/LaunchDaemons/limit.maxproc.plist
sudo launchctl load -w /Library/LaunchDaemons/limit.maxfiles.plist
This works for Catalina as well as Mojave macOS.
Unable to find image 'gcr.io/k8s-staging-sig-docs/k8s-website-hugo:VERSION' locally
If you run make container-serve and see this error, it might be due to
the local changes made to specific files defined
in the $IMAGE_VERSION of Makefile.
The website image versioning includes a hash, which is generated based on
the content of the listed files. E.g., if 1b9242684415 is the hash
for these files, the website image will be called k8s-website-hugo:v0.133.0-1b9242684415.
Executing make container-serve will try to pull such an image from
the Kubernetes website’s GCR. If it’s not a current version, you’ll see
an error saying this image is absent.
If you need to make changes in these files and preview the website,
you’ll have to build your local image instead of pulling a pre-built one.
To do so, proceed with running make container-image.
Other issues
If you experience other problems with running website locally and/or
previewing your changes, feel free to open an issue
in the kubernetes/website GitHub repo.
4.3 - Documenting a feature for a release
Each major Kubernetes release introduces new features that require documentation.
New releases also bring updates to existing features and documentation
(such as upgrading a feature from alpha to beta).
Generally, the SIG responsible for a feature submits draft documentation of the
feature as a pull request to the appropriate development branch of the
kubernetes/website repository, and someone on the SIG Docs team provides
editorial feedback or edits the draft directly. This section covers the branching
conventions and process used during a release by both groups.
In general, documentation contributors don't write content from scratch for a release.
Instead, they work with the SIG creating a new feature to refine the draft documentation
and make it release ready.
After you've chosen a feature to document or assist, ask about it in the #sig-docs
Slack channel, in a weekly SIG Docs meeting, or directly on the PR filed by the
feature SIG. If you're given the go-ahead, you can edit into the PR using one of
the techniques described in
Commit into another person's PR.
Find out about upcoming features
To find out about upcoming features, attend the weekly SIG Release meeting (see
the community page for upcoming meetings)
and monitor the release-specific documentation
in the kubernetes/sig-release
repository. Each release has a sub-directory in the
/sig-release/tree/master/releases/
directory. The sub-directory contains a release schedule, a draft of the release
notes, and a document listing each person on the release team.
The release schedule contains links to all other documents, meetings,
meeting minutes, and milestones relating to the release. It also contains
information about the goals and timeline of the release, and any special
processes in place for this release. Near the bottom of the document, several
release-related terms are defined.
This document also contains a link to the Feature tracking sheet, which is
the official way to find out about all new features scheduled to go into the
release.
The release team document lists who is responsible for each release role. If
it's not clear who to talk to about a specific feature or question you have,
either attend the release meeting to ask your question, or contact the release
lead so that they can redirect you.
The release notes draft is a good place to find out about
specific features, changes, deprecations, and more about the release. The
content is not finalized until late in the release cycle, so use caution.
Feature tracking sheet
The feature tracking sheet for a given Kubernetes release
lists each feature that is planned for a release.
Each line item includes the name of the feature, a link to the feature's main
GitHub issue, its stability level (Alpha, Beta, or Stable), the SIG and
individual responsible for implementing it, whether it
needs docs, a draft release note for the feature, and whether it has been
merged. Keep the following in mind:
Beta and Stable features are generally a higher documentation priority than
Alpha features.
It's hard to test (and therefore to document) a feature that hasn't been merged,
or is at least considered feature-complete in its PR.
Determining whether a feature needs documentation is a manual process. Even if
a feature is not marked as needing docs, you may need to document the feature.
For developers or other SIG members
This section is information for members of other Kubernetes SIGs documenting new features
for a release.
If you are a member of a SIG developing a new feature for Kubernetes, you need
to work with SIG Docs to be sure your feature is documented in time for the
release. Check the
feature tracking spreadsheet
or check in the #sig-release Kubernetes Slack channel to verify scheduling details and
deadlines.
Open a placeholder PR
Open a draft pull request against the
dev-1.36 branch in the kubernetes/website repository, with a small
commit that you will amend later. To create a draft pull request, use the
Create Pull Request drop-down and select Create Draft Pull Request,
then click Draft Pull Request.
Leave a comment on the related kubernetes/enhancements
issue with a link to the PR to notify the docs person managing this release that
the feature docs are coming and should be tracked for the release.
If your feature does not need any documentation changes, make sure the sig-release team knows this,
by mentioning it in the #sig-release Slack channel. If the feature does need
documentation but the PR is not created, the feature may be removed from the milestone.
PR ready for review
When ready, populate your placeholder PR with feature documentation and change
the state of the PR from draft to ready for review. To mark a pull request
as ready for review, navigate to the merge box and click Ready for review.
Do your best to describe your feature and how to use it. If you need help
structuring your documentation, ask in the #sig-docs Slack channel.
When you complete your content, the documentation person assigned to your feature reviews it.
To ensure technical accuracy, the content may also require a technical review from corresponding SIG(s).
Use their suggestions to get the content to a release ready state.
If your feature needs documentation and the first draft
content is not received, the feature may be removed from the milestone.
Feature gates
If your feature is an Alpha or Beta feature and is behind a feature gate,
you need a feature gate file for it inside
content/en/docs/reference/command-line-tools-reference/feature-gates/.
The name of the file should be the name of the feature gate with .md as the suffix.
You can look at other files already in the same directory for a hint about what yours
should look like. Usually a single paragraph is enough; for longer explanations,
add documentation elsewhere and link to that.
Also, to ensure your feature gate appears in the
Alpha/Beta Feature gates
table, include the following details in the
front matter
of your Markdown description file:
stages:- stage:<alpha/beta/stable/deprecated> # Specify the development stage of the feature gatedefaultValue:<true or false> # Set to true if enabled by default, false otherwisefromVersion:<Version> # Version from which the feature gate is availabletoVersion:<Version> # (Optional) The version until which the feature gate is available
With net new feature gates, a separate description of the feature gate is also required;
create a new Markdown file inside content/en/docs/reference/command-line-tools-reference/feature-gates/
(use other files as a template).
When you change a feature gate from disabled-by-default to enabled-by-default,
you may also need to change other documentation (not just the list of
feature gates). Watch out for language such as ”The exampleSetting field
is a beta field and disabled by default. You can enable it by enabling the
ProcessExampleThings feature gate.”
If your feature is GA'ed or deprecated, include an additional stage entry within
the stages block in the description file.
Ensure that the Alpha and Beta stages remain intact. This step transitions the
feature gate from the
Feature gates for Alpha/Beta table
to Feature gates for graduated or deprecated features
table. For example:
stages:- stage:alpha defaultValue:falsefromVersion:"1.12"toVersion:"1.12"- stage:beta defaultValue:truefromVersion:"1.13"# Added a `toVersion` to the previous stage.toVersion:"1.18"# Added 'stable' stage block to existing stages.- stage:stabledefaultValue:truefromVersion:"1.19"toVersion:"1.27"
Eventually, Kubernetes will stop including the feature gate at all.
To signify the removal of a feature gate, include removed: true in
the front matter of the respective description file.
Making that change means that the feature gate information moves from the
Feature gates for graduated or deprecated features
section to a dedicated page titled
Feature Gates (removed),
including its description.
All PRs reviewed and ready to merge
If your PR has not yet been merged into the dev-1.36
branch by the release deadline, work with the docs person managing the release
to get it in by the deadline. If your feature needs documentation and the docs
are not ready, the feature may be removed from the milestone.
4.4 - Submitting case studies
Case studies highlight how organizations are using Kubernetes to solve real-world problems. The
Kubernetes marketing team and members of the CNCF
collaborate with you on all case studies.
Case studies require extensive review before they're approved.
Refer to the case study guidelines
and submit your request as outlined in the guidelines.
5 - Reviewing changes
This section describes how to review content.
5.1 - Reviewing pull requests
Anyone can review a documentation pull request. Visit the pull requests
section in the Kubernetes website repository to see open pull requests.
Reviewing documentation pull requests is a great way to introduce yourself to the Kubernetes
community. It helps you learn the code base and build trust with other contributors.
Comment on positive aspects of PRs as well as changes.
Be empathetic and mindful of how your review may be received.
Assume good intent and ask clarifying questions.
Experienced contributors, consider pairing with new contributors whose work requires extensive changes.
Review process
In general, review pull requests for content and style in English. Figure 1 outlines the steps for
the review process. The details for each step follow.
flowchart LR
subgraph fourth[Start review]
direction TB
S[ ] -.-
M[add comments] --> N[review changes]
N --> O[new contributors should choose Comment]
end
subgraph third[Select PR]
direction TB
T[ ] -.-
J[read description and comments]--> K[preview changes in Netlify preview build]
end
A[Review open PR list]--> B[Filter open PRs by label]
B --> third --> fourth
classDef grey fill:#dddddd,stroke:#ffffff,stroke-width:px,color:#000000, font-size:15px;
classDef white fill:#ffffff,stroke:#000,stroke-width:px,color:#000,font-weight:bold
classDef spacewhite fill:#ffffff,stroke:#fff,stroke-width:0px,color:#000
class A,B,J,K,M,N,O grey
class S,T spacewhite
class third,fourth white
Filter the open PRs using one or all of the following labels:
cncf-cla: yes (Recommended): PRs submitted by contributors who have not signed the CLA
cannot be merged. See Sign the CLA
for more information.
language/en (Recommended): Filters for english language PRs only.
size/<size>: filters for PRs of a certain size. If you're new, start with smaller PRs.
Additionally, ensure the PR isn't marked as a work in progress. PRs using the work in progress label are not ready for review yet.
Once you've selected a PR to review, understand the change by:
Reading the PR description to understand the changes made, and read any linked issues
Reading any comments by other reviewers
Clicking the Files changed tab to see the files and lines changed
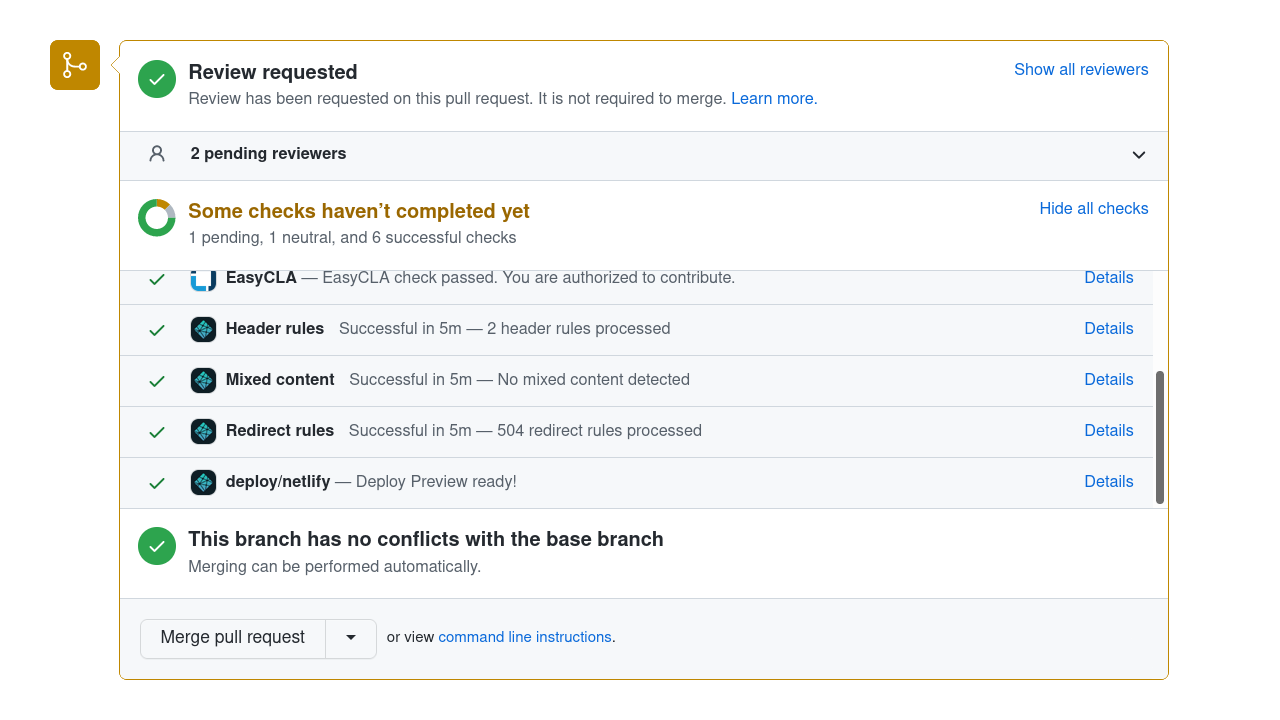
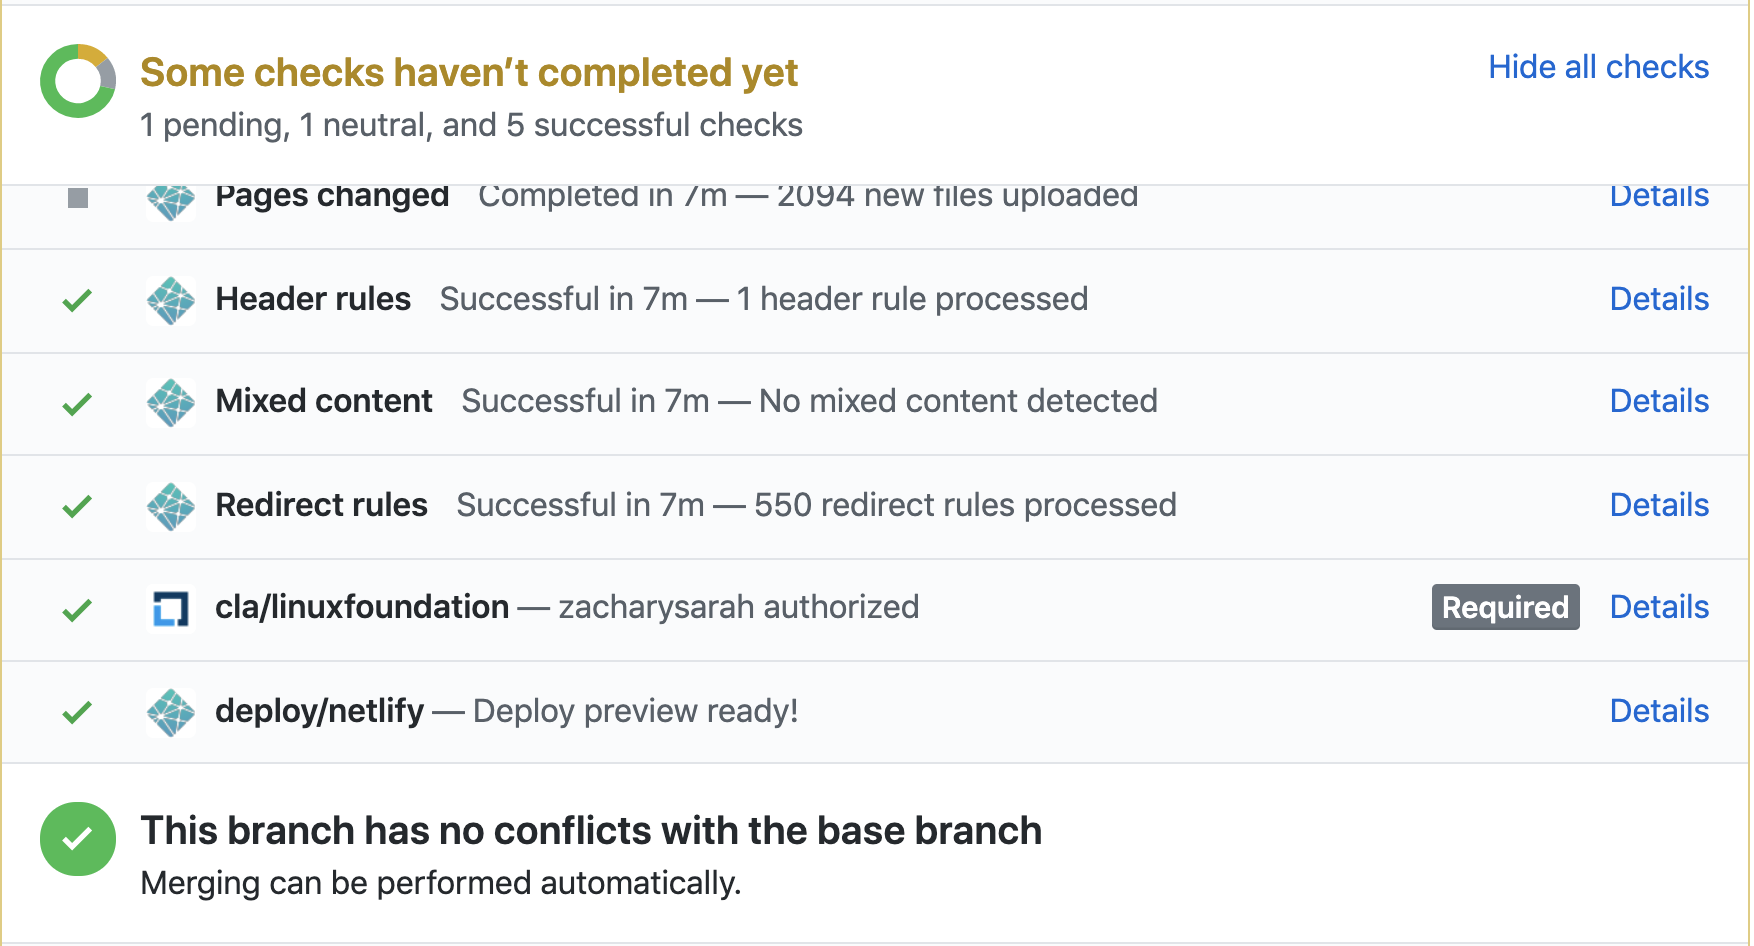
Previewing the changes in the Netlify preview build by scrolling to the PR's build check
section at the bottom of the Conversation tab.
Here's a screenshot (this shows GitHub's desktop site; if you're reviewing
on a tablet or smartphone device, the GitHub web UI is slightly different):
To open the preview, click on the Details link of the deploy/netlify line in the
list of checks.
Go to the Files changed tab to start your review.
Click on the + symbol beside the line you want to comment on.
Fill in any comments you have about the line and click either Add single comment
(if you have only one comment to make) or Start a review (if you have multiple comments to make).
When finished, click Review changes at the top of the page. Here, you can add
a summary of your review (and leave some positive comments for the contributor!).
Please always use the "Comment"
Avoid clicking the "Request changes" button when finishing your review.
If you want to block a PR from being merged before some further changes are made,
you can leave a "/hold" comment.
Mention why you are setting a hold, and optionally specify the conditions under
which the hold can be removed by you or other reviewers.
Avoid clicking the "Approve" button when finishing your review.
Leaving a "/approve" comment is recommended most of the time.
Reviewing checklist
When reviewing, use the following as a starting point.
Language and grammar
Are there any obvious errors in language or grammar? Is there a better way to phrase something?
Focus on the language and grammar of the parts of the page that the author is changing.
Unless the author is clearly aiming to update the entire page, they have no obligation to
fix every issue on the page.
When a PR updates an existing page, you should focus on reviewing the parts of
the page that are being updated. That changed content should be reviewed for technical
and editorial correctness.
If you find errors on the page that don't directly relate to what the PR author
is attempting to address, then it should be treated as a separate issue (check
that there isn't an existing issue about this first).
Watch out for pull requests that move content. If an author renames a page
or combines two pages, we (Kubernetes SIG Docs) usually avoid asking that author to fix every grammar or spelling nit
that we could spot within that moved content.
Are there any complicated or archaic words which could be replaced with a simpler word?
Are there any words, terms or phrases in use which could be replaced with a non-discriminatory alternative?
Does the word choice and its capitalization follow the style guide?
Are there long sentences which could be shorter or less complex?
Are there any long paragraphs which might work better as a list or table?
Content
Does similar content exist elsewhere on the Kubernetes site?
Does the content excessively link to off-site, individual vendor or non-open source documentation?
Documentation
Some checks to consider:
Did this PR change or remove a page title, slug/alias or anchor link? If so, are there broken
links as a result of this PR? Is there another option, like changing the page title without
changing the slug?
Does the PR introduce a new page? If so:
Is the page using the right page content type
and associated Hugo shortcodes?
Does the page appear correctly in the section's side navigation (or at all)?
Make sure you also know about evergreen articles
and how to decide if an article is evergreen.
Blog articles may contain direct quotes and
indirect speech. Avoid suggesting a rewording for
anything that is attributed to someone or part of a dialog that has happened - even if you think
the original speaker's grammar was not correct. For those cases, also, try to respect the article
author's suggested punctuation unless it is obviously wrong.
As a project, we only mark blog articles as maintained (evergreen: true in front matter) if the Kubernetes project
is happy to commit to maintaining them indefinitely.
Some blog articles absolutely merit this, and we always mark our release announcements evergreen. Check with other contributors if you are not sure how to review on this point.
The content guide applies unconditionally to blog articles and the PRs that add them. Bear in mind that some restrictions in the guide state that they are only relevant to documentation; those restrictions don't apply to blog articles.
Check if the Markdown source is using the right page content type and / or layout.
Other
Watch out for trivial edits;
if you see a change that you think is a trivial edit, please point out that policy
(it's still OK to accept the change if it is genuinely an improvement).
Encourage authors who are making whitespace fixes to do
so in the first commit of their PR, and then add other changes on top of that. This
makes both merges and reviews easier. Watch out especially for a trivial change that
happens in a single commit along with a large amount of whitespace cleanup
(and if you see that, encourage the author to fix it).
As a reviewer, if you identify small issues with a PR that aren't essential to the meaning,
such as typos or incorrect whitespace, prefix your comments with nit:.
This lets the author know that this part of your feedback is non-critical.
If you are considering a pull request for approval and all the remaining feedback is
marked as a nit, you can merge the PR anyway. In that case, it's often useful to open
an issue about the remaining nits. Consider whether you're able to meet the requirements
for marking that new issue as a Good First Issue; if you can, these are a good source.
5.2 - Reviewing for approvers and reviewers
SIG Docs Reviewers and
Approvers do a few extra things
when reviewing a change.
Every week a specific docs approver volunteers to triage and review pull requests.
This person is the "PR Wrangler" for the week. See the
PR Wrangler scheduler
for more information. To become a PR Wrangler, attend the weekly SIG Docs meeting
and volunteer. Even if you are not on the schedule for the current week, you can
still review pull requests (PRs) that are not already under active review.
In addition to the rotation, a bot assigns reviewers and approvers
for the PR based on the owners for the affected files.
Everything described in Reviewing a pull request
applies, but Reviewers and Approvers should also do the following:
Using the /assign Prow command to assign a specific reviewer to a PR as needed.
This is extra important when it comes to requesting technical review from code contributors.
Note:
Look at the reviewers field in the front-matter at the top of a Markdown file to see who can
provide technical review.
Making sure the PR follows the Content
and Style guides; link the author to the
relevant part of the guide(s) if it doesn't.
Using the GitHub Request Changes option when applicable to suggest changes to the PR author.
Changing your review status in GitHub using the /approve or /lgtm Prow commands,
if your suggestions are implemented.
Commit into another person's PR
Leaving PR comments is helpful, but there might be times when you need to commit
into another person's PR instead.
Do not "take over" for another person unless they explicitly ask
you to, or you want to resurrect a long-abandoned PR. While it may be faster
in the short term, it deprives the person of the chance to contribute.
The process you use depends on whether you need to edit a file that is already
in the scope of the PR, or a file that the PR has not yet touched.
You can't commit into someone else's PR if either of the following things is
true:
If the PR author pushed their branch directly to the
https://github.com/kubernetes/website/
repository. Only a reviewer with push access can commit to another user's PR.
Note:
Encourage the author to push their branch to their fork before
opening the PR next time.
The PR author explicitly disallows edits from approvers.
Prow commands for reviewing
Prow is
the Kubernetes-based CI/CD system that runs jobs against pull requests (PRs). Prow
enables chatbot-style commands to handle GitHub actions across the Kubernetes
organization, like adding and removing labels,
closing issues, and assigning an approver. Enter Prow commands as GitHub comments
using the /<command-name> format.
The most common prow commands reviewers and approvers use are:
Prow commands for reviewing
Prow Command
Role Restrictions
Description
/lgtm
Organization members
Signals that you've finished reviewing a PR and are satisfied with the changes.
/approve
Approvers
Approves a PR for merging.
/assign
Anyone
Assigns a person to review or approve a PR
/close
Organization members
Closes an issue or PR.
/hold
Anyone
Adds the do-not-merge/hold label, indicating the PR cannot be automatically merged.
This GitHub Issue filter
finds issues that might need triage.
Triaging an issue
Validate the issue
Make sure the issue is about website documentation. Some issues can be closed quickly by
answering a question or pointing the reporter to a resource. See the
Support requests or code bug reports section for details.
Assess whether the issue has merit.
Add the triage/needs-information label if the issue doesn't have enough
detail to be actionable or the template is not filled out adequately.
Close the issue if it has both the lifecycle/stale and triage/needs-information labels.
Issues are generally opened and closed quickly.
However, sometimes an issue is inactive after its opened.
Other times, an issue may need to remain open for longer than 90 days.
Issue lifecycle labels
Label
Description
lifecycle/stale
After 90 days with no activity, an issue is automatically labeled as stale. The issue will be automatically closed if the lifecycle is not manually reverted using the /remove-lifecycle stale command.
lifecycle/frozen
An issue with this label will not become stale after 90 days of inactivity. A user manually adds this label to issues that need to remain open for much longer than 90 days, such as those with a priority/important-longterm label.
Handling special issue types
SIG Docs encounters the following types of issues often enough to document how
to handle them.
Duplicate issues
If a single problem has one or more issues open for it, combine them into a single issue.
You should decide which issue to keep open (or
open a new issue), then move over all relevant information and link related issues.
Finally, label all other issues that describe the same problem with
triage/duplicate and close them. Only having a single issue to work on reduces confusion
and avoids duplicate work on the same problem.
Dead link issues
If the dead link issue is in the API or kubectl documentation, assign them
/priority critical-urgent until the problem is fully understood. Assign all
other dead link issues /priority important-longterm, as they must be manually fixed.
Blog issues
We expect Kubernetes Blog entries to become
outdated over time. Therefore, we only maintain blog entries less than a year old.
If an issue is related to a blog entry that is more than one year old,
you should typically close the issue without fixing.
It is OK to make an exception where a relevant justification applies.
Support requests or code bug reports
Some docs issues are actually issues with the underlying code, or requests for
assistance when something, for example a tutorial, doesn't work.
For issues unrelated to docs, close the issue with the kind/support label and a comment
directing the requester to support venues (Slack, Stack Overflow) and, if
relevant, the repository to file an issue for bugs with features (kubernetes/kubernetes
is a great place to start).
Sample response to a request for support:
This issue sounds more like a request for support and less
like an issue specifically for docs. I encourage you to bring
your question to the `#kubernetes-users` channel in
[Kubernetes slack](https://slack.k8s.io/). You can also search
resources like
[Stack Overflow](https://stackoverflow.com/questions/tagged/kubernetes)
for answers to similar questions.

You can also open issues for Kubernetes functionality in
https://github.com/kubernetes/kubernetes.

If this is a documentation issue, please re-open this issue.
Sample code bug report response:
This sounds more like an issue with the code than an issue with
the documentation. Please open an issue at
https://github.com/kubernetes/kubernetes/issues.

If this is a documentation issue, please re-open this issue.
Squashing
As an approver, when you review pull requests (PRs), there are various cases
where you might do the following:
Advise the contributor to squash their commits.
Squash the commits for the contributor.
Advise the contributor not to squash yet.
Prevent squashing.
Advising contributors to squash: A new contributor might not know that they
should squash commits in their pull requests (PRs). If this is the case, advise
them to do so, provide links to useful information, and offer to arrange help if
they need it. Some useful links:
Squashing commits for contributors: If a contributor might have difficulty
squashing commits or there is time pressure to merge a PR, you can perform the
squash for them:
In the PR, if the contributor enables maintainers to manage the PR, you can
squash their commits and update their fork with the result. Before you squash,
advise them to save and push their latest changes to the PR. After you squash,
advise them to pull the squashed commit to their local clone.
You can get GitHub to squash the commits by using a label so that Tide / GitHub
performs the squash or by clicking the Squash commits button when you merge the PR.
Advise contributors to avoid squashing
If one commit does something broken or unwise, and the last commit reverts this
error, don't squash the commits. Even though the "Files changed" tab in the PR
on GitHub and the Netlify preview will both look OK, merging this PR might create
rebase or merge conflicts for other folks. Intervene as you see fit to avoid that
risk to other contributors.
Never squash
If you're launching a localization or releasing the docs for a new version,
you are merging in a branch that's not from a user's fork, never squash the commits.
Not squashing is essential because you must maintain the commit history for those files.
6 - Localizing Kubernetes documentation
This page shows you how to
localize
the docs for a different language.
Contribute to an existing localization
You can help add or improve the content of an existing localization. In
Kubernetes Slack, you can find a channel for each
localization. There is also a general
SIG Docs Localizations Slack channel
where you can say hello.
Note:
For extra details on how to contribute to a specific localization,
look for a localized version of this page.
Find your two-letter language code
First, consult the
ISO 639-1 standard
to find your localization's two-letter language code. For example, the two-letter code for
Korean is ko.
Some languages use a lowercase version of the country code as defined by the
ISO-3166 along with their language codes. For example, the Brazilian Portuguese
language code is pt-br.
git clone https://github.com/<username>/website
cd website
The website content directory includes subdirectories for each language. The
localization you want to help out with is inside content/<two-letter-code>.
Suggest changes
Create or update your chosen localized page based on the English original. See
localize content for more details.
If you notice a technical inaccuracy or other problem with the upstream
(English) documentation, you should fix the upstream documentation first and
then repeat the equivalent fix by updating the localization you're working on.
Limit changes in a pull requests to a single localization. Reviewing pull
requests that change content in multiple localizations is problematic.
Follow Suggesting Content Improvements
to propose changes to that localization. The process is similar to proposing
changes to the upstream (English) content.
Start a new localization
If you want the Kubernetes documentation localized into a new language, here's
what you need to do.
Because contributors can't approve their own pull requests, you need at least
two contributors to begin a localization.
All localization teams must be self-sufficient. The Kubernetes website is happy
to host your work, but it's up to you to translate it and keep existing
localized content current.
You'll need to know the two-letter language code for your language. Consult the
ISO 639-1 standard
to find your localization's two-letter language code. For example, the
two-letter code for Korean is ko.
If the language you are starting a localization for is spoken in various places
with significant differences between the variants, it might make sense to
combine the lowercased ISO-3166 country code with the language two-letter code.
For example, Brazilian Portuguese is localized as pt-br.
When you start a new localization, you must localize all the
minimum required content before
the Kubernetes project can publish your changes to the live
website.
SIG Docs can help you work on a separate branch so that you
can incrementally work towards that goal.
Find community
Let Kubernetes SIG Docs know you're interested in creating a localization! Join
the SIG Docs Slack channel and
the SIG Docs Localizations Slack channel.
Other localization teams are happy to help you get started and answer your
questions.
Please also consider participating in the
SIG Docs Localization Subgroup meeting.
The mission of the SIG Docs localization subgroup is to work across the SIG Docs
localization teams to collaborate on defining and documenting the processes for
creating localized contribution guides. In addition, the SIG Docs localization
subgroup looks for opportunities to create and share common tools across
localization teams and identify new requirements for the SIG Docs Leadership
team. If you have questions about this meeting, please inquire on the
SIG Docs Localizations Slack channel.
You can also create a Slack channel for your localization in the
kubernetes/community repository. For an example of adding a Slack channel, see
the PR for adding a channel for Persian.
Join the Kubernetes GitHub organization
When you've opened a localization PR, you can become members of the Kubernetes
GitHub organization. Each person on the team needs to create their own
Organization Membership Request
in the kubernetes/org repository.
Members of @kubernetes/sig-docs-**-owners can approve PRs that change content
within (and only within) your localization directory: /content/**/. For each
localization, The @kubernetes/sig-docs-**-reviews team automates review
assignments for new PRs. Members of @kubernetes/website-maintainers can create
new localization branches to coordinate translation efforts. Members of
@kubernetes/website-milestone-maintainers can use the /milestoneProw command to assign a milestone to issues or PRs.
Configure the workflow
Next, add a GitHub label for your localization in the kubernetes/test-infra
repository. A label lets you filter issues and pull requests for your specific
language.
The Kubernetes website uses Hugo as its web framework. The website's Hugo
configuration resides in the
hugo.toml
file. You'll need to modify hugo.toml to support a new localization.
Add a configuration block for the new language to hugo.toml under the
existing [languages] block. The German block, for example, looks like:
The language selection bar lists the value for languageName. Assign "language
name in native script and language (English language name in Latin script)" to
languageName. For example, languageName = "한국어 (Korean)" or languageName = "Deutsch (German)".
languageNameLatinScript can be used to access the language name in Latin
script and use it in the theme. Assign "language name in latin script" to
languageNameLatinScript. For example, languageNameLatinScript ="Korean" or
languageNameLatinScript = "Deutsch".
The weight parameter determines the order of languages in the language selection bar.
A lower weight takes precedence, resulting in the language appearing first.
When assigning the weight parameter, it is important to examine the existing languages
block and adjust their weights to ensure they are in a sorted order relative to all languages,
including any newly added language.
For more information about Hugo's multilingual support, see
"Multilingual Mode".
Add a new localization directory
Add a language-specific subdirectory to the
content folder in
the repository. For example, the two-letter code for German is de:
mkdir content/de
You also need to create a directory inside i18n for
localized strings; look at existing localizations
for an example.
For example, for German the strings live in i18n/de/de.toml.
Localize the community code of conduct
Open a PR against the
cncf/foundation
repository to add the code of conduct in your language.
Set up the OWNERS files
To set the roles of each user contributing to the localization, create an
OWNERS file inside the language-specific subdirectory with:
reviewers: A list of kubernetes teams with reviewer roles, in this case,
# See the OWNERS docs at https://go.k8s.io/owners# This is the localization project for Spanish.# Teams and members are visible at https://github.com/orgs/kubernetes/teams.reviewers:- sig-docs-es-reviewsapprovers:- sig-docs-es-ownerslabels:- area/localization- language/es
After adding the language-specific OWNERS file, update the root
OWNERS_ALIASES file with the new
Kubernetes teams for the localization, sig-docs-**-owners and
sig-docs-**-reviews.
For an example of adding a new localization, see the PR to enable
docs in French.
Add a localized README file
To guide other localization contributors, add a new
README-**.md to the top
level of kubernetes/website, where
** is the two-letter language code. For example, a German README file would be
README-de.md.
Guide localization contributors in the localized README-**.md file.
Include the same information contained in README.md as well as:
A point of contact for the localization project
Any information specific to the localization
After you create the localized README, add a link to the file from the main
English README.md, and include contact information in English. You can provide
a GitHub ID, email address, Slack channel, or another
method of contact. You must also provide a link to your localized Community Code
of Conduct.
Launch your new localization
When a localization meets the requirements for workflow and minimum output, SIG
Docs does the following:
Translated documents must reside in their own content/**/ subdirectory, but otherwise, follow the
same URL path as the English source. For example, to prepare the
Kubernetes Basics tutorial for translation into German,
create a subdirectory under the content/de/ directory and copy the English source or directory:
Translation tools can speed up the translation process. For example, some
editors offer plugins to quickly translate text.
Caution:
Machine-generated translation is insufficient on its own. Localization requires
extensive human review to meet minimum standards of quality.
To ensure accuracy in grammar and meaning, members of your localization team
should carefully review all machine-generated translations before publishing.
Localize SVG images
The Kubernetes project recommends using vector (SVG) images where possible, as
these are much easier for a localization team to edit. If you find a raster
image that needs localizing, consider first redrawing the English version as
a vector image, and then localize that.
When translating text within SVG (Scalable Vector Graphics) images, it's
essential to follow certain guidelines to ensure accuracy and maintain
consistency across different language versions. SVG images are commonly
used in the Kubernetes documentation to illustrate concepts, workflows,
and diagrams.
Identifying translatable text: Start by identifying the text elements
within the SVG image that need to be translated. These elements typically
include labels, captions, annotations, or any text that conveys information.
Editing SVG files: SVG files are XML-based, which means they can be
edited using a text editor. However, it's important to note that most of the
documentation images in Kubernetes already convert text to curves to avoid font
compatibility issues. In such cases, it is recommended to use specialized SVG
editing software, such as Inkscape, for editing, open the SVG file and locate
the text elements that require translation.
Translating the text: Replace the original text with the translated
version in the desired language. Ensure the translated text accurately conveys
the intended meaning and fits within the available space in the image. The Open
Sans font family should be used when working with languages that use the Latin
alphabet. You can download the Open Sans typeface from here:
Open Sans Typeface.
Converting text to curves: As already mentioned, to address font
compatibility issues, it is recommended to convert the translated text to
curves or paths. Converting text to curves ensures that the final image
displays the translated text correctly, even if the user's system does not
have the exact font used in the original SVG.
Reviewing and testing: After making the necessary translations and
converting text to curves, save and review the updated SVG image to ensure
the text is properly displayed and aligned. Check
Preview your changes locally.
Source files
Localizations must be based on the English files from a specific release
targeted by the localization team. Each localization team can decide which
release to target, referred to as the target version below.
Revise the comments at the top of the file to suit your localization, then
translate the value of each string. For example, this is the German-language
placeholder text for the search form:
[ui_search]
other = "Suchen"
Localizing site strings lets you customize site-wide text and features: for
example, the legal copyright text in the footer on each page.
Language-specific localization guide
As a localization team, you can formalize the best practices your team follows
by creating a language-specific localization guide.
If the localization project needs a separate meeting time, contact a SIG Docs
Co-Chair or Tech Lead to create a new reoccurring Zoom meeting and calendar
invite. This is only needed when the team is large enough to sustain and require
a separate meeting.
Per CNCF policy, the localization teams must upload their meetings to the SIG
Docs YouTube playlist. A SIG Docs Co-Chair or Tech Lead can help with the
process until SIG Docs automates it.
Branch strategy
Because localization projects are highly collaborative efforts, we
encourage teams to work in shared localization branches - especially
when starting out and the localization is not yet live.
For example, an approver on a German localization team opens the localization
branch dev-1.12-de.1 directly against the kubernetes/website repository,
based on the source branch for Kubernetes v1.12.
Individual contributors open feature branches based on the localization
branch.
For example, a German contributor opens a pull request with changes to
kubernetes:dev-1.12-de.1 from username:local-branch-name.
Approvers review and merge feature branches into the localization branch.
Periodically, an approver merges the localization branch with its source
branch by opening and approving a new pull request. Be sure to squash the
commits before approving the pull request.
Repeat steps 1-4 as needed until the localization is complete. For example,
subsequent German localization branches would be: dev-1.12-de.2,
dev-1.12-de.3, etc.
Teams must merge localized content into the same branch from which the content
was sourced. For example:
A localization branch sourced from main must be merged into main.
A localization branch sourced from release-1.34
must be merged into release-1.34.
Note:
If your localization branch was created from main branch, but it is not merged
into main before the new release branch release-1.35 created,
merge it into both main and new release branch release-1.35. To
merge your localization branch into the new release branch
release-1.35, you need to switch the upstream branch of your
localization branch to release-1.35.
At the beginning of every team milestone, it's helpful to open an issue
comparing upstream changes between the previous localization branch and the
current localization branch. There are two scripts for comparing upstream
changes.
upstream_changes.py
is useful for checking the changes made to a specific file. And
diff_l10n_branches.py
is useful for creating a list of outdated files for a specific localization
branch.
While only approvers can open a new localization branch and merge pull requests,
anyone can open a pull request for a new localization branch. No special
permissions are required.
For more information about working from forks or directly from the repository,
see "fork and clone the repo".
Upstream contributions
SIG Docs welcomes upstream contributions and corrections to the English source.
7 - Participating in SIG Docs
SIG Docs is one of the
special interest groups
within the Kubernetes project, focused on writing, updating, and maintaining
the documentation for Kubernetes as a whole. See
SIG Docs from the community github repo
for more information about the SIG.
SIG Docs welcomes content and reviews from all contributors. Anyone can open a
pull request (PR), and anyone is welcome to file issues about content or comment
on pull requests in progress.
You can also become a member,
reviewer, or
approver.
These roles require greater access and entail certain responsibilities for
approving and committing changes. See
community-membership
for more information on how membership works within the Kubernetes community.
The rest of this document outlines some unique ways these roles function within
SIG Docs, which is responsible for maintaining one of the most public-facing
aspects of Kubernetes -- the Kubernetes website and documentation.
SIG Docs chairperson
Each SIG, including SIG Docs, selects one or more SIG members to act as
chairpersons. These are points of contact between SIG Docs and other parts of
the Kubernetes organization. They require extensive knowledge of the structure
of the Kubernetes project as a whole and how SIG Docs works within it. See
Leadership
for the current list of chairpersons.
SIG Docs teams and automation
Automation in SIG Docs relies on two different mechanisms:
GitHub teams and OWNERS files.
GitHub teams
There are two categories of SIG Docs teams on GitHub:
@sig-docs-{language}-owners are approvers and leads
@sig-docs-{language}-reviews are reviewers
Each can be referenced with their @name in GitHub comments to communicate with
everyone in that group.
Sometimes Prow and GitHub teams overlap without matching exactly. For
assignment of issues, pull requests, and to support PR approvals, the
automation uses information from OWNERS files.
OWNERS files and front-matter
The Kubernetes project uses an automation tool called prow for automation
related to GitHub issues and pull requests. The
Kubernetes website repository uses
two prow plugins:
blunderbuss
approve
These two plugins use the
OWNERS and
OWNERS_ALIASES
files in the top level of the kubernetes/website GitHub repository to control
how prow works within the repository.
An OWNERS file contains a list of people who are SIG Docs reviewers and
approvers. OWNERS files can also exist in subdirectories, and can override who
can act as a reviewer or approver of files in that subdirectory and its
descendants. For more information about OWNERS files in general, see
OWNERS.
In addition, an individual Markdown file can list reviewers and approvers in its
front-matter, either by listing individual GitHub usernames or GitHub groups.
The combination of OWNERS files and front-matter in Markdown files determines
the advice PR owners get from automated systems about who to ask for technical
and editorial review of their PR.
How merging works
When a pull request is merged to the branch used to publish content, that content is published to https://kubernetes.io. To ensure that
the quality of our published content is high, we limit merging pull requests to
SIG Docs approvers. Here's how it works.
When a pull request has both the lgtm and approve labels, has no hold
labels, and all tests are passing, the pull request merges automatically.
Kubernetes organization members and SIG Docs approvers can add comments to
prevent automatic merging of a given pull request (by adding a /hold comment
or withholding a /lgtm comment).
Any Kubernetes member can add the lgtm label by adding a /lgtm comment.
Only SIG Docs approvers can merge a pull request
by adding an /approve comment. Some approvers also perform additional
specific roles, such as PR Wrangler or
SIG Docs chairperson.
What's next
For more information about contributing to the Kubernetes documentation, see:
Anyone can contribute to Kubernetes. As your contributions to SIG Docs grow,
you can apply for different levels of membership in the community.
These roles allow you to take on more responsibility within the community.
Each role requires more time and commitment. The roles are:
Anyone: regular contributors to the Kubernetes documentation
Members: can assign and triage issues and provide non-binding review on pull requests
Reviewers: can lead reviews on documentation pull requests and can vouch for a change's quality
Approvers: can lead reviews on documentation and merge changes
Anyone
Anyone with a GitHub account can contribute to Kubernetes. SIG Docs welcomes all new contributors!
Don't send a direct email or Slack direct message to an individual
SIG Docs member. You must request sponsorship before submitting your application.
Open a GitHub issue in the
kubernetes/org repository. Use the
Organization Membership Request issue template.
Let your sponsors know about the GitHub issue. You can either:
Mention their GitHub username in an issue (@<GitHub-username>)
Send them the issue link using Slack or email.
Sponsors will approve your request with a +1 vote. Once your sponsors
approve the request, a Kubernetes GitHub admin adds you as a member.
Congratulations!
If your membership request is not accepted you will receive feedback.
After addressing the feedback, apply again.
Accept the invitation to the Kubernetes GitHub organization in your email account.
Note:
GitHub sends the invitation to the default email address in your account.
Reviewers
Reviewers are responsible for reviewing open pull requests. Unlike member
feedback, the PR author must address reviewer feedback. Reviewers are members of the
@kubernetes/sig-docs-{language}-reviews
GitHub team.
To provide non-binding feedback, prefix your comments with a phrase like "Optionally: ".
Edit user-facing strings in code
Improve code comments
You can be a SIG Docs reviewer, or a reviewer for docs in a specific subject area.
Assigning reviewers to pull requests
Automation assigns reviewers to all pull requests. You can request a
review from a specific person by commenting: /assign [@_github_handle].
If the assigned reviewer has not commented on the PR, another reviewer can
step in. You can also assign technical reviewers as needed.
Using /lgtm
LGTM stands for "Looks good to me" and indicates that a pull request is
technically accurate and ready to merge. All PRs need a /lgtm comment from a
reviewer and a /approve comment from an approver to merge.
A /lgtm comment from reviewer is binding and triggers automation that adds the lgtm label.
Becoming a reviewer
When you meet the
requirements,
you can become a SIG Docs reviewer. Reviewers in other SIGs must apply
separately for reviewer status in SIG Docs.
To apply:
Open a pull request that adds your GitHub username to a section of the
OWNERS_ALIASES file
in the kubernetes/website repository.
Note:
If you aren't sure where to add yourself, add yourself to sig-docs-en-reviews.
Assign the PR to one or more SIG-Docs approvers (usernames listed under
sig-docs-{language}-owners).
If approved, a SIG Docs lead adds you to the appropriate GitHub team. Once added,
K8s-ci-robot
assigns and suggests you as a reviewer on new pull requests.
Publish contributor content by approving and merging pull requests using the /approve comment
Propose improvements to the style guide
Propose improvements to docs tests
Propose improvements to the Kubernetes website or other tooling
If the PR already has a /lgtm, or if the approver also comments with
/lgtm, the PR merges automatically. A SIG Docs approver should only leave a
/lgtm on a change that doesn't need additional technical review.
Approving pull requests
Approvers and SIG Docs leads are the only ones who can merge pull requests
into the website repository. This comes with certain responsibilities.
Approvers can use the /approve command, which merges PRs into the repo.
Warning:
A careless merge can break the site, so be sure that when you merge something, you mean it.
If you ever have a question, or you're not sure about something, feel free
to call for additional review.
Verify that Netlify tests pass before you /approve a PR.
Visit the Netlify page preview for a PR to make sure things look good before approving.
Participate in the
PR Wrangler rotation schedule
for weekly rotations. SIG Docs expects all approvers to participate in this
rotation. See PR wranglers.
for more details.
Becoming an approver
When you meet the
requirements,
you can become a SIG Docs approver. Approvers in other SIGs must apply
separately for approver status in SIG Docs.
To apply:
Open a pull request adding yourself to a section of the
OWNERS_ALIASES
file in the kubernetes/website repository.
Note:
If you aren't sure where to add yourself, add yourself to `sig-docs-en-owners`.
Assign the PR to one or more current SIG Docs approvers.
If approved, a SIG Docs lead adds you to the appropriate GitHub team. Once added,
@k8s-ci-robot
assigns and suggests you as a reviewer on new pull requests.
What's next
Read about PR wrangling, a role all approvers take on rotation.
Must be an active member of the Kubernetes organization.
A minimum of 15 non-trivial
contributions to Kubernetes (of which a certain amount should be directed towards kubernetes/website).
Performing the role in an informal capacity already.
Helpful Prow commands for wranglers
Below are some commonly used commands for Issue Wranglers:
# reopen an issue/reopen
# transfer issues that don't fit in k/website to another repository/transfer[-issue]# change the state of rotten issues/remove-lifecycle rotten
# change the state of stale issues/remove-lifecycle stale
# assign sig to an issue/sig <sig_name>
# add specific area/area <area_name>
# for beginner friendly issues/good-first-issue
# issues that needs help/help wanted
# tagging issue as support specific/kind support
# to accept triaging for an issue/triage accepted
# closing an issue we won't be working on and haven't fixed yet/close not-planned
To find more Prow commands, refer to the Command Help documentation.
When to close Issues
For an open source project to succeed, good issue management is crucial.
But it is also critical to resolve issues in order to maintain the repository
and communicate clearly with contributors and users.
Close issues when:
A similar issue is reported more than once. You will first need to tag it as /triage duplicate;
link it to the main issue & then close it. It is also advisable to direct the users to the original issue.
It is very difficult to understand and address the issue presented by the author with the information provided.
However, encourage the user to provide more details or reopen the issue if they can reproduce it later.
The same functionality is implemented elsewhere. One can close this issue and direct user to the appropriate place.
The reported issue is not currently planned or aligned with the project's goals.
If the issue appears to be spam and is clearly unrelated.
If the issue is related to an external limitation or dependency and is beyond the control of the project.
To close an issue, leave a /close comment on the issue.
Use this script to remind contributors
that haven't signed the CLA to do so.
Provide feedback on changes and ask for technical reviews from members of other SIGs.
Provide inline suggestions on the PR for the proposed content changes.
If you need to verify content, comment on the PR and request more details.
Assign relevant sig/ label(s).
If needed, assign reviewers from the reviewers: block in the file's front matter.
You can also tag a SIG
for a review by commenting @kubernetes/<sig>-pr-reviews on the PR.
Use the /approve comment to approve a PR for merging. Merge the PR when ready.
PRs should have a /lgtm comment from another member before merging.
Consider accepting technically accurate content that doesn't meet the
style guidelines. As you approve the change,
open a new issue to address the style concern. You can usually write these style fix
issues as good first issues.
Using style fixups as good first issues is a good way to ensure a supply of easier tasks
to help onboard new contributors.
Also check for pull requests against the reference docs generator
code, and review those (or bring in help).
PR wrangler duties do not apply to localization PRs (non-English PRs).
Localization teams have their own processes and teams for reviewing their language PRs.
However, it's often helpful to ensure language PRs are labeled correctly,
review small non-language dependent PRs (like a link update),
or tag reviewers or contributors in long-running PRs
(ones opened more than 6 months ago and have not been updated in a month or more).
Helpful GitHub queries for wranglers
The following queries are helpful when wrangling.
After working through these queries, the remaining list of PRs to review is usually small.
These queries exclude localization PRs. All queries are against the main branch except the last one.
No CLA, not eligible to merge:
Remind the contributor to sign the CLA. If both the bot and a human have reminded them, close
the PR and remind them that they can open it after signing the CLA.
Do not review PRs whose authors have not signed the CLA!
Needs LGTM:
Lists PRs that need an LGTM from a member. If the PR needs technical review,
loop in one of the reviewers suggested by the bot. If the content needs work,
add suggestions and feedback in-line.
Quick Wins:
Lists PRs against the main branch with no clear blockers.
(change "XS" in the size label as you work through the PRs [XS, S, M, L, XL, XXL]).
Not against the primary branch:
If the PR is against a dev- branch, it's for an upcoming release. Assign the
docs release manager
using: /assign @<manager's_github-username>. If the PR is against an old branch,
help the author figure out whether it's targeted against the best branch.
Helpful Prow commands for wranglers
# add English label
/language en

# add squash label to PR if more than one commit
/label tide/merge-method-squash

# retitle a PR via Prow (such as a work-in-progress [WIP] or better detail of PR)
/retitle [WIP] <TITLE>
When to close Pull Requests
Reviews and approvals are one tool to keep our PR queue short and current. Another tool is closure.
Close PRs where:
The author hasn't signed the CLA for two weeks.
Authors can reopen the PR after signing the CLA. This is a low-risk way to make
sure nothing gets merged without a signed CLA.
The author has not responded to comments or feedback in 2 or more weeks.
Don't be afraid to close pull requests. Contributors can easily reopen and resume works in progress.
Often a closure notice is what spurs an author to resume and finish their contribution.
To close a pull request, leave a /close comment on the PR.
Note:
The k8s-triage-robot bot marks issues
as stale after 90 days of inactivity. After 30 more days it marks issues as rotten
and closes them. PR wranglers should close issues after 14-30 days of inactivity.
PR Wrangler shadow program
In late 2021, SIG Docs introduced the PR Wrangler Shadow Program.
The program was introduced to help new contributors understand the PR wrangling process.
Become a shadow
If you are interested in shadowing as a PR wrangler, please visit the
PR Wranglers Wiki page
to see the PR wrangling schedule for this year and sign up.
Once you've signed up to shadow a PR Wrangler, introduce yourself to the PR Wrangler on the
Kubernetes Slack.
8 - Documentation style overview
The topics in this section provide guidance on writing style, content formatting
and organization, and using Hugo customizations specific to Kubernetes
documentation.
8.1 - Documentation Content Guide
This page contains guidelines for Kubernetes documentation.
If you have questions about what's allowed, join the #sig-docs channel in
Kubernetes Slack and ask!
For information on creating new content for the Kubernetes
docs, follow the style guide.
Overview
Source for the Kubernetes website, including the docs, resides in the
kubernetes/website repository.
Located in the kubernetes/website/content/<language_code>/docs folder, the
majority of Kubernetes documentation is specific to the Kubernetes
project.
What's allowed
Kubernetes docs allow content for third-party projects only when:
Content documents software in the Kubernetes project
Content documents software that's out of project but necessary for Kubernetes to function
Content is canonical on kubernetes.io, or links to canonical content elsewhere
Third party content
Kubernetes documentation includes applied examples of projects in the Kubernetes
project—projects that live in the kubernetes and
kubernetes-sigs GitHub organizations.
Links to active content in the Kubernetes project are always allowed.
Kubernetes requires some third party content to function. Examples include container runtimes (containerd, CRI-O, Docker),
networking policy (CNI plugins),
Ingress controllers,
and logging.
Docs can link to third-party open source software (OSS) outside the Kubernetes
project only if it's necessary for Kubernetes to function.
Dual sourced content
Wherever possible, Kubernetes docs link to canonical sources instead of hosting
dual-sourced content.
Dual-sourced content requires double the effort (or more!) to maintain
and grows stale more quickly.
Note:
If you're a maintainer for a Kubernetes project and need help hosting your own docs,
ask for help in #sig-docs on Kubernetes Slack.
More information
If you have questions about allowed content, join the Kubernetes Slack #sig-docs channel and ask!
This page gives writing style guidelines for the Kubernetes documentation.
These are guidelines, not rules. Use your best judgment, and feel free to
propose changes to this document in a pull request.
For additional information on creating new content for the Kubernetes
documentation, read the Documentation Content Guide.
Changes to the style guide are made by SIG Docs as a group. To propose a change
or addition, add it to the agenda for an upcoming
SIG Docs meeting, and attend the meeting to participate in the discussion.
Note:
Kubernetes documentation uses
Goldmark Markdown Renderer
with some adjustments along with a few
Hugo Shortcodes to support
glossary entries, tabs, and representing feature state.
Language
Kubernetes documentation has been translated into multiple languages
(see Localization READMEs).
The English-language documentation uses U.S. English spelling and grammar.
Documentation formatting standards
Use upper camel case for API objects
When you refer specifically to interacting with an API object, use
UpperCamelCase, also known as
Pascal case. You may see different capitalization, such as "configMap",
in the API Reference. When writing
general documentation, it's better to use upper camel case, calling it "ConfigMap" instead.
The following examples focus on capitalization. For more information about formatting
API object names, review the related guidance on Code Style.
Do and Don't - Use Pascal case for API objects
Do
Don't
The HorizontalPodAutoscaler resource is responsible for ...
The Horizontal pod autoscaler is responsible for ...
A PodList object is a list of pods.
A Pod List object is a list of pods.
The Volume object contains a hostPath field.
The volume object contains a hostPath field.
Every ConfigMap object is part of a namespace.
Every configMap object is part of a namespace.
For managing confidential data, consider using the Secret API.
For managing confidential data, consider using the secret API.
Use angle brackets for placeholders
Use angle brackets for placeholders. Tell the reader what a placeholder
represents, for example:
Display information about a pod:
kubectl describe pod <pod-name> -n <namespace>
If the namespace of the pod is default, you can omit the '-n' parameter.
Use bold for user interface elements
Do and Don't - Bold interface elements
Do
Don't
Click Fork.
Click "Fork".
Select Other.
Select "Other".
Use italics to define or introduce new terms
Do and Don't - Use italics for new terms
Do
Don't
A cluster is a set of nodes ...
A "cluster" is a set of nodes ...
These components form the control plane.
These components form the control plane.
Use code style for filenames, directories, and paths
Do and Don't - Use code style for filenames, directories, and paths
Do
Don't
Open the envars.yaml file.
Open the envars.yaml file.
Go to the /docs/tutorials directory.
Go to the /docs/tutorials directory.
Open the /_data/concepts.yaml file.
Open the /_data/concepts.yaml file.
Use the international standard for punctuation inside quotes
Do and Don't - Use the international standard for punctuation inside quotes
Do
Don't
events are recorded with an associated "stage".
events are recorded with an associated "stage."
The copy is called a "fork".
The copy is called a "fork."
Inline code formatting
Use code style for inline code, commands
For inline code in an HTML document, use the <code> tag. In a Markdown
document, use the backtick (`). However, API kinds such as StatefulSet
or ConfigMap are written verbatim (no backticks); this allows using possessive
apostrophes.
Do and Don't - Use code style for inline code, commands, and API objects
Do
Don't
The kubectl run command creates a Pod.
The "kubectl run" command creates a Pod.
The kubelet on each node acquires a Lease…
The kubelet on each node acquires a Lease…
A PersistentVolume represents durable storage…
A PersistentVolume represents durable storage…
The CustomResourceDefinition's .spec.group field…
The CustomResourceDefinition.spec.group field…
For declarative management, use kubectl apply.
For declarative management, use "kubectl apply".
Enclose code samples with triple backticks. (```)
Enclose code samples with any other syntax.
Use single backticks to enclose inline code. For example, var example = true.
Use two asterisks (**) or an underscore (_) to enclose inline code. For example, var example = true.
Use triple backticks before and after a multi-line block of code for fenced code blocks.
Use multi-line blocks of code to create diagrams, flowcharts, or other illustrations.
Use meaningful variable names that have a context.
Use variable names such as 'foo','bar', and 'baz' that are not meaningful and lack context.
Remove trailing spaces in the code.
Add trailing spaces in the code, where these are important, because the screen reader will read out the spaces as well.
Note:
The website supports syntax highlighting for code samples, but specifying a language
is optional. Syntax highlighting in the code block should conform to the
contrast guidelines.
Use code style for object field names and namespaces
Do and Don't - Use code style for object field names
Do
Don't
Set the value of the replicas field in the configuration file.
Set the value of the "replicas" field in the configuration file.
The value of the exec field is an ExecAction object.
The value of the "exec" field is an ExecAction object.
Run the process as a DaemonSet in the kube-system namespace.
Run the process as a DaemonSet in the kube-system namespace.
Use code style for Kubernetes command tool and component names
Do and Don't - Use code style for Kubernetes command tool and component names
Do
Don't
The kubelet preserves node stability.
The kubelet preserves node stability.
The kubectl handles locating and authenticating to the API server.
The kubectl handles locating and authenticating to the apiserver.
Run the process with the certificate, kube-apiserver --client-ca-file=FILENAME.
Run the process with the certificate, kube-apiserver --client-ca-file=FILENAME.
Starting a sentence with a component tool or component name
Do and Don't - Starting a sentence with a component tool or component name
Do
Don't
The kubeadm tool bootstraps and provisions machines in a cluster.
kubeadm tool bootstraps and provisions machines in a cluster.
The kube-scheduler is the default scheduler for Kubernetes.
kube-scheduler is the default scheduler for Kubernetes.
Use a general descriptor over a component name
Do and Don't - Use a general descriptor over a component name
Do
Don't
The Kubernetes API server offers an OpenAPI spec.
The apiserver offers an OpenAPI spec.
Aggregated APIs are subordinate API servers.
Aggregated APIs are subordinate APIServers.
Use normal style for string and integer field values
For field values of type string or integer, use normal style without quotation marks.
Do and Don't - Use normal style for string and integer field values
Do
Don't
Set the value of imagePullPolicy to Always.
Set the value of imagePullPolicy to "Always".
Set the value of image to nginx:1.16.
Set the value of image to nginx:1.16.
Set the value of the replicas field to 2.
Set the value of the replicas field to 2.
However, consider quoting values where there is a risk that readers might confuse the value
with an API kind.
Referring to Kubernetes API resources
This section talks about how we reference API resources in the documentation.
Clarification about "resource"
Kubernetes uses the word resource to refer to API resources. For example,
the URL path /apis/apps/v1/namespaces/default/deployments/my-app represents a
Deployment named "my-app" in the "default"
namespace. In HTTP jargon,
namespace is a resource -
the same way that all web URLs identify a resource.
Kubernetes documentation also uses "resource" to talk about CPU and memory
requests and limits. It's very often a good idea to refer to API resources
as "API resources"; that helps to avoid confusion with CPU and memory resources,
or with other kinds of resource.
If you are using the lowercase plural form of a resource name, such as
deployments or configmaps, provide extra written context to help readers
understand what you mean. If you are using the term in a context where the
UpperCamelCase name could work too, and there is a risk of ambiguity,
consider using the API kind in UpperCamelCase.
When to use Kubernetes API terminologies
The different Kubernetes API terminologies are:
API kinds: the name used in the API URL (such as pods, namespaces).
API kinds are sometimes also called resource types.
API resource: a single instance of an API kind (such as pod, secret).
Object: a resource that serves as a "record of intent". An object is a desired
state for a specific part of your cluster, which the Kubernetes control plane tries to maintain.
All objects in the Kubernetes API are also resources.
For clarity, you can add "resource" or "object" when referring to an API resource in Kubernetes
documentation.
An example: write "a Secret object" instead of "a Secret".
If it is clear just from the capitalization, you don't need to add the extra word.
Consider rephrasing when that change helps avoid misunderstandings. A common situation is
when you want to start a sentence with an API kind, such as “Secret”; because English
and other languages capitalize at the start of sentences, readers cannot tell whether you
mean the API kind or the general concept. Rewording can help.
API resource names
Always format API resource names using UpperCamelCase,
also known as PascalCase. Do not write API kinds with code formatting.
Don't split an API object name into separate words. For example, use PodTemplateList, not Pod Template List.
For more information about Kubernetes API terminologies, review the related
guidance on Kubernetes API terminology.
Code snippet formatting
Don't include the command prompt
Do and Don't - Don't include the command prompt
Do
Don't
kubectl get pods
$ kubectl get pods
Separate commands from output
Verify that the pod is running on your chosen node:
kubectl get pods --output=wide
The output is similar to this:
NAME     READY     STATUS    RESTARTS   AGE    IP           NODE
nginx    1/1       Running   0          13s    10.200.0.4   worker0
Versioning Kubernetes examples
Code examples and configuration examples that include version information should
be consistent with the accompanying text.
If the information is version specific, the Kubernetes version needs to be defined
in the prerequisites section of the Task template
or the Tutorial template.
Once the page is saved, the prerequisites section is shown as Before you begin.
To specify the Kubernetes version for a task or tutorial page, include
min-kubernetes-server-version in the front matter of the page.
If the example YAML is in a standalone file, find and review the topics that include it as a reference.
Verify that any topics using the standalone YAML have the appropriate version information defined.
If a stand-alone YAML file is not referenced from any topics, consider deleting it instead of updating it.
For example, if you are writing a tutorial that is relevant to Kubernetes version 1.8,
the front-matter of your markdown file should look something like:
---title:<your tutorial title here>min-kubernetes-server-version:v1.8---
In code and configuration examples, do not include comments about alternative versions.
Be careful to not include incorrect statements in your examples as comments, such as:
For example: \\(\frac{7}{9} \sqrt{K^8 s}\\), which renders as \(\frac{7}{9} \sqrt{K^8 s}\).
Prefer inline formulae where reasonable, but you can use a math block if that's likely to help readers.
Read the Docsy guide to find out what you need to change in your page to activate support;
if you have problems, add math: true to the page front matter
(you can do this even if you think the automatic activation should be enough).
Kubernetes.io word list
A list of Kubernetes-specific terms and words to be used consistently across the site.
Kubernetes.io word list
Term
Usage
Kubernetes
Kubernetes should always be capitalized.
Docker
Docker should always be capitalized.
SIG Docs
SIG Docs rather than SIG-DOCS or other variations.
On-premises
On-premises or On-prem rather than On-premise or other variations.
cloud native
Cloud native or cloud native as appropriate for sentence structure rather than cloud-native or Cloud Native.
open source
Open source or open source as appropriate for sentence structure rather than open-source or Open Source.
Shortcodes
Hugo Shortcodes help create
different rhetorical appeal levels. Our documentation supports three different
shortcodes in this category: Note{{< note >}},
Caution{{< caution >}}, and Warning{{< warning >}}.
Surround the text with an opening and closing shortcode.
Use the following syntax to apply a style:
{{< note >}}
No need to include a prefix; the shortcode automatically provides one. (Note:, Caution:, etc.)
{{< /note >}}
The output is:
Note:
The prefix you choose is the same text for the tag.
Note
Use {{< note >}} to highlight a tip or a piece of information that may be helpful to know.
For example:
{{< note >}}
You can _still_ use Markdown inside these callouts.
{{< /note >}}
The output is:
Note:
You can still use Markdown inside these callouts.
You can use a {{< note >}} in a list:
1. Use the note shortcode in a list

1. A second item with an embedded note

   {{< note >}}
   Warning, Caution, and Note shortcodes, embedded in lists, need to be indented four spaces. See [Common Shortcode Issues](#common-shortcode-issues).
   {{< /note >}}

1. A third item in a list

1. A fourth item in a list
The output is:
Use the note shortcode in a list
A second item with an embedded note
Note:
Warning, Caution, and Note shortcodes, embedded in lists, need to be indented four spaces. See [Common Shortcode Issues](#common-shortcode-issues).
A third item in a list
A fourth item in a list
Caution
Use {{< caution >}} to call attention to an important piece of information to avoid pitfalls.
For example:
{{< caution >}}
The callout style only applies to the line directly above the tag.
{{< /caution >}}
The output is:
Caution:
The callout style only applies to the line directly above the tag.
Warning
Use {{< warning >}} to indicate danger or a piece of information that is crucial to follow.
For example:
{{< warning >}}
Beware.
{{< /warning >}}
The output is:
Warning:
Beware.
Common Shortcode Issues
Ordered Lists
Shortcodes will interrupt numbered lists unless you indent four spaces before the notice and the tag.
For example:
1. Preheat oven to 350˚F

1. Prepare the batter, and pour into springform pan.
   {{< note >}}Grease the pan for best results.{{< /note >}}

1. Bake for 20-25 minutes or until set.
The output is:
Preheat oven to 350˚F
Prepare the batter, and pour into springform pan.
Note:
Grease the pan for best results.
Bake for 20-25 minutes or until set.
Include Statements
Shortcodes inside include statements will break the build. You must insert them
in the parent document, before and after you call the include. For example:
{{< note >}}
{{< include "task-tutorial-prereqs.md" >}}
{{< /note >}}
Markdown elements
Line breaks
Use a single newline to separate block-level content like headings, lists, images,
code blocks, and others. The exception is second-level headings, where it should
be two newlines. Second-level headings follow the first-level (or the title) without
any preceding paragraphs or texts. A two line spacing helps visualize the overall
structure of content in a code editor better.
Manually wrap paragraphs in the Markdown source when appropriate. Since the git
tool and the GitHub website generate file diffs on a line-by-line basis,
manually wrapping long lines helps the reviewers to easily find out the changes
made in a PR and provide feedback. It also helps the downstream localization
teams where people track the upstream changes on a per-line basis. Line
wrapping can happen at the end of a sentence or a punctuation character, for
example. One exception to this is that a Markdown link or a shortcode is
expected to be in a single line.
Headings and titles
People accessing this documentation may use a screen reader or other assistive technology (AT).
Screen readers are linear output devices,
they output items on a page one at a time. If there is a lot of content on a page, you can
use headings to give the page an internal structure. A good page structure helps all readers
to easily navigate the page or filter topics of interest.
Do and Don't - Headings
Do
Don't
Update the title in the front matter of the page or blog post.
Use first level heading, as Hugo automatically converts the title in the front matter of the page into a first-level heading.
Use ordered headings to provide a meaningful high-level outline of your content.
Use headings level 4 through 6, unless it is absolutely necessary. If your content is that detailed, it may need to be broken into separate articles.
Use pound or hash signs (#) for non-blog post content.
Use underlines (--- or ===) to designate first-level headings.
Use sentence case for headings in the page body. For example, Extend kubectl with plugins
Use title case for headings in the page body. For example, Extend Kubectl With Plugins
Use title case for the page title in the front matter. For example, title: Kubernetes API Server Bypass Risks
Use sentence case for page titles in the front matter. For example, don't use title: Kubernetes API server bypass risks
Place relevant links in the body copy.
Include hyperlinks (<a href=""></a>) in headings.
Use pound or hash signs (#) to indicate headings.
Use bold text or other indicators to split paragraphs.
Paragraphs
Do and Don't - Paragraphs
Do
Don't
Try to keep paragraphs under 6 sentences.
Indent the first paragraph with space characters. For example, ⋅⋅⋅Three spaces before a paragraph will indent it.
Use three hyphens (---) to create a horizontal rule. Use horizontal rules for breaks in paragraph content. For example, a change of scene in a story, or a shift of topic within a section.
Use horizontal rules for decoration.
Links
Do and Don't - Links
Do
Don't
Write hyperlinks that give you context for the content they link to. For example: Certain ports are open on your machines. See Check required ports for more details.
Use ambiguous terms such as "click here". For example: Certain ports are open on your machines. See here for more details.
Write Markdown-style links: [link text](URL). For example: [Hugo shortcodes](/docs/contribute/style/hugo-shortcodes/#table-captions) and the output is Hugo shortcodes.
Write HTML-style links: <a href="/media/examples/link-element-example.css" target="_blank">Visit our tutorial!</a>, or create links that open in new tabs or windows. For example: [example website](https://example.com){target="_blank"}
Lists
Group items in a list that are related to each other and need to appear in a specific
order or to indicate a correlation between multiple items. When a screen reader comes
across a list—whether it is an ordered or unordered list—it will be announced to the
user that there is a group of list items. The user can then use the arrow keys to move
up and down between the various items in the list. Website navigation links can also be
marked up as list items; after all they are nothing but a group of related links.
End each item in a list with a period if one or more items in the list are complete
sentences. For the sake of consistency, normally either all items or none should be complete sentences.
Note:
Ordered lists that are part of an incomplete introductory sentence can be in lowercase
and punctuated as if each item was a part of the introductory sentence.
Use the number one (1.) for ordered lists.
Use (+), (*), or (-) for unordered lists.
Leave a blank line after each list.
Indent nested lists with four spaces (for example, ⋅⋅⋅⋅).
List items may consist of multiple paragraphs. Each subsequent paragraph in a list
item must be indented by either four spaces or one tab.
Tables
The semantic purpose of a data table is to present tabular data. Sighted users can
quickly scan the table but a screen reader goes through line by line. A table caption
is used to create a descriptive title for a data table. Assistive technologies (AT)
use the HTML table caption element to identify the table contents to the user within the page structure.
This section contains suggested best practices for clear, concise, and consistent content.
Use present tense
Do and Don't - Use present tense
Do
Don't
This command starts a proxy.
This command will start a proxy.
Exception: Use future or past tense if it is required to convey the correct
meaning.
Use active voice
Do and Don't - Use active voice
Do
Don't
You can explore the API using a browser.
The API can be explored using a browser.
The YAML file specifies the replica count.
The replica count is specified in the YAML file.
Exception: Use passive voice if active voice leads to an awkward construction.
Use simple and direct language
Use simple and direct language. Avoid using unnecessary phrases, such as saying "please."
Do and Don't - Use simple and direct language
Do
Don't
To create a ReplicaSet, ...
In order to create a ReplicaSet, ...
See the configuration file.
Please see the configuration file.
View the pods.
With this next command, we'll view the pods.
Address the reader as "you"
Do and Don't - Addressing the reader
Do
Don't
You can create a Deployment by ...
We'll create a Deployment by ...
In the preceding output, you can see...
In the preceding output, we can see ...
Avoid Latin phrases
Prefer English terms over Latin abbreviations.
Do and Don't - Avoid Latin phrases
Do
Don't
For example, ...
e.g., ...
That is, ...
i.e., ...
Exception: Use "etc." for et cetera.
Patterns to avoid
Avoid using "we"
Using "we" in a sentence can be confusing, because the reader might not know
whether they're part of the "we" you're describing.
Do and Don't - Patterns to avoid
Do
Don't
Version 1.4 includes ...
In version 1.4, we have added ...
Kubernetes provides a new feature for ...
We provide a new feature ...
This page teaches you how to use pods.
In this page, we are going to learn about pods.
Avoid jargon and idioms
Some readers speak English as a second language. Avoid jargon and idioms to help them understand better.
Do and Don't - Avoid jargon and idioms
Do
Don't
Internally, ...
Under the hood, ...
Create a new cluster.
Turn up a new cluster.
Avoid statements about the future
Avoid making promises or giving hints about the future. If you need to talk about
an alpha feature, put the text under a heading that identifies it as alpha
information.
An exception to this rule is documentation about announced deprecations
targeting removal in future versions. One example of documentation like this
is the Deprecated API migration guide.
Avoid statements that will soon be out of date
Avoid words like "currently" and "new." A feature that is new today might not be
considered new in a few months.
Do and Don't - Avoid statements that will soon be out of date
Do
Don't
In version 1.4, ...
In the current version, ...
The Federation feature provides ...
The new Federation feature provides ...
Avoid words that assume a specific level of understanding
Avoid words such as "just", "simply", "easy", "easily", or "simple". These words do not add value.
Do and Don't - Avoid insensitive words
Do
Don't
Include one command in ...
Include just one command in ...
Run the container ...
Simply run the container ...
You can remove ...
You can easily remove ...
These steps ...
These simple steps ...
EditorConfig file
The Kubernetes project maintains an EditorConfig file that sets common style preferences in text editors
such as VS Code. You can use this file if you want to ensure that your contributions are consistent with
the rest of the project. To view the file, refer to
.editorconfig in the repository root.
This guide shows you how to create, edit and share diagrams using the Mermaid
JavaScript library. Mermaid.js allows you to generate diagrams using a simple
markdown-like syntax inside Markdown files. You can also use Mermaid to
generate .svg or .png image files that you can add to your documentation.
The target audience for this guide is anybody wishing to learn about Mermaid
and/or how to create and add diagrams to Kubernetes documentation.
Figure 1 outlines the topics covered in this section.
flowchart LR
subgraph m[Mermaid.js]
direction TB
S[ ]-.-
C[build diagrams with markdown] -->
D[on-line live editor]
end
A[Why are diagrams useful?] --> m
m --> N[3 x methods for creating diagrams]
N --> T[Examples]
T --> X[Styling and captions]
X --> V[Tips]
classDef box fill:#fff,stroke:#000,stroke-width:1px,color:#000;
classDef spacewhite fill:#ffffff,stroke:#fff,stroke-width:0px,color:#000
class A,C,D,N,X,m,T,V box
class S spacewhite
%% you can hyperlink Mermaid diagram nodes to a URL using click statements
click A "https://mermaid-js.github.io/mermaid-live-editor/edit/#eyJjb2RlIjoiZmxvd2NoYXJ0IExSXG4gICAgc3ViZ3JhcGggbVtNZXJtYWlkLmpzXVxuICAgIGRpcmVjdGlvbiBUQlxuICAgICAgICBTWyBdLS4tXG4gICAgICAgIENbYnVpbGQ8YnI-ZGlhZ3JhbXM8YnI-d2l0aCBtYXJrZG93bl0gLS0-XG4gICAgICAgIERbb24tbGluZTxicj5saXZlIGVkaXRvcl1cbiAgICBlbmRcbiAgICBBW1doeSBhcmUgZGlhZ3JhbXM8YnI-dXNlZnVsP10gLS0-IG1cbiAgICBtIC0tPiBOWzMgeCBtZXRob2RzPGJyPmZvciBjcmVhdGluZzxicj5kaWFncmFtc11cbiAgICBOIC0tPiBUW0V4YW1wbGVzXVxuICAgIFQgLS0-IFhbU3R5bGluZzxicj5hbmQ8YnI-Y2FwdGlvbnNdXG4gICAgWCAtLT4gVltUaXBzXVxuICAgIFxuIFxuICAgIGNsYXNzRGVmIGJveCBmaWxsOiNmZmYsc3Ryb2tlOiMwMDAsc3Ryb2tlLXdpZHRoOjFweCxjb2xvcjojMDAwO1xuICAgIGNsYXNzRGVmIHNwYWNld2hpdGUgZmlsbDojZmZmZmZmLHN0cm9rZTojZmZmLHN0cm9rZS13aWR0aDowcHgsY29sb3I6IzAwMFxuICAgIGNsYXNzIEEsQyxELE4sWCxtLFQsViBib3hcbiAgICBjbGFzcyBTIHNwYWNld2hpdGUiLCJtZXJtYWlkIjoie1xuICBcInRoZW1lXCI6IFwiZGVmYXVsdFwiXG59IiwidXBkYXRlRWRpdG9yIjpmYWxzZSwiYXV0b1N5bmMiOnRydWUsInVwZGF0ZURpYWdyYW0iOnRydWV9" _blank
click C "https://mermaid-js.github.io/mermaid-live-editor/edit/#eyJjb2RlIjoiZmxvd2NoYXJ0IExSXG4gICAgc3ViZ3JhcGggbVtNZXJtYWlkLmpzXVxuICAgIGRpcmVjdGlvbiBUQlxuICAgICAgICBTWyBdLS4tXG4gICAgICAgIENbYnVpbGQ8YnI-ZGlhZ3JhbXM8YnI-d2l0aCBtYXJrZG93bl0gLS0-XG4gICAgICAgIERbb24tbGluZTxicj5saXZlIGVkaXRvcl1cbiAgICBlbmRcbiAgICBBW1doeSBhcmUgZGlhZ3JhbXM8YnI-dXNlZnVsP10gLS0-IG1cbiAgICBtIC0tPiBOWzMgeCBtZXRob2RzPGJyPmZvciBjcmVhdGluZzxicj5kaWFncmFtc11cbiAgICBOIC0tPiBUW0V4YW1wbGVzXVxuICAgIFQgLS0-IFhbU3R5bGluZzxicj5hbmQ8YnI-Y2FwdGlvbnNdXG4gICAgWCAtLT4gVltUaXBzXVxuICAgIFxuIFxuICAgIGNsYXNzRGVmIGJveCBmaWxsOiNmZmYsc3Ryb2tlOiMwMDAsc3Ryb2tlLXdpZHRoOjFweCxjb2xvcjojMDAwO1xuICAgIGNsYXNzRGVmIHNwYWNld2hpdGUgZmlsbDojZmZmZmZmLHN0cm9rZTojZmZmLHN0cm9rZS13aWR0aDowcHgsY29sb3I6IzAwMFxuICAgIGNsYXNzIEEsQyxELE4sWCxtLFQsViBib3hcbiAgICBjbGFzcyBTIHNwYWNld2hpdGUiLCJtZXJtYWlkIjoie1xuICBcInRoZW1lXCI6IFwiZGVmYXVsdFwiXG59IiwidXBkYXRlRWRpdG9yIjpmYWxzZSwiYXV0b1N5bmMiOnRydWUsInVwZGF0ZURpYWdyYW0iOnRydWV9" _blank
click D "https://mermaid-js.github.io/mermaid-live-editor/edit/#eyJjb2RlIjoiZmxvd2NoYXJ0IExSXG4gICAgc3ViZ3JhcGggbVtNZXJtYWlkLmpzXVxuICAgIGRpcmVjdGlvbiBUQlxuICAgICAgICBTWyBdLS4tXG4gICAgICAgIENbYnVpbGQ8YnI-ZGlhZ3JhbXM8YnI-d2l0aCBtYXJrZG93bl0gLS0-XG4gICAgICAgIERbb24tbGluZTxicj5saXZlIGVkaXRvcl1cbiAgICBlbmRcbiAgICBBW1doeSBhcmUgZGlhZ3JhbXM8YnI-dXNlZnVsP10gLS0-IG1cbiAgICBtIC0tPiBOWzMgeCBtZXRob2RzPGJyPmZvciBjcmVhdGluZzxicj5kaWFncmFtc11cbiAgICBOIC0tPiBUW0V4YW1wbGVzXVxuICAgIFQgLS0-IFhbU3R5bGluZzxicj5hbmQ8YnI-Y2FwdGlvbnNdXG4gICAgWCAtLT4gVltUaXBzXVxuICAgIFxuIFxuICAgIGNsYXNzRGVmIGJveCBmaWxsOiNmZmYsc3Ryb2tlOiMwMDAsc3Ryb2tlLXdpZHRoOjFweCxjb2xvcjojMDAwO1xuICAgIGNsYXNzRGVmIHNwYWNld2hpdGUgZmlsbDojZmZmZmZmLHN0cm9rZTojZmZmLHN0cm9rZS13aWR0aDowcHgsY29sb3I6IzAwMFxuICAgIGNsYXNzIEEsQyxELE4sWCxtLFQsViBib3hcbiAgICBjbGFzcyBTIHNwYWNld2hpdGUiLCJtZXJtYWlkIjoie1xuICBcInRoZW1lXCI6IFwiZGVmYXVsdFwiXG59IiwidXBkYXRlRWRpdG9yIjpmYWxzZSwiYXV0b1N5bmMiOnRydWUsInVwZGF0ZURpYWdyYW0iOnRydWV9" _blank
click N "https://mermaid-js.github.io/mermaid-live-editor/edit/#eyJjb2RlIjoiZmxvd2NoYXJ0IExSXG4gICAgc3ViZ3JhcGggbVtNZXJtYWlkLmpzXVxuICAgIGRpcmVjdGlvbiBUQlxuICAgICAgICBTWyBdLS4tXG4gICAgICAgIENbYnVpbGQ8YnI-ZGlhZ3JhbXM8YnI-d2l0aCBtYXJrZG93bl0gLS0-XG4gICAgICAgIERbb24tbGluZTxicj5saXZlIGVkaXRvcl1cbiAgICBlbmRcbiAgICBBW1doeSBhcmUgZGlhZ3JhbXM8YnI-dXNlZnVsP10gLS0-IG1cbiAgICBtIC0tPiBOWzMgeCBtZXRob2RzPGJyPmZvciBjcmVhdGluZzxicj5kaWFncmFtc11cbiAgICBOIC0tPiBUW0V4YW1wbGVzXVxuICAgIFQgLS0-IFhbU3R5bGluZzxicj5hbmQ8YnI-Y2FwdGlvbnNdXG4gICAgWCAtLT4gVltUaXBzXVxuICAgIFxuIFxuICAgIGNsYXNzRGVmIGJveCBmaWxsOiNmZmYsc3Ryb2tlOiMwMDAsc3Ryb2tlLXdpZHRoOjFweCxjb2xvcjojMDAwO1xuICAgIGNsYXNzRGVmIHNwYWNld2hpdGUgZmlsbDojZmZmZmZmLHN0cm9rZTojZmZmLHN0cm9rZS13aWR0aDowcHgsY29sb3I6IzAwMFxuICAgIGNsYXNzIEEsQyxELE4sWCxtLFQsViBib3hcbiAgICBjbGFzcyBTIHNwYWNld2hpdGUiLCJtZXJtYWlkIjoie1xuICBcInRoZW1lXCI6IFwiZGVmYXVsdFwiXG59IiwidXBkYXRlRWRpdG9yIjpmYWxzZSwiYXV0b1N5bmMiOnRydWUsInVwZGF0ZURpYWdyYW0iOnRydWV9" _blank
click T "https://mermaid-js.github.io/mermaid-live-editor/edit/#eyJjb2RlIjoiZmxvd2NoYXJ0IExSXG4gICAgc3ViZ3JhcGggbVtNZXJtYWlkLmpzXVxuICAgIGRpcmVjdGlvbiBUQlxuICAgICAgICBTWyBdLS4tXG4gICAgICAgIENbYnVpbGQ8YnI-ZGlhZ3JhbXM8YnI-d2l0aCBtYXJrZG93bl0gLS0-XG4gICAgICAgIERbb24tbGluZTxicj5saXZlIGVkaXRvcl1cbiAgICBlbmRcbiAgICBBW1doeSBhcmUgZGlhZ3JhbXM8YnI-dXNlZnVsP10gLS0-IG1cbiAgICBtIC0tPiBOWzMgeCBtZXRob2RzPGJyPmZvciBjcmVhdGluZzxicj5kaWFncmFtc11cbiAgICBOIC0tPiBUW0V4YW1wbGVzXVxuICAgIFQgLS0-IFhbU3R5bGluZzxicj5hbmQ8YnI-Y2FwdGlvbnNdXG4gICAgWCAtLT4gVltUaXBzXVxuICAgIFxuIFxuICAgIGNsYXNzRGVmIGJveCBmaWxsOiNmZmYsc3Ryb2tlOiMwMDAsc3Ryb2tlLXdpZHRoOjFweCxjb2xvcjojMDAwO1xuICAgIGNsYXNzRGVmIHNwYWNld2hpdGUgZmlsbDojZmZmZmZmLHN0cm9rZTojZmZmLHN0cm9rZS13aWR0aDowcHgsY29sb3I6IzAwMFxuICAgIGNsYXNzIEEsQyxELE4sWCxtLFQsViBib3hcbiAgICBjbGFzcyBTIHNwYWNld2hpdGUiLCJtZXJtYWlkIjoie1xuICBcInRoZW1lXCI6IFwiZGVmYXVsdFwiXG59IiwidXBkYXRlRWRpdG9yIjpmYWxzZSwiYXV0b1N5bmMiOnRydWUsInVwZGF0ZURpYWdyYW0iOnRydWV9" _blank
click X "https://mermaid-js.github.io/mermaid-live-editor/edit/#eyJjb2RlIjoiZmxvd2NoYXJ0IExSXG4gICAgc3ViZ3JhcGggbVtNZXJtYWlkLmpzXVxuICAgIGRpcmVjdGlvbiBUQlxuICAgICAgICBTWyBdLS4tXG4gICAgICAgIENbYnVpbGQ8YnI-ZGlhZ3JhbXM8YnI-d2l0aCBtYXJrZG93bl0gLS0-XG4gICAgICAgIERbb24tbGluZTxicj5saXZlIGVkaXRvcl1cbiAgICBlbmRcbiAgICBBW1doeSBhcmUgZGlhZ3JhbXM8YnI-dXNlZnVsP10gLS0-IG1cbiAgICBtIC0tPiBOWzMgeCBtZXRob2RzPGJyPmZvciBjcmVhdGluZzxicj5kaWFncmFtc11cbiAgICBOIC0tPiBUW0V4YW1wbGVzXVxuICAgIFQgLS0-IFhbU3R5bGluZzxicj5hbmQ8YnI-Y2FwdGlvbnNdXG4gICAgWCAtLT4gVltUaXBzXVxuICAgIFxuIFxuICAgIGNsYXNzRGVmIGJveCBmaWxsOiNmZmYsc3Ryb2tlOiMwMDAsc3Ryb2tlLXdpZHRoOjFweCxjb2xvcjojMDAwO1xuICAgIGNsYXNzRGVmIHNwYWNld2hpdGUgZmlsbDojZmZmZmZmLHN0cm9rZTojZmZmLHN0cm9rZS13aWR0aDowcHgsY29sb3I6IzAwMFxuICAgIGNsYXNzIEEsQyxELE4sWCxtLFQsViBib3hcbiAgICBjbGFzcyBTIHNwYWNld2hpdGUiLCJtZXJtYWlkIjoie1xuICBcInRoZW1lXCI6IFwiZGVmYXVsdFwiXG59IiwidXBkYXRlRWRpdG9yIjpmYWxzZSwiYXV0b1N5bmMiOnRydWUsInVwZGF0ZURpYWdyYW0iOnRydWV9" _blank
click V "https://mermaid-js.github.io/mermaid-live-editor/edit/#eyJjb2RlIjoiZmxvd2NoYXJ0IExSXG4gICAgc3ViZ3JhcGggbVtNZXJtYWlkLmpzXVxuICAgIGRpcmVjdGlvbiBUQlxuICAgICAgICBTWyBdLS4tXG4gICAgICAgIENbYnVpbGQ8YnI-ZGlhZ3JhbXM8YnI-d2l0aCBtYXJrZG93bl0gLS0-XG4gICAgICAgIERbb24tbGluZTxicj5saXZlIGVkaXRvcl1cbiAgICBlbmRcbiAgICBBW1doeSBhcmUgZGlhZ3JhbXM8YnI-dXNlZnVsP10gLS0-IG1cbiAgICBtIC0tPiBOWzMgeCBtZXRob2RzPGJyPmZvciBjcmVhdGluZzxicj5kaWFncmFtc11cbiAgICBOIC0tPiBUW0V4YW1wbGVzXVxuICAgIFQgLS0-IFhbU3R5bGluZzxicj5hbmQ8YnI-Y2FwdGlvbnNdXG4gICAgWCAtLT4gVltUaXBzXVxuICAgIFxuIFxuICAgIGNsYXNzRGVmIGJveCBmaWxsOiNmZmYsc3Ryb2tlOiMwMDAsc3Ryb2tlLXdpZHRoOjFweCxjb2xvcjojMDAwO1xuICAgIGNsYXNzRGVmIHNwYWNld2hpdGUgZmlsbDojZmZmZmZmLHN0cm9rZTojZmZmLHN0cm9rZS13aWR0aDowcHgsY29sb3I6IzAwMFxuICAgIGNsYXNzIEEsQyxELE4sWCxtLFQsViBib3hcbiAgICBjbGFzcyBTIHNwYWNld2hpdGUiLCJtZXJtYWlkIjoie1xuICBcInRoZW1lXCI6IFwiZGVmYXVsdFwiXG59IiwidXBkYXRlRWRpdG9yIjpmYWxzZSwiYXV0b1N5bmMiOnRydWUsInVwZGF0ZURpYWdyYW0iOnRydWV9" _blank
Figure 1. Topics covered in this section.
All you need to begin working with Mermaid is the following:
You can click on each diagram in this section to view the code and rendered
diagram in the Mermaid live editor.
Why you should use diagrams in documentation
Diagrams improve documentation clarity and comprehension. There are advantages for both the user and the contributor.
The user benefits include:
Friendly landing spot. A detailed text-only greeting page could
intimidate users, in particular, first-time Kubernetes users.
Faster grasp of concepts. A diagram can help users understand the key
points of a complex topic. Your diagram can serve as a visual learning guide
to dive into the topic details.
Better retention. For some, it is easier to recall pictures rather than text.
The contributor benefits include:
Assist in developing the structure and content of your contribution. For
example, you can start with a simple diagram covering the high-level points
and then dive into details.
Expand and grow the user community. Easily consumed documentation
augmented with diagrams attracts new users who might previously have been
reluctant to engage due to perceived complexities.
You should consider your target audience. In addition to experienced K8s
users, you will have many who are new to Kubernetes. Even a simple diagram can
assist new users in absorbing Kubernetes concepts. They become emboldened and
more confident to further explore Kubernetes and the documentation.
Mermaid
Mermaid is an open source
JavaScript library that allows you to create, edit and easily share diagrams
using a simple, markdown-like syntax configured inline in Markdown files.
The following lists features of Mermaid:
Simple code syntax.
Includes a web-based tool allowing you to code and preview your diagrams.
Supports multiple formats including flowchart, state and sequence.
Easy collaboration with colleagues by sharing a per-diagram URL.
Broad selection of shapes, lines, themes and styling.
The following lists advantages of using Mermaid:
No need for separate, non-Mermaid diagram tools.
Adheres to existing PR workflow. You can think of Mermaid code as just
Markdown text included in your PR.
Simple tool builds simple diagrams. You don't want to get bogged down
(re)crafting an overly complex and detailed picture. Keep it simple!
Mermaid provides a simple, open and transparent method for the SIG communities
to add, edit and collaborate on diagrams for new or existing documentation.
Note:
You can still use Mermaid to create/edit diagrams even if it's not supported
in your environment. This method is called Mermaid+SVG and is explained
below.
Live editor
The Mermaid live editor is
a web-based tool that enables you to create, edit and review diagrams.
The following lists live editor functions:
Displays Mermaid code and rendered diagram.
Generates a URL for each saved diagram. The URL is displayed in the URL
field of your browser. You can share the URL with colleagues who can access
and modify the diagram.
Option to download .svg or .png files.
Note:
The live editor is the easiest and fastest way to create and edit Mermaid diagrams.
Methods for creating diagrams
Figure 2 outlines the three methods to generate and add diagrams.
graph TB
A[Contributor]
B[Inline
Mermaid code added to .md file]
C[Mermaid+SVG
Add mermaid-generated svg file to .md file]
D[External tool
Add external-tool- generated svg file to .md file]
A --> B
A --> C
A --> D
classDef box fill:#fff,stroke:#000,stroke-width:1px,color:#000;
class A,B,C,D box
%% you can hyperlink Mermaid diagram nodes to a URL using click statements
click A "https://mermaid-js.github.io/mermaid-live-editor/edit/#eyJjb2RlIjoiZ3JhcGggVEJcbiAgICBBW0NvbnRyaWJ1dG9yXVxuICAgIEJbSW5saW5lPGJyPjxicj5NZXJtYWlkIGNvZGU8YnI-YWRkZWQgdG8gLm1kIGZpbGVdXG4gICAgQ1tNZXJtYWlkK1NWRzxicj48YnI-QWRkIG1lcm1haWQtZ2VuZXJhdGVkPGJyPnN2ZyBmaWxlIHRvIC5tZCBmaWxlXVxuICAgIERbRXh0ZXJuYWwgdG9vbDxicj48YnI-QWRkIGV4dGVybmFsLXRvb2wtPGJyPmdlbmVyYXRlZCBzdmcgZmlsZTxicj50byAubWQgZmlsZV1cblxuICAgIEEgLS0-IEJcbiAgICBBIC0tPiBDXG4gICAgQSAtLT4gRFxuXG4gICAgY2xhc3NEZWYgYm94IGZpbGw6I2ZmZixzdHJva2U6IzAwMCxzdHJva2Utd2lkdGg6MXB4LGNvbG9yOiMwMDA7XG4gICAgY2xhc3MgQSxCLEMsRCBib3giLCJtZXJtYWlkIjoie1xuICBcInRoZW1lXCI6IFwiZGVmYXVsdFwiXG59IiwidXBkYXRlRWRpdG9yIjpmYWxzZSwiYXV0b1N5bmMiOnRydWUsInVwZGF0ZURpYWdyYW0iOmZhbHNlfQ" _blank
click B "https://mermaid-js.github.io/mermaid-live-editor/edit/#eyJjb2RlIjoiZ3JhcGggVEJcbiAgICBBW0NvbnRyaWJ1dG9yXVxuICAgIEJbSW5saW5lPGJyPjxicj5NZXJtYWlkIGNvZGU8YnI-YWRkZWQgdG8gLm1kIGZpbGVdXG4gICAgQ1tNZXJtYWlkK1NWRzxicj48YnI-QWRkIG1lcm1haWQtZ2VuZXJhdGVkPGJyPnN2ZyBmaWxlIHRvIC5tZCBmaWxlXVxuICAgIERbRXh0ZXJuYWwgdG9vbDxicj48YnI-QWRkIGV4dGVybmFsLXRvb2wtPGJyPmdlbmVyYXRlZCBzdmcgZmlsZTxicj50byAubWQgZmlsZV1cblxuICAgIEEgLS0-IEJcbiAgICBBIC0tPiBDXG4gICAgQSAtLT4gRFxuXG4gICAgY2xhc3NEZWYgYm94IGZpbGw6I2ZmZixzdHJva2U6IzAwMCxzdHJva2Utd2lkdGg6MXB4LGNvbG9yOiMwMDA7XG4gICAgY2xhc3MgQSxCLEMsRCBib3giLCJtZXJtYWlkIjoie1xuICBcInRoZW1lXCI6IFwiZGVmYXVsdFwiXG59IiwidXBkYXRlRWRpdG9yIjpmYWxzZSwiYXV0b1N5bmMiOnRydWUsInVwZGF0ZURpYWdyYW0iOmZhbHNlfQ" _blank
click C "https://mermaid-js.github.io/mermaid-live-editor/edit/#eyJjb2RlIjoiZ3JhcGggVEJcbiAgICBBW0NvbnRyaWJ1dG9yXVxuICAgIEJbSW5saW5lPGJyPjxicj5NZXJtYWlkIGNvZGU8YnI-YWRkZWQgdG8gLm1kIGZpbGVdXG4gICAgQ1tNZXJtYWlkK1NWRzxicj48YnI-QWRkIG1lcm1haWQtZ2VuZXJhdGVkPGJyPnN2ZyBmaWxlIHRvIC5tZCBmaWxlXVxuICAgIERbRXh0ZXJuYWwgdG9vbDxicj48YnI-QWRkIGV4dGVybmFsLXRvb2wtPGJyPmdlbmVyYXRlZCBzdmcgZmlsZTxicj50byAubWQgZmlsZV1cblxuICAgIEEgLS0-IEJcbiAgICBBIC0tPiBDXG4gICAgQSAtLT4gRFxuXG4gICAgY2xhc3NEZWYgYm94IGZpbGw6I2ZmZixzdHJva2U6IzAwMCxzdHJva2Utd2lkdGg6MXB4LGNvbG9yOiMwMDA7XG4gICAgY2xhc3MgQSxCLEMsRCBib3giLCJtZXJtYWlkIjoie1xuICBcInRoZW1lXCI6IFwiZGVmYXVsdFwiXG59IiwidXBkYXRlRWRpdG9yIjpmYWxzZSwiYXV0b1N5bmMiOnRydWUsInVwZGF0ZURpYWdyYW0iOmZhbHNlfQ" _blank
click D "https://mermaid-js.github.io/mermaid-live-editor/edit/#eyJjb2RlIjoiZ3JhcGggVEJcbiAgICBBW0NvbnRyaWJ1dG9yXVxuICAgIEJbSW5saW5lPGJyPjxicj5NZXJtYWlkIGNvZGU8YnI-YWRkZWQgdG8gLm1kIGZpbGVdXG4gICAgQ1tNZXJtYWlkK1NWRzxicj48YnI-QWRkIG1lcm1haWQtZ2VuZXJhdGVkPGJyPnN2ZyBmaWxlIHRvIC5tZCBmaWxlXVxuICAgIERbRXh0ZXJuYWwgdG9vbDxicj48YnI-QWRkIGV4dGVybmFsLXRvb2wtPGJyPmdlbmVyYXRlZCBzdmcgZmlsZTxicj50byAubWQgZmlsZV1cblxuICAgIEEgLS0-IEJcbiAgICBBIC0tPiBDXG4gICAgQSAtLT4gRFxuXG4gICAgY2xhc3NEZWYgYm94IGZpbGw6I2ZmZixzdHJva2U6IzAwMCxzdHJva2Utd2lkdGg6MXB4LGNvbG9yOiMwMDA7XG4gICAgY2xhc3MgQSxCLEMsRCBib3giLCJtZXJtYWlkIjoie1xuICBcInRoZW1lXCI6IFwiZGVmYXVsdFwiXG59IiwidXBkYXRlRWRpdG9yIjpmYWxzZSwiYXV0b1N5bmMiOnRydWUsInVwZGF0ZURpYWdyYW0iOmZhbHNlfQ" _blank
Figure 2. Methods to create diagrams.
Inline
Figure 3 outlines the steps to follow for adding a diagram using the Inline
method.
graph LR
A[1. Use live editor to create/edit diagram] -->
B[2. Store diagram URL somewhere] -->
C[3. Copy Mermaid code to page markdown file] -->
D[4. Add caption]
classDef box fill:#fff,stroke:#000,stroke-width:1px,color:#000;
class A,B,C,D box
%% you can hyperlink Mermaid diagram nodes to a URL using click statements
click A "https://mermaid-js.github.io/mermaid-live-editor/edit/#eyJjb2RlIjoiZ3JhcGggTFJcbiAgICBBWzEuIFVzZSBsaXZlIGVkaXRvcjxicj4gdG8gY3JlYXRlL2VkaXQ8YnI-ZGlhZ3JhbV0gLS0-XG4gICAgQlsyLiBTdG9yZSBkaWFncmFtPGJyPlVSTCBzb21ld2hlcmVdIC0tPlxuICAgIENbMy4gQ29weSBNZXJtYWlkIGNvZGU8YnI-dG8gcGFnZSBtYXJrZG93biBmaWxlXSAtLT5cbiAgICBEWzQuIEFkZCBjYXB0aW9uXVxuIFxuXG4gICAgY2xhc3NEZWYgYm94IGZpbGw6I2ZmZixzdHJva2U6IzAwMCxzdHJva2Utd2lkdGg6MXB4LGNvbG9yOiMwMDA7XG4gICAgY2xhc3MgQSxCLEMsRCBib3hcbiAgICAiLCJtZXJtYWlkIjoie1xuICBcInRoZW1lXCI6IFwiZGVmYXVsdFwiXG59IiwidXBkYXRlRWRpdG9yIjpmYWxzZSwiYXV0b1N5bmMiOnRydWUsInVwZGF0ZURpYWdyYW0iOmZhbHNlfQ" _blank
click B "https://mermaid-js.github.io/mermaid-live-editor/edit/#eyJjb2RlIjoiZ3JhcGggTFJcbiAgICBBWzEuIFVzZSBsaXZlIGVkaXRvcjxicj4gdG8gY3JlYXRlL2VkaXQ8YnI-ZGlhZ3JhbV0gLS0-XG4gICAgQlsyLiBTdG9yZSBkaWFncmFtPGJyPlVSTCBzb21ld2hlcmVdIC0tPlxuICAgIENbMy4gQ29weSBNZXJtYWlkIGNvZGU8YnI-dG8gcGFnZSBtYXJrZG93biBmaWxlXSAtLT5cbiAgICBEWzQuIEFkZCBjYXB0aW9uXVxuIFxuXG4gICAgY2xhc3NEZWYgYm94IGZpbGw6I2ZmZixzdHJva2U6IzAwMCxzdHJva2Utd2lkdGg6MXB4LGNvbG9yOiMwMDA7XG4gICAgY2xhc3MgQSxCLEMsRCBib3hcbiAgICAiLCJtZXJtYWlkIjoie1xuICBcInRoZW1lXCI6IFwiZGVmYXVsdFwiXG59IiwidXBkYXRlRWRpdG9yIjpmYWxzZSwiYXV0b1N5bmMiOnRydWUsInVwZGF0ZURpYWdyYW0iOmZhbHNlfQ" _blank
click C "https://mermaid-js.github.io/mermaid-live-editor/edit/#eyJjb2RlIjoiZ3JhcGggTFJcbiAgICBBWzEuIFVzZSBsaXZlIGVkaXRvcjxicj4gdG8gY3JlYXRlL2VkaXQ8YnI-ZGlhZ3JhbV0gLS0-XG4gICAgQlsyLiBTdG9yZSBkaWFncmFtPGJyPlVSTCBzb21ld2hlcmVdIC0tPlxuICAgIENbMy4gQ29weSBNZXJtYWlkIGNvZGU8YnI-dG8gcGFnZSBtYXJrZG93biBmaWxlXSAtLT5cbiAgICBEWzQuIEFkZCBjYXB0aW9uXVxuIFxuXG4gICAgY2xhc3NEZWYgYm94IGZpbGw6I2ZmZixzdHJva2U6IzAwMCxzdHJva2Utd2lkdGg6MXB4LGNvbG9yOiMwMDA7XG4gICAgY2xhc3MgQSxCLEMsRCBib3hcbiAgICAiLCJtZXJtYWlkIjoie1xuICBcInRoZW1lXCI6IFwiZGVmYXVsdFwiXG59IiwidXBkYXRlRWRpdG9yIjpmYWxzZSwiYXV0b1N5bmMiOnRydWUsInVwZGF0ZURpYWdyYW0iOmZhbHNlfQ" _blank
click D "https://mermaid-js.github.io/mermaid-live-editor/edit/#eyJjb2RlIjoiZ3JhcGggTFJcbiAgICBBWzEuIFVzZSBsaXZlIGVkaXRvcjxicj4gdG8gY3JlYXRlL2VkaXQ8YnI-ZGlhZ3JhbV0gLS0-XG4gICAgQlsyLiBTdG9yZSBkaWFncmFtPGJyPlVSTCBzb21ld2hlcmVdIC0tPlxuICAgIENbMy4gQ29weSBNZXJtYWlkIGNvZGU8YnI-dG8gcGFnZSBtYXJrZG93biBmaWxlXSAtLT5cbiAgICBEWzQuIEFkZCBjYXB0aW9uXVxuIFxuXG4gICAgY2xhc3NEZWYgYm94IGZpbGw6I2ZmZixzdHJva2U6IzAwMCxzdHJva2Utd2lkdGg6MXB4LGNvbG9yOiMwMDA7XG4gICAgY2xhc3MgQSxCLEMsRCBib3hcbiAgICAiLCJtZXJtYWlkIjoie1xuICBcInRoZW1lXCI6IFwiZGVmYXVsdFwiXG59IiwidXBkYXRlRWRpdG9yIjpmYWxzZSwiYXV0b1N5bmMiOnRydWUsInVwZGF0ZURpYWdyYW0iOmZhbHNlfQ" _blank
Figure 3. Inline Method steps.
The following lists the steps you should follow for adding a diagram using the Inline method:
Create your diagram using the live editor.
Store the diagram URL somewhere for later access.
Copy the mermaid code to the location in your .md file where you want the diagram to appear.
Add a caption below the diagram using Markdown text.
A Hugo build runs the Mermaid code and turns it into a diagram.
Note:
You may find keeping track of diagram URLs is cumbersome. If so, make a note
in the .md file that the Mermaid code is self-documenting. Contributors can
copy the Mermaid code to and from the live editor for diagram edits.
Here is a sample code snippet contained in an .md file:
---
title: My PR
---
Figure 17 shows a simple A to B process.
some markdown text
...
{{< mermaid >}}
    graph TB
    A --> B
{{< /mermaid >}}

Figure 17. A to B
more text
Note:
You must include the Hugo Mermaid shortcode
tags at the start and end of the Mermaid code block. You should add a diagram
caption below the diagram.
The following lists advantages of the Inline method:
Live editor tool.
Easy to copy Mermaid code to and from the live editor and your .md file.
No need for separate .svg image file handling.
Content text, diagram code and diagram caption contained in the same .md file.
You should use the local
and Netlify previews to verify the diagram is properly rendered.
Caution:
The Mermaid live editor feature set may not support the kubernetes/website Mermaid feature set.
And please, note that contributors can mention kubernetes/website as k/website.
You might see a syntax error or a blank screen after the Hugo build.
If that is the case, consider using the Mermaid+SVG method.
Mermaid+SVG
Figure 4 outlines the steps to follow for adding a diagram using the Mermaid+SVG method.
flowchart LR
A[1. Use live editor to create/edit diagram]
B[2. Store diagram URL somewhere]
C[3. Generate .svg file and download to images/ folder]
subgraph w[ ]
direction TB
D[4. Use figure shortcode to reference .svg file in page .md file] -->
E[5. Add caption]
end
A --> B
B --> C
C --> w
classDef box fill:#fff,stroke:#000,stroke-width:1px,color:#000;
class A,B,C,D,E,w box
click A "https://mermaid-js.github.io/mermaid-live-editor/edit/#eyJjb2RlIjoiZmxvd2NoYXJ0IExSXG4gICAgQVsxLiBVc2UgbGl2ZSBlZGl0b3I8YnI-IHRvIGNyZWF0ZS9lZGl0PGJyPmRpYWdyYW1dXG4gICAgQlsyLiBTdG9yZSBkaWFncmFtPGJyPlVSTCBzb21ld2hlcmVdXG4gICAgQ1szLiBHZW5lcmF0ZSAuc3ZnIGZpbGU8YnI-YW5kIGRvd25sb2FkIHRvPGJyPmltYWdlcy8gZm9sZGVyXVxuICAgIHN1YmdyYXBoIHdbIF1cbiAgICBkaXJlY3Rpb24gVEJcbiAgICBEWzQuIFVzZSBmaWd1cmUgc2hvcnRjb2RlPGJyPnRvIHJlZmVyZW5jZSAuc3ZnPGJyPmZpbGUgaW4gcGFnZTxicj4ubWQgZmlsZV0gLS0-XG4gICAgRVs1LiBBZGQgY2FwdGlvbl1cbiAgICBlbmRcbkEgLS0-IEJcbkIgLS0-IENcbkMgLS0-IHdcblxuICAgIGNsYXNzRGVmIGJveCBmaWxsOiNmZmYsc3Ryb2tlOiMwMDAsc3Ryb2tlLXdpZHRoOjFweCxjb2xvcjojMDAwO1xuICAgIGNsYXNzIEEsQixDLEQsRSx3IGJveFxuICAgICIsIm1lcm1haWQiOiJ7XG4gIFwidGhlbWVcIjogXCJkZWZhdWx0XCJcbn0iLCJ1cGRhdGVFZGl0b3IiOmZhbHNlLCJhdXRvU3luYyI6dHJ1ZSwidXBkYXRlRGlhZ3JhbSI6dHJ1ZX0" _blank
click B "https://mermaid-js.github.io/mermaid-live-editor/edit/#eyJjb2RlIjoiZmxvd2NoYXJ0IExSXG4gICAgQVsxLiBVc2UgbGl2ZSBlZGl0b3I8YnI-IHRvIGNyZWF0ZS9lZGl0PGJyPmRpYWdyYW1dXG4gICAgQlsyLiBTdG9yZSBkaWFncmFtPGJyPlVSTCBzb21ld2hlcmVdXG4gICAgQ1szLiBHZW5lcmF0ZSAuc3ZnIGZpbGU8YnI-YW5kIGRvd25sb2FkIHRvPGJyPmltYWdlcy8gZm9sZGVyXVxuICAgIHN1YmdyYXBoIHdbIF1cbiAgICBkaXJlY3Rpb24gVEJcbiAgICBEWzQuIFVzZSBmaWd1cmUgc2hvcnRjb2RlPGJyPnRvIHJlZmVyZW5jZSAuc3ZnPGJyPmZpbGUgaW4gcGFnZTxicj4ubWQgZmlsZV0gLS0-XG4gICAgRVs1LiBBZGQgY2FwdGlvbl1cbiAgICBlbmRcbkEgLS0-IEJcbkIgLS0-IENcbkMgLS0-IHdcblxuICAgIGNsYXNzRGVmIGJveCBmaWxsOiNmZmYsc3Ryb2tlOiMwMDAsc3Ryb2tlLXdpZHRoOjFweCxjb2xvcjojMDAwO1xuICAgIGNsYXNzIEEsQixDLEQsRSx3IGJveFxuICAgICIsIm1lcm1haWQiOiJ7XG4gIFwidGhlbWVcIjogXCJkZWZhdWx0XCJcbn0iLCJ1cGRhdGVFZGl0b3IiOmZhbHNlLCJhdXRvU3luYyI6dHJ1ZSwidXBkYXRlRGlhZ3JhbSI6dHJ1ZX0" _blank
click C "https://mermaid-js.github.io/mermaid-live-editor/edit/#eyJjb2RlIjoiZmxvd2NoYXJ0IExSXG4gICAgQVsxLiBVc2UgbGl2ZSBlZGl0b3I8YnI-IHRvIGNyZWF0ZS9lZGl0PGJyPmRpYWdyYW1dXG4gICAgQlsyLiBTdG9yZSBkaWFncmFtPGJyPlVSTCBzb21ld2hlcmVdXG4gICAgQ1szLiBHZW5lcmF0ZSAuc3ZnIGZpbGU8YnI-YW5kIGRvd25sb2FkIHRvPGJyPmltYWdlcy8gZm9sZGVyXVxuICAgIHN1YmdyYXBoIHdbIF1cbiAgICBkaXJlY3Rpb24gVEJcbiAgICBEWzQuIFVzZSBmaWd1cmUgc2hvcnRjb2RlPGJyPnRvIHJlZmVyZW5jZSAuc3ZnPGJyPmZpbGUgaW4gcGFnZTxicj4ubWQgZmlsZV0gLS0-XG4gICAgRVs1LiBBZGQgY2FwdGlvbl1cbiAgICBlbmRcbkEgLS0-IEJcbkIgLS0-IENcbkMgLS0-IHdcblxuICAgIGNsYXNzRGVmIGJveCBmaWxsOiNmZmYsc3Ryb2tlOiMwMDAsc3Ryb2tlLXdpZHRoOjFweCxjb2xvcjojMDAwO1xuICAgIGNsYXNzIEEsQixDLEQsRSx3IGJveFxuICAgICIsIm1lcm1haWQiOiJ7XG4gIFwidGhlbWVcIjogXCJkZWZhdWx0XCJcbn0iLCJ1cGRhdGVFZGl0b3IiOmZhbHNlLCJhdXRvU3luYyI6dHJ1ZSwidXBkYXRlRGlhZ3JhbSI6dHJ1ZX0" _blank
click D "https://mermaid-js.github.io/mermaid-live-editor/edit/#eyJjb2RlIjoiZmxvd2NoYXJ0IExSXG4gICAgQVsxLiBVc2UgbGl2ZSBlZGl0b3I8YnI-IHRvIGNyZWF0ZS9lZGl0PGJyPmRpYWdyYW1dXG4gICAgQlsyLiBTdG9yZSBkaWFncmFtPGJyPlVSTCBzb21ld2hlcmVdXG4gICAgQ1szLiBHZW5lcmF0ZSAuc3ZnIGZpbGU8YnI-YW5kIGRvd25sb2FkIHRvPGJyPmltYWdlcy8gZm9sZGVyXVxuICAgIHN1YmdyYXBoIHdbIF1cbiAgICBkaXJlY3Rpb24gVEJcbiAgICBEWzQuIFVzZSBmaWd1cmUgc2hvcnRjb2RlPGJyPnRvIHJlZmVyZW5jZSAuc3ZnPGJyPmZpbGUgaW4gcGFnZTxicj4ubWQgZmlsZV0gLS0-XG4gICAgRVs1LiBBZGQgY2FwdGlvbl1cbiAgICBlbmRcbkEgLS0-IEJcbkIgLS0-IENcbkMgLS0-IHdcblxuICAgIGNsYXNzRGVmIGJveCBmaWxsOiNmZmYsc3Ryb2tlOiMwMDAsc3Ryb2tlLXdpZHRoOjFweCxjb2xvcjojMDAwO1xuICAgIGNsYXNzIEEsQixDLEQsRSx3IGJveFxuICAgICIsIm1lcm1haWQiOiJ7XG4gIFwidGhlbWVcIjogXCJkZWZhdWx0XCJcbn0iLCJ1cGRhdGVFZGl0b3IiOmZhbHNlLCJhdXRvU3luYyI6dHJ1ZSwidXBkYXRlRGlhZ3JhbSI6dHJ1ZX0" _blank
click E "https://mermaid-js.github.io/mermaid-live-editor/edit/#eyJjb2RlIjoiZmxvd2NoYXJ0IExSXG4gICAgQVsxLiBVc2UgbGl2ZSBlZGl0b3I8YnI-IHRvIGNyZWF0ZS9lZGl0PGJyPmRpYWdyYW1dXG4gICAgQlsyLiBTdG9yZSBkaWFncmFtPGJyPlVSTCBzb21ld2hlcmVdXG4gICAgQ1szLiBHZW5lcmF0ZSAuc3ZnIGZpbGU8YnI-YW5kIGRvd25sb2FkIHRvPGJyPmltYWdlcy8gZm9sZGVyXVxuICAgIHN1YmdyYXBoIHdbIF1cbiAgICBkaXJlY3Rpb24gVEJcbiAgICBEWzQuIFVzZSBmaWd1cmUgc2hvcnRjb2RlPGJyPnRvIHJlZmVyZW5jZSAuc3ZnPGJyPmZpbGUgaW4gcGFnZTxicj4ubWQgZmlsZV0gLS0-XG4gICAgRVs1LiBBZGQgY2FwdGlvbl1cbiAgICBlbmRcbkEgLS0-IEJcbkIgLS0-IENcbkMgLS0-IHdcblxuICAgIGNsYXNzRGVmIGJveCBmaWxsOiNmZmYsc3Ryb2tlOiMwMDAsc3Ryb2tlLXdpZHRoOjFweCxjb2xvcjojMDAwO1xuICAgIGNsYXNzIEEsQixDLEQsRSx3IGJveFxuICAgICIsIm1lcm1haWQiOiJ7XG4gIFwidGhlbWVcIjogXCJkZWZhdWx0XCJcbn0iLCJ1cGRhdGVFZGl0b3IiOmZhbHNlLCJhdXRvU3luYyI6dHJ1ZSwidXBkYXRlRGlhZ3JhbSI6dHJ1ZX0" _blank
Figure 4. Mermaid+SVG method steps.
The following lists the steps you should follow for adding a diagram using the Mermaid+SVG method:
Create your diagram using the live editor.
Store the diagram URL somewhere for later access.
Generate an .svg image file for the diagram and download it to the appropriate images/ folder.
Use the {{< figure >}} shortcode to reference the diagram in the .md file.
Add a caption using the {{< figure >}} shortcode's caption parameter.
For example, use the live editor to create a diagram called boxnet.
Store the diagram URL somewhere for later access. Generate and download a
boxnet.svg file to the appropriate ../images/ folder.
Use the {{< figure >}} shortcode in your PR's .md file to reference
the .svg image file and add a caption.
The figure shortcode is the preferred method for adding .svg image files
to your documentation. You can also use the standard markdown image syntax like so:
.
And you will need to add a caption below the diagram.
You should add the live editor URL as a comment block in the .svg image file using a text editor.
For example, you would include the following at the beginning of the .svg image file:
<!-- To view or edit the mermaid code, use the following URL: -->
<!-- https://mermaid-js.github.io/mermaid-live-editor/edit/#eyJjb ... <remainder of the URL> -->
The following lists advantages of the Mermaid+SVG method:
Live editor tool.
Live editor tool supports the most current Mermaid feature set.
Employ existing kubernetes/website methods for handling .svg image files.
Environment doesn't require Mermaid support.
Be sure to check that your diagram renders properly using the
local
and Netlify previews.
External tool
Figure 5 outlines the steps to follow for adding a diagram using the External Tool method.
First, use your external tool to create the diagram and save it as an .svg
or .png image file. After that, use the same steps as the Mermaid+SVG
method for adding .svg image files.
flowchart LR
A[1. Use external tool to create/edit diagram]
B[2. If possible, save diagram coordinates for contributor access]
C[3. Generate .svg or.png file and download to appropriate images/ folder]
subgraph w[ ]
direction TB
D[4. Use figure shortcode to reference svg or png file in page .md file] -->
E[5. Add caption]
end
A --> B
B --> C
C --> w
classDef box fill:#fff,stroke:#000,stroke-width:1px,color:#000;
class A,B,C,D,E,w box
click A "https://mermaid-js.github.io/mermaid-live-editor/edit/#eyJjb2RlIjoiZmxvd2NoYXJ0IExSXG4gICAgQVsxLiBVc2UgZXh0ZXJuYWw8YnI-dG9vbCB0byBjcmVhdGUvZWRpdDxicj5kaWFncmFtXVxuICAgIEJbMi4gSWYgcG9zc2libGUsIHNhdmU8YnI-ZGlhZ3JhbSBjb29yZGluYXRlczxicj5mb3IgY29udHJpYnV0b3I8YnI-YWNjZXNzXVxuICAgIENbMy4gR2VuZXJhdGUgLnN2ZyA8YnI-b3IucG5nIGZpbGU8YnI-YW5kIGRvd25sb2FkIHRvPGJyPmFwcHJvcHJpYXRlPGJyPmltYWdlcy8gZm9sZGVyXVxuICAgIHN1YmdyYXBoIHdbIF1cbiAgICBkaXJlY3Rpb24gVEJcbiAgICBEWzQuIFVzZSBmaWd1cmUgc2hvcnRjb2RlPGJyPnRvIHJlZmVyZW5jZSBzdmcgb3I8YnI-cG5nIGZpbGUgaW48YnI-cGFnZSAubWQgZmlsZV0gLS0-XG4gICAgRVs1LiBBZGQgY2FwdGlvbl1cbiAgICBlbmRcbiAgICBBIC0tPiBCXG4gICAgQiAtLT4gQ1xuICAgIEMgLS0-IHdcbiAgICBjbGFzc0RlZiBib3ggZmlsbDojZmZmLHN0cm9rZTojMDAwLHN0cm9rZS13aWR0aDoxcHgsY29sb3I6IzAwMDtcbiAgICBjbGFzcyBBLEIsQyxELEUsdyBib3hcbiAgICAiLCJtZXJtYWlkIjoie1xuICBcInRoZW1lXCI6IFwiZGVmYXVsdFwiXG59IiwidXBkYXRlRWRpdG9yIjpmYWxzZSwiYXV0b1N5bmMiOnRydWUsInVwZGF0ZURpYWdyYW0iOmZhbHNlfQ"
click B "https://mermaid-js.github.io/mermaid-live-editor/edit/#eyJjb2RlIjoiZmxvd2NoYXJ0IExSXG4gICAgQVsxLiBVc2UgZXh0ZXJuYWw8YnI-dG9vbCB0byBjcmVhdGUvZWRpdDxicj5kaWFncmFtXVxuICAgIEJbMi4gSWYgcG9zc2libGUsIHNhdmU8YnI-ZGlhZ3JhbSBjb29yZGluYXRlczxicj5mb3IgY29udHJpYnV0b3I8YnI-YWNjZXNzXVxuICAgIENbMy4gR2VuZXJhdGUgLnN2ZyA8YnI-b3IucG5nIGZpbGU8YnI-YW5kIGRvd25sb2FkIHRvPGJyPmFwcHJvcHJpYXRlPGJyPmltYWdlcy8gZm9sZGVyXVxuICAgIHN1YmdyYXBoIHdbIF1cbiAgICBkaXJlY3Rpb24gVEJcbiAgICBEWzQuIFVzZSBmaWd1cmUgc2hvcnRjb2RlPGJyPnRvIHJlZmVyZW5jZSBzdmcgb3I8YnI-cG5nIGZpbGUgaW48YnI-cGFnZSAubWQgZmlsZV0gLS0-XG4gICAgRVs1LiBBZGQgY2FwdGlvbl1cbiAgICBlbmRcbiAgICBBIC0tPiBCXG4gICAgQiAtLT4gQ1xuICAgIEMgLS0-IHdcbiAgICBjbGFzc0RlZiBib3ggZmlsbDojZmZmLHN0cm9rZTojMDAwLHN0cm9rZS13aWR0aDoxcHgsY29sb3I6IzAwMDtcbiAgICBjbGFzcyBBLEIsQyxELEUsdyBib3hcbiAgICAiLCJtZXJtYWlkIjoie1xuICBcInRoZW1lXCI6IFwiZGVmYXVsdFwiXG59IiwidXBkYXRlRWRpdG9yIjpmYWxzZSwiYXV0b1N5bmMiOnRydWUsInVwZGF0ZURpYWdyYW0iOmZhbHNlfQ"
click C "https://mermaid-js.github.io/mermaid-live-editor/edit/#eyJjb2RlIjoiZmxvd2NoYXJ0IExSXG4gICAgQVsxLiBVc2UgZXh0ZXJuYWw8YnI-dG9vbCB0byBjcmVhdGUvZWRpdDxicj5kaWFncmFtXVxuICAgIEJbMi4gSWYgcG9zc2libGUsIHNhdmU8YnI-ZGlhZ3JhbSBjb29yZGluYXRlczxicj5mb3IgY29udHJpYnV0b3I8YnI-YWNjZXNzXVxuICAgIENbMy4gR2VuZXJhdGUgLnN2ZyA8YnI-b3IucG5nIGZpbGU8YnI-YW5kIGRvd25sb2FkIHRvPGJyPmFwcHJvcHJpYXRlPGJyPmltYWdlcy8gZm9sZGVyXVxuICAgIHN1YmdyYXBoIHdbIF1cbiAgICBkaXJlY3Rpb24gVEJcbiAgICBEWzQuIFVzZSBmaWd1cmUgc2hvcnRjb2RlPGJyPnRvIHJlZmVyZW5jZSBzdmcgb3I8YnI-cG5nIGZpbGUgaW48YnI-cGFnZSAubWQgZmlsZV0gLS0-XG4gICAgRVs1LiBBZGQgY2FwdGlvbl1cbiAgICBlbmRcbiAgICBBIC0tPiBCXG4gICAgQiAtLT4gQ1xuICAgIEMgLS0-IHdcbiAgICBjbGFzc0RlZiBib3ggZmlsbDojZmZmLHN0cm9rZTojMDAwLHN0cm9rZS13aWR0aDoxcHgsY29sb3I6IzAwMDtcbiAgICBjbGFzcyBBLEIsQyxELEUsdyBib3hcbiAgICAiLCJtZXJtYWlkIjoie1xuICBcInRoZW1lXCI6IFwiZGVmYXVsdFwiXG59IiwidXBkYXRlRWRpdG9yIjpmYWxzZSwiYXV0b1N5bmMiOnRydWUsInVwZGF0ZURpYWdyYW0iOmZhbHNlfQ"
click D "https://mermaid-js.github.io/mermaid-live-editor/edit/#eyJjb2RlIjoiZmxvd2NoYXJ0IExSXG4gICAgQVsxLiBVc2UgZXh0ZXJuYWw8YnI-dG9vbCB0byBjcmVhdGUvZWRpdDxicj5kaWFncmFtXVxuICAgIEJbMi4gSWYgcG9zc2libGUsIHNhdmU8YnI-ZGlhZ3JhbSBjb29yZGluYXRlczxicj5mb3IgY29udHJpYnV0b3I8YnI-YWNjZXNzXVxuICAgIENbMy4gR2VuZXJhdGUgLnN2ZyA8YnI-b3IucG5nIGZpbGU8YnI-YW5kIGRvd25sb2FkIHRvPGJyPmFwcHJvcHJpYXRlPGJyPmltYWdlcy8gZm9sZGVyXVxuICAgIHN1YmdyYXBoIHdbIF1cbiAgICBkaXJlY3Rpb24gVEJcbiAgICBEWzQuIFVzZSBmaWd1cmUgc2hvcnRjb2RlPGJyPnRvIHJlZmVyZW5jZSBzdmcgb3I8YnI-cG5nIGZpbGUgaW48YnI-cGFnZSAubWQgZmlsZV0gLS0-XG4gICAgRVs1LiBBZGQgY2FwdGlvbl1cbiAgICBlbmRcbiAgICBBIC0tPiBCXG4gICAgQiAtLT4gQ1xuICAgIEMgLS0-IHdcbiAgICBjbGFzc0RlZiBib3ggZmlsbDojZmZmLHN0cm9rZTojMDAwLHN0cm9rZS13aWR0aDoxcHgsY29sb3I6IzAwMDtcbiAgICBjbGFzcyBBLEIsQyxELEUsdyBib3hcbiAgICAiLCJtZXJtYWlkIjoie1xuICBcInRoZW1lXCI6IFwiZGVmYXVsdFwiXG59IiwidXBkYXRlRWRpdG9yIjpmYWxzZSwiYXV0b1N5bmMiOnRydWUsInVwZGF0ZURpYWdyYW0iOmZhbHNlfQ"
click E "https://mermaid-js.github.io/mermaid-live-editor/edit/#eyJjb2RlIjoiZmxvd2NoYXJ0IExSXG4gICAgQVsxLiBVc2UgZXh0ZXJuYWw8YnI-dG9vbCB0byBjcmVhdGUvZWRpdDxicj5kaWFncmFtXVxuICAgIEJbMi4gSWYgcG9zc2libGUsIHNhdmU8YnI-ZGlhZ3JhbSBjb29yZGluYXRlczxicj5mb3IgY29udHJpYnV0b3I8YnI-YWNjZXNzXVxuICAgIENbMy4gR2VuZXJhdGUgLnN2ZyA8YnI-b3IucG5nIGZpbGU8YnI-YW5kIGRvd25sb2FkIHRvPGJyPmFwcHJvcHJpYXRlPGJyPmltYWdlcy8gZm9sZGVyXVxuICAgIHN1YmdyYXBoIHdbIF1cbiAgICBkaXJlY3Rpb24gVEJcbiAgICBEWzQuIFVzZSBmaWd1cmUgc2hvcnRjb2RlPGJyPnRvIHJlZmVyZW5jZSBzdmcgb3I8YnI-cG5nIGZpbGUgaW48YnI-cGFnZSAubWQgZmlsZV0gLS0-XG4gICAgRVs1LiBBZGQgY2FwdGlvbl1cbiAgICBlbmRcbiAgICBBIC0tPiBCXG4gICAgQiAtLT4gQ1xuICAgIEMgLS0-IHdcbiAgICBjbGFzc0RlZiBib3ggZmlsbDojZmZmLHN0cm9rZTojMDAwLHN0cm9rZS13aWR0aDoxcHgsY29sb3I6IzAwMDtcbiAgICBjbGFzcyBBLEIsQyxELEUsdyBib3hcbiAgICAiLCJtZXJtYWlkIjoie1xuICBcInRoZW1lXCI6IFwiZGVmYXVsdFwiXG59IiwidXBkYXRlRWRpdG9yIjpmYWxzZSwiYXV0b1N5bmMiOnRydWUsInVwZGF0ZURpYWdyYW0iOmZhbHNlfQ"
Figure 5. External Tool method steps
The following lists the steps you should follow for adding a diagram using the External Tool method:
Use your external tool to create a diagram.
Save the diagram coordinates for contributor access. For example, your tool
may offer a link to the diagram image, or you could place the source code
file, such as an .xml file, in a public repository for later contributor access.
Generate and save the diagram as an .svg or .png image file.
Download this file to the appropriate ../images/ folder.
Use the {{< figure >}} shortcode to reference the diagram in the .md file.
Add a caption using the {{< figure >}} shortcode's caption parameter.
Here is the {{< figure >}} shortcode for the images/apple.svg diagram:
{{< figure src="/static/images/apple.svg" alt="red-apple-figure" class="diagram-large" caption="Figure 9. A Big Red Apple" >}}
If your external drawing tool permits:
You can incorporate multiple .svg or .png logos, icons and images into your diagram.
However, make sure you observe copyright and follow the Kubernetes documentation
guidelines on the use of third party content.
You should save the diagram source coordinates for later contributor access.
For example, your tool may offer a link to the diagram image, or you could
place the source code file, such as an .xml file, somewhere for contributor access.
For more information on K8s and CNCF logos and images, check out
CNCF Artwork.
The following lists advantages of the External Tool method:
Contributor familiarity with external tool.
Diagrams require more detail than what Mermaid can offer.
Don't forget to check that your diagram renders correctly using the
local and Netlify previews.
Examples
This section shows several examples of Mermaid diagrams.
Note:
The code block examples omit the Hugo Mermaid
shortcode tags. This allows you to copy the code block into the live editor
to experiment on your own.
Note that the live editor doesn't recognize Hugo shortcodes.
graph LR;
 client([client])-. Ingress-managed <br> load balancer .->ingress[Ingress];
 ingress-->|routing rule|service[Service];
 subgraph cluster
 ingress;
 service-->pod1[Pod];
 service-->pod2[Pod];
 end
 classDef plain fill:#ddd,stroke:#fff,stroke-width:4px,color:#000;
 classDef k8s fill:#326ce5,stroke:#fff,stroke-width:4px,color:#fff;
 classDef cluster fill:#fff,stroke:#bbb,stroke-width:2px,color:#326ce5;
 class ingress,service,pod1,pod2 k8s;
 class client plain;
 class cluster cluster;
Example 3 - K8s system flow
Figure 8 depicts a Mermaid sequence diagram showing the system flow between
K8s components to start a container.
Figure 8. K8s system flow diagram
Code block:
%%{init:{"theme":"neutral"}}%%
sequenceDiagram
    actor me
    participant apiSrv as control plane<br><br>api-server
    participant etcd as control plane<br><br>etcd datastore
    participant cntrlMgr as control plane<br><br>controller<br>manager
    participant sched as control plane<br><br>scheduler
    participant kubelet as node<br><br>kubelet
    participant container as node<br><br>container<br>runtime
    me->>apiSrv: 1. kubectl create -f pod.yaml
    apiSrv-->>etcd: 2. save new state
    cntrlMgr->>apiSrv: 3. check for changes
    sched->>apiSrv: 4. watch for unassigned pods(s)
    apiSrv->>sched: 5. notify about pod w nodename=" "
    sched->>apiSrv: 6. assign pod to node
    apiSrv-->>etcd: 7. save new state
    kubelet->>apiSrv: 8. look for newly assigned pod(s)
    apiSrv->>kubelet: 9. bind pod to node
    kubelet->>container: 10. start container
    kubelet->>apiSrv: 11. update pod status
    apiSrv-->>etcd: 12. save new state
How to style diagrams
You can style one or more diagram elements using well-known CSS nomenclature.
You accomplish this using two types of statements in the Mermaid code.
classDef defines a class of style attributes.
class defines one or more elements to apply the class to.
In the code for
figure 7,
you can see examples of both.
classDef k8s fill:#326ce5,stroke:#fff,stroke-width:4px,color:#fff; // defines style for the k8s class
class ingress,service,pod1,pod2 k8s; // k8s class is applied to elements ingress, service, pod1 and pod2.
You can include one or multiple classDef and class statements in your diagram.
You can also use the official K8s #326ce5 hex color code for K8s components in your diagram.
A caption is a brief description of a diagram. A title or a short description
of the diagram are examples of captions. Captions aren't meant to replace
explanatory text you have in your documentation. Rather, they serve as a
"context link" between that text and your diagram.
The combination of some text and a diagram tied together with a caption help
provide a concise representation of the information you wish to convey to the
user.
Without captions, you are asking the user to scan the text above or below the
diagram to figure out a meaning. This can be frustrating for the user.
Figure 9 lays out the three components for proper captioning: diagram, diagram
caption and the diagram referral.
flowchart
A[Diagram
Inline Mermaid or SVG image files]
B[Diagram Caption
Add Figure Number. and Caption Text]
C[Diagram Referral
Reference Figure Number in text]
classDef box fill:#fff,stroke:#000,stroke-width:1px,color:#000;
class A,B,C box
click A "https://mermaid-js.github.io/mermaid-live-editor/edit#eyJjb2RlIjoiZmxvd2NoYXJ0XG4gICAgQVtEaWFncmFtPGJyPjxicj5JbmxpbmUgTWVybWFpZCBvcjxicj5TVkcgaW1hZ2UgZmlsZXNdXG4gICAgQltEaWFncmFtIENhcHRpb248YnI-PGJyPkFkZCBGaWd1cmUgTnVtYmVyLiBhbmQ8YnI-Q2FwdGlvbiBUZXh0XVxuICAgIENbRGlhZ3JhbSBSZWZlcnJhbDxicj48YnI-UmVmZXJlbmVuY2UgRmlndXJlIE51bWJlcjxicj5pbiB0ZXh0XVxuXG4gICAgY2xhc3NEZWYgYm94IGZpbGw6I2ZmZixzdHJva2U6IzAwMCxzdHJva2Utd2lkdGg6MXB4LGNvbG9yOiMwMDA7XG4gICAgY2xhc3MgQSxCLEMgYm94IiwibWVybWFpZCI6IntcbiAgXCJ0aGVtZVwiOiBcImRlZmF1bHRcIlxufSIsInVwZGF0ZUVkaXRvciI6ZmFsc2UsImF1dG9TeW5jIjp0cnVlLCJ1cGRhdGVEaWFncmFtIjpmYWxzZX0" _blank
click B "https://mermaid-js.github.io/mermaid-live-editor/edit#eyJjb2RlIjoiZmxvd2NoYXJ0XG4gICAgQVtEaWFncmFtPGJyPjxicj5JbmxpbmUgTWVybWFpZCBvcjxicj5TVkcgaW1hZ2UgZmlsZXNdXG4gICAgQltEaWFncmFtIENhcHRpb248YnI-PGJyPkFkZCBGaWd1cmUgTnVtYmVyLiBhbmQ8YnI-Q2FwdGlvbiBUZXh0XVxuICAgIENbRGlhZ3JhbSBSZWZlcnJhbDxicj48YnI-UmVmZXJlbmVuY2UgRmlndXJlIE51bWJlcjxicj5pbiB0ZXh0XVxuXG4gICAgY2xhc3NEZWYgYm94IGZpbGw6I2ZmZixzdHJva2U6IzAwMCxzdHJva2Utd2lkdGg6MXB4LGNvbG9yOiMwMDA7XG4gICAgY2xhc3MgQSxCLEMgYm94IiwibWVybWFpZCI6IntcbiAgXCJ0aGVtZVwiOiBcImRlZmF1bHRcIlxufSIsInVwZGF0ZUVkaXRvciI6ZmFsc2UsImF1dG9TeW5jIjp0cnVlLCJ1cGRhdGVEaWFncmFtIjpmYWxzZX0" _blank
click C "https://mermaid-js.github.io/mermaid-live-editor/edit#eyJjb2RlIjoiZmxvd2NoYXJ0XG4gICAgQVtEaWFncmFtPGJyPjxicj5JbmxpbmUgTWVybWFpZCBvcjxicj5TVkcgaW1hZ2UgZmlsZXNdXG4gICAgQltEaWFncmFtIENhcHRpb248YnI-PGJyPkFkZCBGaWd1cmUgTnVtYmVyLiBhbmQ8YnI-Q2FwdGlvbiBUZXh0XVxuICAgIENbRGlhZ3JhbSBSZWZlcnJhbDxicj48YnI-UmVmZXJlbmVuY2UgRmlndXJlIE51bWJlcjxicj5pbiB0ZXh0XVxuXG4gICAgY2xhc3NEZWYgYm94IGZpbGw6I2ZmZixzdHJva2U6IzAwMCxzdHJva2Utd2lkdGg6MXB4LGNvbG9yOiMwMDA7XG4gICAgY2xhc3MgQSxCLEMgYm94IiwibWVybWFpZCI6IntcbiAgXCJ0aGVtZVwiOiBcImRlZmF1bHRcIlxufSIsInVwZGF0ZUVkaXRvciI6ZmFsc2UsImF1dG9TeW5jIjp0cnVlLCJ1cGRhdGVEaWFncmFtIjpmYWxzZX0" _blank
Figure 9. Caption Components.
Note:
You should always add a caption to each diagram in your documentation.
Diagram
The Mermaid+SVG and External Tool methods generate .svg image files.
Here is the {{< figure >}} shortcode for the diagram defined in an
.svg image file saved to /images/docs/components-of-kubernetes.svg:
{{< figure src="/images/docs/components-of-kubernetes.svg" alt="Kubernetes pod running inside a cluster" class="diagram-large" caption="Figure 4. Kubernetes Architecture Components" >}}
You should pass the src, alt, class and caption values into the
{{< figure >}} shortcode. You can adjust the size of the diagram using
diagram-large, diagram-medium and diagram-small classes.
Note:
Diagrams created using the Inline method don't use the figure
shortcode. The Mermaid code defines how the diagram will render on your page.
If you define your diagram in an .svg image file, then you should use the
{{< figure >}} shortcode's caption parameter.
{{< figure src="/images/docs/components-of-kubernetes.svg" alt="Kubernetes pod running inside a cluster" class="diagram-large" caption="Figure 4. Kubernetes Architecture Components" >}}
If you define your diagram using inline Mermaid code, then you should use Markdown text.
Figure 4. Kubernetes Architecture Components
The following lists several items to consider when adding diagram captions:
Use the {{< figure >}} shortcode to add a diagram caption for Mermaid+SVG
and External Tool diagrams.
Use simple Markdown text to add a diagram caption for the Inline method.
Prepend your diagram caption with Figure NUMBER.. You must use Figure
and the number must be unique for each diagram in your documentation page.
Add a period after the number.
Add your diagram caption text after the Figure NUMBER. on the same line.
You must puncuate the caption with a period. Keep the caption text short.
Position your diagram caption BELOW your diagram.
Diagram Referral
Finally, you can add a diagram referral. This is used inside your text and
should precede the diagram itself. It allows a user to connect your text with
the associated diagram. The Figure NUMBER in your referral and caption must
match.
You should avoid using spatial references such as ..the image below.. or
..the following figure ..
Here is an example of a diagram referral:
Figure 10 depicts the components of the Kubernetes architecture.
The control plane ...
Diagram referrals are optional and there are cases where they might not be
suitable. If you are not sure, add a diagram referral to your text to see if
it looks and sounds okay. When in doubt, use a diagram referral.
Complete picture
Figure 10 shows the Kubernetes Architecture diagram that includes the diagram,
diagram caption and diagram referral. The {{< figure >}} shortcode
renders the diagram, adds the caption and includes the optional link
parameter so you can hyperlink the diagram. The diagram referral is contained
in this paragraph.
Here is the {{< figure >}} shortcode for this diagram:
{{< figure src="/images/docs/components-of-kubernetes.svg" alt="Kubernetes pod running inside a cluster" class="diagram-large" caption="Figure 10. Kubernetes Architecture." link="https://kubernetes.io/docs/concepts/overview/components/" >}}
Figure 10. Kubernetes Architecture.
Tips
Always use the live editor to create/edit your diagram.
Always use Hugo local and Netlify previews to check out how the diagram
appears in the documentation.
Include diagram source pointers such as a URL, source code location, or
indicate the code is self-documenting.
Always use diagram captions.
Very helpful to include the diagram .svg or .png image and/or Mermaid
source code in issues and PRs.
With the Mermaid+SVG and External Tool methods, use .svg image files
because they stay sharp when you zoom in on the diagram.
Best practice for .svg files is to load it into an SVG editing tool and use the
"Convert text to paths" function.
This ensures that the diagram renders the same on all systems, regardless of font
availability and font rendering support.
No Mermaid support for additional icons or artwork.
Hugo Mermaid shortcodes don't work in the live editor.
Any time you modify a diagram in the live editor, you must save it
to generate a new URL for the diagram.
Click on the diagrams in this section to view the code and diagram rendering
in the live editor.
Look over the source code of this page, diagram-guide.md, for more examples.
Check out the Mermaid docs
for explanations and examples.
Most important, Keep Diagrams Simple.
This will save time for you and fellow contributors, and allow for easier reading
by new and experienced users.
8.4 - Writing a new topic
This page shows how to create a new topic for the Kubernetes docs.
Before you begin
Create a fork of the Kubernetes documentation repository as described in
Open a PR.
Choosing a page type
As you prepare to write a new topic, think about the page type that would fit your content the best:
Guidelines for choosing a page type
Type
Description
Concept
A concept page explains some aspect of Kubernetes. For example, a concept page might describe the Kubernetes Deployment object and explain the role it plays as an application while it is deployed, scaled, and updated. Typically, concept pages don't include sequences of steps, but instead provide links to tasks or tutorials. For an example of a concept topic, see Nodes.
Task
A task page shows how to do a single thing. The idea is to give readers a sequence of steps that they can actually do as they read the page. A task page can be short or long, provided it stays focused on one area. In a task page, it is OK to blend brief explanations with the steps to be performed, but if you need to provide a lengthy explanation, you should do that in a concept topic. Related task and concept topics should link to each other. For an example of a short task page, see Configure a Pod to Use a Volume for Storage. For an example of a longer task page, see Configure Liveness and Readiness Probes
Tutorial
A tutorial page shows how to accomplish a goal that ties together several Kubernetes features. A tutorial might provide several sequences of steps that readers can actually do as they read the page. Or it might provide explanations of related pieces of code. For example, a tutorial could provide a walkthrough of a code sample. A tutorial can include brief explanations of the Kubernetes features that are being tied together, but should link to related concept topics for deep explanations of individual features.
Creating a new page
Use a content type for each new page
that you write. The docs site provides templates or
Hugo archetypes to create
new content pages. To create a new type of page, run hugo new with the path to the file
you want to create. For example:
hugo new docs/concepts/my-first-concept.md
Choosing a title and filename
Choose a title that has the keywords you want search engines to find.
Create a filename that uses the words in your title separated by hyphens.
For example, the topic with title
Using an HTTP Proxy to Access the Kubernetes API
has filename http-proxy-access-api.md. You don't need to put
"kubernetes" in the filename, because "kubernetes" is already in the
URL for the topic, for example:
In your topic, put a title field in the
front matter.
The front matter is the YAML block that is between the
triple-dashed lines at the top of the page. Here's an example:
---
title: Using an HTTP Proxy to Access the Kubernetes API
---
Choosing a directory
Depending on your page type, put your new file in a subdirectory of one of these:
/content/en/docs/tasks/
/content/en/docs/tutorials/
/content/en/docs/concepts/
You can put your file in an existing subdirectory, or you can create a new
subdirectory.
Placing your topic in the table of contents
The table of contents is built dynamically using the directory structure of the
documentation source. The top-level directories under /content/en/docs/ create
top-level navigation, and subdirectories each have entries in the table of
contents.
Each subdirectory has a file _index.md, which represents the "home" page for
a given subdirectory's content. The _index.md does not need a template. It
can contain overview content about the topics in the subdirectory.
Other files in a directory are sorted alphabetically by default. This is almost
never the best order. To control the relative sorting of topics in a
subdirectory, set the weight: front-matter key to an integer. Typically, we
use multiples of 10, to account for adding topics later. For instance, a topic
with weight 10 will come before one with weight 20.
Embedding code in your topic
If you want to include some code in your topic, you can embed the code in your
file directly using the markdown code block syntax. This is recommended for the
following cases (not an exhaustive list):
The code shows the output from a command such as
kubectl get deploy mydeployment -o json | jq '.status'.
The code is not generic enough for users to try out. As an example, you can
embed the YAML
file for creating a Pod which depends on a specific
FlexVolume implementation.
The code is an incomplete example because its purpose is to highlight a
portion of a larger file. For example, when describing ways to
customize a RoleBinding,
you can provide a short snippet directly in your topic file.
The code is not meant for users to try out due to other reasons. For example,
when describing how a new attribute should be added to a resource using the
kubectl edit command, you can provide a short example that includes only
the attribute to add.
Including code from another file
Another way to include code in your topic is to create a new, complete sample
file (or group of sample files) and then reference the sample from your topic.
Use this method to include sample YAML files when the sample is generic and
reusable, and you want the reader to try it out themselves.
When adding a new standalone sample file, such as a YAML file, place the code in
one of the <LANG>/examples/ subdirectories where <LANG> is the language for
the topic. In your topic file, use the code_sample shortcode:
where <RELPATH> is the path to the file to include, relative to the
examples directory. The following Hugo shortcode references a YAML
file located at /content/en/examples/pods/storage/gce-volume.yaml.
Showing how to create an API object from a configuration file
If you need to demonstrate how to create an API object based on a
configuration file, place the configuration file in one of the subdirectories
under <LANG>/examples.
When adding new YAML files to the <LANG>/examples directory, make
sure the file is also included into the <LANG>/examples_test.go file. The
Travis CI for the Website automatically runs this test case when PRs are
submitted to ensure all examples pass the tests.
The Kubernetes documentation follows several types of page content:
Concept
Task
Tutorial
Reference
Content sections
Each page content type contains a number of sections defined by
Markdown comments and HTML headings. You can add content headings to
your page with the heading shortcode. The comments and headings help
maintain the structure of the page content types.
Examples of Markdown comments defining page content sections:
<!-- overview -->
<!-- body -->
To create common headings in your content pages, use the heading shortcode with
a heading string.
Examples of heading strings:
whatsnext
prerequisites
objectives
cleanup
synopsis
seealso
options
For example, to create a whatsnext heading, add the heading shortcode with the "whatsnext" string:
## {{% heading "whatsnext" %}}
You can declare a prerequisites heading as follows:
## {{% heading "prerequisites" %}}
The heading shortcode expects one string parameter.
The heading string parameter matches the prefix of a variable in the i18n/<lang>/<lang>.toml files.
For example:
i18n/en/en.toml:
[whatsnext_heading]
other = "What's next"
i18n/ko/ko.toml:
[whatsnext_heading]
other = "다음 내용"
Content types
Each content type informally defines its expected page structure.
Create page content with the suggested page sections.
Concept
A concept page explains some aspect of Kubernetes. For example, a concept
page might describe the Kubernetes Deployment object and explain the role it
plays as an application once it is deployed, scaled, and updated. Typically, concept
pages don't include sequences of steps, but instead provide links to tasks or
tutorials.
To write a new concept page, create a Markdown file in a subdirectory of the
/content/en/docs/concepts directory, with the following characteristics:
Concept pages are divided into three sections:
Page section
overview
body
whatsnext
The overview and body sections appear as comments in the concept page.
You can add the whatsnext section to your page with the heading shortcode.
Fill each section with content. Follow these guidelines:
Organize content with H2 and H3 headings.
For overview, set the topic's context with a single paragraph.
For body, explain the concept.
For whatsnext, provide a bulleted list of topics (5 maximum) to learn more about the concept.
Annotations is a published example of a concept page.
Task
A task page shows how to do a single thing, typically by giving a short
sequence of steps. Task pages have minimal explanation, but often provide links
to conceptual topics that provide related background and knowledge.
To write a new task page, create a Markdown file in a subdirectory of the
/content/en/docs/tasks directory, with the following characteristics:
Page section
overview
prerequisites
steps
discussion
whatsnext
The overview, steps, and discussion sections appear as comments in the task page.
You can add the prerequisites and whatsnext sections to your page
with the heading shortcode.
Within each section, write your content. Use the following guidelines:
Use a minimum of H2 headings (with two leading # characters). The sections
themselves are titled automatically by the template.
For overview, use a paragraph to set context for the entire topic.
For prerequisites, use bullet lists when possible. Start adding additional
prerequisites below the include. The default prerequisites include a running Kubernetes cluster.
For steps, use numbered lists.
For discussion, use normal content to expand upon the information covered
in steps.
For whatsnext, give a bullet list of up to 5 topics the reader might be
interested in reading next.
A tutorial page shows how to accomplish a goal that is larger than a single
task. Typically a tutorial page has several sections, each of which has a
sequence of steps. For example, a tutorial might provide a walkthrough of a
code sample that illustrates a certain feature of Kubernetes. Tutorials can
include surface-level explanations, but should link to related concept topics
for deep explanations.
To write a new tutorial page, create a Markdown file in a subdirectory of the
/content/en/docs/tutorials directory, with the following characteristics:
Page section
overview
prerequisites
objectives
lessoncontent
cleanup
whatsnext
The overview, objectives, and lessoncontent sections appear as comments in the tutorial page.
You can add the prerequisites, cleanup, and whatsnext sections to your page
with the heading shortcode.
Within each section, write your content. Use the following guidelines:
Use a minimum of H2 headings (with two leading # characters). The sections
themselves are titled automatically by the template.
For overview, use a paragraph to set context for the entire topic.
For prerequisites, use bullet lists when possible. Add additional
prerequisites below the ones included by default.
For objectives, use bullet lists.
For lessoncontent, use a mix of numbered lists and narrative content as
appropriate.
For cleanup, use numbered lists to describe the steps to clean up the
state of the cluster after finishing the task.
For whatsnext, give a bullet list of up to 5 topics the reader might be
interested in reading next.
A component tool reference page shows the description and flag options output for
a Kubernetes component tool. Each page generates from scripts using the component tool commands.
A tool reference page has several possible sections:
Hugo Tip: Start Hugo with hugo server --navigateToChanged for content edit-sessions.
Page Lists
Page Order
The documentation side menu, the documentation page browser etc. are listed using
Hugo's default sort order, which sorts by weight (from 1), date (newest first),
and finally by the link title.
Given that, if you want to move a page or a section up, set a weight in the page's front matter:
title:My Pageweight:10
Note:
For page weights, it can be smart not to use 1, 2, 3 ..., but some other interval,
say 10, 20, 30... This allows you to insert pages where you want later.
Additionally, each weight within the same directory (section) should not be
overlapped with the other weights. This makes sure that content is always
organized correctly, especially in localized content.
Documentation Main Menu
The Documentation main menu is built from the sections below docs/ with
the main_menu flag set in front matter of the _index.md section content file:
main_menu:true
Note that the link title is fetched from the page's linkTitle, so if you want
it to be something different than the title, change it in the content file:
main_menu:truetitle:Page TitlelinkTitle:Title used in links
Note:
The above needs to be done per language. If you don't see your section in the menu,
it is probably because it is not identified as a section by Hugo. Create a
_index.md content file in the section folder.
Documentation Side Menu
The documentation side-bar menu is built from the current section tree starting below docs/.
It will show all sections and their pages.
If you don't want to list a section or page, set the toc_hide flag to true in front matter:
toc_hide:true
When you navigate to a section that has content, the specific section or page
(e.g. _index.md) is shown. Else, the first page inside that section is shown.
Documentation Browser
The page browser on the documentation home page is built using all the sections
and pages that are directly below the docs section.
If you don't want to list a section or page, set the toc_hide flag to true in front matter:
toc_hide:true
The Main Menu
The site links in the top-right menu -- and also in the footer -- are built by
page-lookups. This is to make sure that the page actually exists. So, if the
case-studies section does not exist in a site (language), it will not be linked to.
Page Bundles
In addition to standalone content pages (Markdown files), Hugo supports
Page Bundles.
One example is Custom Hugo Shortcodes.
It is considered a leaf bundle. Everything below the directory, including the index.md,
will be part of the bundle. This also includes page-relative links, images that can be processed etc.:
Another widely used example is the includes bundle. It sets headless: true in
front matter, which means that it does not get its own URL. It is only used in other pages.
For translated bundles, any missing non-content files will be inherited from
languages above. This avoids duplication.
All the files in a bundle are what Hugo calls Resources and you can provide
metadata per language, such as parameters and title, even if it does not supports
front matter (YAML files etc.).
See Page Resources Metadata.
The value you get from .RelPermalink of a Resource is page-relative.
See Permalinks.
Styles
The SASS source of the stylesheets for this site is
stored in assets/sass and is automatically built by Hugo.
In a Markdown page (.md file) on this site, you can add a shortcode to
display version and state of the documented feature.
Feature state demo
Below is a demo of the feature state snippet, which displays the feature as
stable in the latest Kubernetes version.
{{< feature-state state="stable" >}}
Renders to:
FEATURE STATE:Kubernetes v1.35 [stable]
The valid values for state are:
alpha
beta
deprecated
stable
Feature state code
The displayed Kubernetes version defaults to that of the page or the site. You can change the
feature state version by passing the for_k8s_version shortcode parameter. For example:
To dynamically determine the state of the feature, make use of the feature_gate_name
shortcode parameter. The feature state details will be extracted from the corresponding feature gate
description file located in content/en/docs/reference/command-line-tools-reference/feature-gates/.
For example:
FEATURE STATE:Kubernetes v1.34 [stable](enabled by default)
Feature gate description
In a Markdown page (.md file) on this site, you can add a shortcode to
display the description for a shortcode.
Feature gate description demo
Below is a demo of the feature state snippet, which displays the feature as
stable in the latest Kubernetes version.
{{< feature-gate-description name="DryRun" >}}
Renders to:
DryRun: Enable server-side dry run requests
so that validation, merging, and mutation can be tested without committing.
Glossary
There are two glossary shortcodes: glossary_tooltip and glossary_definition.
You can reference glossary terms with an inclusion that automatically updates
and replaces content with the relevant links from our glossary.
When the glossary term is moused-over, the glossary entry displays a tooltip.
The glossary term also displays as a link.
As well as inclusions with tooltips, you can reuse the definitions from the glossary in
page content.
The raw data for glossary terms is stored at
the glossary directory,
with a content file for each glossary term.
Glossary demo
For example, the following include within the Markdown renders to
cluster with a tooltip:
A set of worker machines, called nodes,
that run containerized applications. Every cluster has at least one worker node.
The worker node(s) host the Pods that are
the components of the application workload. The
control plane manages the worker
nodes and the Pods in the cluster. In production environments, the control plane usually
runs across multiple computers and a cluster usually runs multiple nodes, providing
fault-tolerance and high availability.
Links to API Reference
You can link to a page of the Kubernetes API reference using the
api-reference shortcode, for example to the
Pod reference:
The content of the page parameter is the suffix of the URL of the API reference page.
You can link to a specific place into a page by specifying an anchor
parameter, for example to the
PodSpec
reference or the
environment-variables
section of the page:
You can make tables more accessible to screen readers by adding a table caption. To add a
caption to a table,
enclose the table with a table shortcode and specify the caption with the caption parameter.
Note:
Table captions are visible to screen readers but invisible when viewed in standard HTML.
Here's an example:
{{<tablecaption="Configuration parameters">}}Parameter | Description | Default
:---------|:------------|:-------
`timeout` | The timeout for requests | `30s`
`logLevel` | The log level for log output | `INFO`
{{</table>}}
The rendered table looks like this:
Configuration parameters
Parameter
Description
Default
timeout
The timeout for requests
30s
logLevel
The log level for log output
INFO
If you inspect the HTML for the table, you should see this element immediately
after the opening <table> element:
In a markdown page (.md file) on this site, you can add a tab set to display
multiple flavors of a given solution.
The tabs shortcode takes these parameters:
name: The name as shown on the tab.
codelang: If you provide inner content to the tab shortcode, you can tell Hugo
what code language to use for highlighting.
include: The file to include in the tab. If the tab lives in a Hugo
leaf bundle,
the file -- which can be any MIME type supported by Hugo -- is looked up in the bundle itself.
If not, the content page that needs to be included is looked up relative to the current page.
Note that with the include, you do not have any shortcode inner content and must use the
self-closing syntax. For example,
{{< tab name="Content File #1" include="example1" />}}. The language needs to be specified
under codelang or the language is taken based on the file name.
Non-content files are code-highlighted by default.
If your inner content is markdown, you must use the %-delimiter to surround the tab.
For example, {{% tab name="Tab 1" %}}This is **markdown**{{% /tab %}}
You can combine the variations mentioned above inside a tab set.
Below is a demo of the tabs shortcode.
Note:
The tab name in a tabs definition must be unique within a content page.
Tabs demo: Code highlighting
{{<tabsname="tab_with_code">}}{{<tabname="Tab 1"codelang="bash">}}echo "This is tab 1."
{{</tab>}}{{<tabname="Tab 2"codelang="go">}}println "This is tab 2."
{{</tab>}}{{</tabs>}}
{{<tabsname="tab_with_md">}}{{%tabname="Markdown"%}}This is **some markdown.**
{{<note>}}It can even contain shortcodes.
{{</note>}}{{%/tab%}}{{<tabname="HTML">}}<div>
<h3>Plain HTML</h3>
<p>This is some <i>plain</i> HTML.</p>
</div>
{{</tab>}}{{</tabs>}}
You can use the {{% code_sample %}} shortcode to embed the contents of file in a code block to allow users to download or copy its content to their clipboard. This shortcode is used when the contents of the sample file is generic and reusable, and you want the users to try it out themselves.
This shortcode takes in two named parameters: language and file. The mandatory parameter file is used to specify the path to the file being displayed. The optional parameter language is used to specify the programming language of the file. If the language parameter is not provided, the shortcode will attempt to guess the language based on the file extension.
apiVersion:apps/v1kind:Deploymentmetadata:name:nginx-deploymentspec:selector:matchLabels:app:nginxreplicas:4# Update the replicas from 2 to 4template:metadata:labels:app:nginxspec:containers:- name:nginximage:nginx:1.16.1ports:- containerPort:80
When adding a new sample file, such as a YAML file, create the file in one of the <LANG>/examples/ subdirectories where <LANG> is the language for the page. In the markdown of your page, use the code shortcode:
where <RELATIVE-PATH> is the path to the sample file to include, relative to the examples directory. The following shortcode references a YAML file located at /content/en/examples/configmap/configmaps.yaml.
The legacy {{% codenew %}} shortcode is being replaced by {{% code_sample %}}.
Use {{% code_sample %}} (not {{% codenew %}} or {{% code %}}) in new documentation.
Third party content marker
Running Kubernetes requires third-party software. For example: you
usually need to add a
DNS server
to your cluster so that name resolution works.
When we link to third-party software, or otherwise mention it,
we follow the content guide
and we also mark those third party items.
Using these shortcodes adds a disclaimer to any documentation page
that uses them.
Lists
For a list of several third-party items, add:
{{% thirdparty-content %}}
just below the heading for the section that includes all items.
Items
If you have a list where most of the items refer to in-project
software (for example: Kubernetes itself, and the separate
Descheduler
component), then there is a different form to use.
Add the shortcode:
{{% thirdparty-content single="true" %}}
before the item, or just below the heading for the specific item.
Details
You can render a <details> HTML element using a shortcode:
{{< detailssummary="More about widgets" >}}
The frobnicator extension API implements _widgets_ using example running text.
Neque porro quisquam est, qui dolorem ipsum quia dolor sit amet, consectetur,
adipisci velit, sed quia non numquam eius modi tempora incidunt ut labore et
dolore magnam aliquam quaerat voluptatem.
{{< /details >}}
This renders as:
More about widgets
The frobnicator extension API implements widgets using example running text.
Neque porro quisquam est, qui dolorem ipsum quia dolor sit amet, consectetur,
adipisci velit, sed quia non numquam eius modi tempora incidunt ut labore et
dolore magnam aliquam quaerat voluptatem.
Note:
Use this shortcode sparingly; it is usually best to have all of the text directly shown
to readers.
Version strings
To generate a version string for inclusion in the documentation, you can choose from
several version shortcodes. Each version shortcode displays a version string derived from
the value of a version parameter found in the site configuration file, hugo.toml.
The two most commonly used version parameters are latest and version.
{{< param "version" >}}
The {{< param "version" >}} shortcode generates the value of the current
version of the Kubernetes documentation from the version site parameter. The
param shortcode accepts the name of one site parameter, in this case:
version.
Note:
In previously released documentation, latest and version parameter values
are not equivalent. After a new version is released, latest is incremented
and the value of version for the documentation set remains unchanged. For
example, a previously released version of the documentation displays version
as v1.19 and latest as v1.20.
Renders to:
v1.35
{{< latest-version >}}
The {{< latest-version >}} shortcode returns the value of the latest site parameter.
The latest site parameter is updated when a new version of the documentation is released.
This parameter does not always match the value of version in a documentation set.
Renders to:
v1.35
{{< latest-semver >}}
The {{< latest-semver >}} shortcode generates the value of latest
without the "v" prefix.
Renders to:
1.35
{{< version-check >}}
The {{< version-check >}} shortcode checks if the min-kubernetes-server-version
page parameter is present and then uses this value to compare to version.
Renders to:
To check the version, enter kubectl version.
{{< latest-release-notes >}}
The {{< latest-release-notes >}} shortcode generates a version string
from latest and removes the "v" prefix. The shortcode prints a new URL for
the release note CHANGELOG page with the modified version string.
This page shows how to use the update-imported-docs.py script to generate
the Kubernetes reference documentation. The script automates
the build setup and generates the reference documentation for a release.
Before you begin
Requirements:
You need a machine that is running Linux or macOS.
Docker (Required only for kubectl command reference)
Your PATH environment variable must include the required build tools, such as the Go binary and python.
You need to know how to create a pull request to a GitHub repository.
This involves creating your own fork of the repository. For more
information, see Work from a local clone.
Getting the docs repository
Make sure your website fork is up-to-date with the kubernetes/website remote on
GitHub (main branch), and clone your website fork.
mkdir github.com
cd github.com
git clone git@github.com:<your_github_username>/website.git
Determine the base directory of your clone. For example, if you followed the
preceding step to get the repository, your base directory is
github.com/website. The remaining steps refer to your base directory as
<web-base>.
Note:
If you want to change the content of the component tools and API reference,
see the contributing upstream guide.
Overview of update-imported-docs
The update-imported-docs.py script is located in the <web-base>/update-imported-docs/
directory.
The script builds the following references:
Component and tool reference pages
The kubectl command reference
The Kubernetes API reference
Note:
The kubelet reference page is not generated by this script and is maintained manually.
To update the kubelet reference, follow the standard contribution process described in
Opening a pull request.
The update-imported-docs.py script generates the Kubernetes reference documentation
from the Kubernetes source code. The script creates a temporary directory
under /tmp on your machine and clones the required repositories: kubernetes/kubernetes and
kubernetes-sigs/reference-docs into this directory.
The script sets your GOPATH to this temporary directory.
Three additional environment variables are set:
K8S_RELEASE
K8S_ROOT
K8S_WEBROOT
The script requires two arguments to run successfully:
A YAML configuration file (reference.yml)
A release version, for example:1.17
The configuration file contains a generate-command field.
The generate-command field defines a series of build instructions
from kubernetes-sigs/reference-docs/Makefile. The K8S_RELEASE variable
determines the version of the release.
The update-imported-docs.py script performs the following steps:
Clones the related repositories specified in a configuration file. For the
purpose of generating reference docs, the repository that is cloned by
default is kubernetes-sigs/reference-docs.
Runs commands under the cloned repositories to prepare the docs generator and
then generates the HTML and Markdown files.
Copies the generated HTML and Markdown files to a local clone of the <web-base>
repository under locations specified in the configuration file.
Updates kubectl command links from kubectl.md to the refer to
the sections in the kubectl command reference.
When the generated files are in your local clone of the <web-base>
repository, you can submit them in a pull request
to <web-base>.
Configuration file format
Each configuration file may contain multiple repos that will be imported together. When
necessary, you can customize the configuration file by manually editing it. You
may create new config files for importing other groups of documents.
The following is an example of the YAML configuration file:
Open <web-base>/update-imported-docs/reference.yml for editing.
Do not change the content for the generate-command field unless you understand
how the command is used to build the references.
You should not need to update reference.yml. At times, changes in the
upstream source code, may require changes to the configuration file
(for example: golang version dependencies and third-party library changes).
If you encounter build issues, contact the SIG-Docs team on the
#sig-docs Kubernetes Slack channel.
Note:
The generate-command is an optional entry, which can be used to run a
given command or a short script to generate the docs from within a repository.
In reference.yml, files contains a list of src and dst fields.
The src field contains the location of a generated Markdown file in the cloned
kubernetes-sigs/reference-docs build directory, and the dst field specifies
where to copy this file in the cloned kubernetes/website repository.
For example:
Note that when there are many files to be copied from the same source directory
to the same destination directory, you can use wildcards in the value given to
src. You must provide the directory name as the value for dst.
For example:
You can run the update-imported-docs.py tool as follows:
cd <web-base>/update-imported-docs
./update-imported-docs.py <configuration-file.yml> <release-version>
For example:
./update-imported-docs.py reference.yml 1.17
Fixing Links
The release.yml configuration file contains instructions to fix relative links.
To fix relative links within your imported files, set thegen-absolute-links
property to true. You can find an example of this in
release.yml.
Adding and committing changes in kubernetes/website
List the files that were generated and copied to <web-base>:
cd <web-base>
git status
The output shows the new and modified files. The generated output varies
depending upon changes made to the upstream source code.
Create a pull request to the kubernetes/website repository. Monitor your
pull request, and respond to review comments as needed. Continue to monitor
your pull request until it is merged.
A few minutes after your pull request is merged, your updated reference
topics will be visible in the
published documentation.
What's next
To generate the individual reference documentation by manually setting up the required build repositories and
running the build targets, see the following guides:
9.2 - Contributing to the Upstream Kubernetes Code
This page shows how to contribute to the upstream kubernetes/kubernetes project.
You can fix bugs found in the Kubernetes API documentation or the content of
the Kubernetes components such as kubeadm, kube-apiserver, and kube-controller-manager.
If you instead want to regenerate the reference documentation for the Kubernetes
API or the kube-* components from the upstream code, see the following instructions:
The reference documentation for the Kubernetes API and the kube-* components
such as kube-apiserver, kube-controller-manager are automatically generated
from the source code in the upstream Kubernetes.
When you see bugs in the generated documentation, you may want to consider
creating a patch to fix it in the upstream project.
Clone the Kubernetes repository
If you don't already have the kubernetes/kubernetes repository, get it now:
mkdir $GOPATH/src
cd$GOPATH/src
go get github.com/kubernetes/kubernetes
Determine the base directory of your clone of the
kubernetes/kubernetes repository.
For example, if you followed the preceding step to get the repository, your
base directory is $GOPATH/src/github.com/kubernetes/kubernetes.
The remaining steps refer to your base directory as <k8s-base>.
Determine the base directory of your clone of the
kubernetes-sigs/reference-docs repository.
For example, if you followed the preceding step to get the repository, your
base directory is $GOPATH/src/github.com/kubernetes-sigs/reference-docs.
The remaining steps refer to your base directory as <rdocs-base>.
Edit the Kubernetes source code
The Kubernetes API reference documentation is automatically generated from
an OpenAPI spec, which is generated from the Kubernetes source code. If you
want to change the API reference documentation, the first step is to change one
or more comments in the Kubernetes source code.
The documentation for the kube-* components is also generated from the upstream
source code. You must change the code related to the component
you want to fix in order to fix the generated documentation.
Make changes to the upstream source code
Note:
The following steps are an example, not a general procedure. Details
will be different in your situation.
Here's an example of editing a comment in the Kubernetes source code.
In your local kubernetes/kubernetes repository, check out the default branch,
and make sure it is up to date:
cd <k8s-base>
git checkout master
git pull https://github.com/kubernetes/kubernetes master
Suppose this source file in that default branch has the typo "atmost":
In your local environment, open types.go, and change "atmost" to "at most".
Verify that you have changed the file:
git status
The output shows that you are on the master branch, and that the types.go
source file has been modified:
On branch master
...
    modified:   staging/src/k8s.io/api/apps/v1/types.go
Commit your edited file
Run git add and git commit to commit the changes you have made so far. In the next step,
you will do a second commit. It is important to keep your changes separated into two commits.
View the contents of api/openapi-spec/swagger.json to make sure the typo is fixed.
For example, you could run git diff -a api/openapi-spec/swagger.json.
This is important, because swagger.json is the input to the second stage of
the doc generation process.
Run git add and git commit to commit your changes. Now you have two commits:
one that contains the edited types.go file, and one that contains the generated OpenAPI spec
and related files. Keep these two commits separate. That is, do not squash your commits.
Submit your changes as a
pull request to the
master branch of the
kubernetes/kubernetes repository.
Monitor your pull request, and respond to reviewer comments as needed. Continue
to monitor your pull request until it is merged.
PR 57758
is an example of a pull request that fixes a typo in the Kubernetes source code.
Note:
It can be tricky to determine the correct source file to be changed. In the
preceding example, the authoritative source file is in the staging directory
in the kubernetes/kubernetes repository. But in your situation,the staging directory
might not be the place to find the authoritative source. For guidance, check the
README files in
kubernetes/kubernetes
repository and in related repositories, such as
kubernetes/apiserver.
Cherry pick your commit into a release branch
In the preceding section, you edited a file in the master branch and then ran scripts
to generate an OpenAPI spec and related files. Then you submitted your changes in a pull request
to the master branch of the kubernetes/kubernetes repository. Now suppose you want to backport
your change into a release branch. For example, suppose the master branch is being used to develop
Kubernetes version 1.35, and you want to backport your change into the
release-1.34 branch.
Recall that your pull request has two commits: one for editing types.go
and one for the files generated by scripts. The next step is to propose a cherry pick of your first
commit into the release-1.34 branch. The idea is to cherry pick the commit
that edited types.go, but not the commit that has the results of running the scripts. For instructions, see
Propose a Cherry Pick.
Note:
Proposing a cherry pick requires that you have permission to set a label and a milestone in your
pull request. If you don't have those permissions, you will need to work with someone who can set the label
and milestone for you.
When you have a pull request in place for cherry picking your one commit into the
release-1.34 branch, the next step is to run these scripts in the
release-1.34 branch of your local environment.
Now add a commit to your cherry-pick pull request that has the recently generated OpenAPI spec
and related files. Monitor your pull request until it gets merged into the
release-1.34 branch.
At this point, both the master branch and the release-1.34 branch have your updated types.go
file and a set of generated files that reflect the change you made to types.go. Note that the
generated OpenAPI spec and other generated files in the release-1.34 branch are not necessarily
the same as the generated files in the master branch. The generated files in the release-1.34 branch
contain API elements only from Kubernetes 1.34. The generated files in the master branch might contain
API elements that are not in 1.34, but are under development for 1.35.
Generate the published reference docs
The preceding section showed how to edit a source file and then generate
several files, including api/openapi-spec/swagger.json in the
kubernetes/kubernetes repository.
The swagger.json file is the OpenAPI definition file to use for generating
the API reference documentation.
Docker (Required only for kubectl command reference)
Your PATH environment variable must include the required build tools, such as the Go binary and python.
You need to know how to create a pull request to a GitHub repository.
This involves creating your own fork of the repository. For more
information, see Work from a local clone.
The base directory of your clone of the
kubernetes/kubernetes repository is
<your-path-to>/kubernetes/kubernetes.
The remaining steps refer to your base directory as <k8s-base>.
The base directory of your clone of the
kubernetes/website repository is
<your-path-to>/website.
The remaining steps refer to your base directory as <web-base>.
The base directory of your clone of the
kubernetes-sigs/reference-docs
repository is <your-path-to>/reference-docs.
The remaining steps refer to your base directory as <rdocs-base>.
Create versioned directory and fetch Open API spec
The updateapispec build target creates the versioned build directory.
After the directory is created, the Open API spec is fetched from the
<k8s-base> repository. These steps ensure that the version
of the configuration files and Kubernetes Open API spec match the release version.
The versioned directory name follows the pattern of v<major>_<minor>.
In the <rdocs-base> directory, run the following build target:
cd <rdocs-base>
make updateapispec
Build the API reference docs
The copyapi target builds the API reference and
copies the generated files to directories in <web-base>.
Run the following command in <rdocs-base>:
The generated API reference files (HTML version) are copied to <web-base>/static/docs/reference/generated/kubernetes-api/v1.35/. This directory contains the standalone HTML API documentation.
Note:
The Markdown version of the API reference located at <web-base>/content/en/docs/reference/kubernetes-api/
is generated separately using the gen-resourcesdocs generator.
Locally test the API reference
Publish a local version of the API reference.
Verify the local preview.
cd <web-base>
git submodule update --init --recursive --depth 1# if not already donemake container-serve
Commit the changes
In <web-base>, run git add and git commit to commit the change.
Submit your changes as a
pull request to the
kubernetes/website repository.
Monitor your pull request, and respond to reviewer comments as needed. Continue
to monitor your pull request until it has been merged.
Docker (Required only for kubectl command reference)
Your PATH environment variable must include the required build tools, such as the Go binary and python.
You need to know how to create a pull request to a GitHub repository.
This involves creating your own fork of the repository. For more
information, see Work from a local clone.
The kubernetes/kubernetes repository provides the kubectl and kustomize source code.
Determine the base directory of your clone of the
kubernetes/kubernetes repository.
For example, if you followed the preceding step to get the repository, your
base directory is $GOPATH/src/k8s.io/kubernetes.
The remaining steps refer to your base directory as <k8s-base>.
Determine the base directory of your clone of the
kubernetes/website repository.
For example, if you followed the preceding step to get the repository, your
base directory is $GOPATH/src/github.com/<your-username>/website.
The remaining steps refer to your base directory as <web-base>.
Determine the base directory of your clone of the
kubernetes-sigs/reference-docs repository.
For example, if you followed the preceding step to get the repository, your
base directory is $GOPATH/src/github.com/kubernetes-sigs/reference-docs.
The remaining steps refer to your base directory as <rdocs-base>.
In your local k8s.io/kubernetes repository, check out the branch of interest,
and make sure it is up to date. For example, if you want to generate docs for
Kubernetes 1.34.0, you could use these commands:
cd <k8s-base>
git checkout v1.34.0
git pull https://github.com/kubernetes/kubernetes 1.34.0
If you do not need to edit the kubectl source code, follow the instructions for
Setting build variables.
Edit the kubectl source code
The kubectl command reference documentation is automatically generated from
the kubectl source code. If you want to change the reference documentation, the first step
is to change one or more comments in the kubectl source code. Make the change in your
local kubernetes/kubernetes repository, and then submit a pull request to the master branch of
github.com/kubernetes/kubernetes.
PR 56673
is an example of a pull request that fixes a typo in the kubectl source code.
Monitor your pull request, and respond to reviewer comments. Continue to monitor your
pull request until it is merged into the target branch of the kubernetes/kubernetes repository.
Cherry pick your change into a release branch
Your change is now in the master branch, which is used for development of the next
Kubernetes release. If you want your change to appear in the docs for a Kubernetes
version that has already been released, you need to propose that your change be
cherry picked into the release branch.
For example, suppose the master branch is being used to develop Kubernetes 1.35
and you want to backport your change to the release-1.34 branch. For
instructions on how to do this, see
Propose a Cherry Pick.
Monitor your cherry-pick pull request until it is merged into the release branch.
Note:
Proposing a cherry pick requires that you have permission to set a label and a
milestone in your pull request. If you don't have those permissions, you will
need to work with someone who can set the label and milestone for you.
Set build variables
Go to <rdocs-base>. On you command line, set the following environment variables.
Set K8S_ROOT to <k8s-base>.
Set K8S_WEBROOT to <web-base>.
Set K8S_RELEASE to the version of the docs you want to build.
For example, if you want to build docs for Kubernetes 1.34,
set K8S_RELEASE to 1.34.
The createversiondirs build target creates a versioned directory
and copies the kubectl reference configuration files to the versioned directory.
The versioned directory name follows the pattern of v<major>_<minor>.
In the <rdocs-base> directory, run the following build target:
cd <rdocs-base>
make createversiondirs
Check out a release tag in k8s.io/kubernetes
In your local <k8s-base> repository, check out the branch that has
the version of Kubernetes that you want to document. For example, if you want
to generate docs for Kubernetes 1.34.0, check out the
v1.34 tag. Make sure your local branch is up to date.
cd <k8s-base>
git checkout v1.34.0
git pull https://github.com/kubernetes/kubernetes v1.34.0
Run the doc generation code
In your local <rdocs-base>, run the copycli build target. The command runs as root:
cd <rdocs-base>
make copycli
The copycli command cleans the temporary build directory, generates the kubectl command files,
and copies the collated kubectl command reference HTML page and assets to <web-base>.
Create a pull request to the kubernetes/website repository. Monitor your
pull request, and respond to review comments as needed. Continue to monitor
your pull request until it is merged.
A few minutes after your pull request is merged, your updated reference
topics will be visible in the published documentation.
Docker (Required only for kubectl command reference)
Your PATH environment variable must include the required build tools, such as the Go binary and python.
You need to know how to create a pull request to a GitHub repository.
This involves creating your own fork of the repository. For more
information, see Work from a local clone.
Clone the Kubernetes repository
The metric generation happens in the Kubernetes repository.
To clone the repository, change directories to where you want the clone to exist.
This creates a kubernetes folder in your current working directory.
Generate the metrics
Inside the cloned Kubernetes repository, locate the
test/instrumentation/documentation directory.
The metrics documentation is generated in this directory.
With each release, new metrics are added.
After you run the metrics documentation generator script, copy the
metrics documentation to the Kubernetes website and
publish the updated metrics documentation.
To generate the latest metrics, make sure you are in the root of the cloned Kubernetes directory.
Then, execute the following command:
Docker (Required only for kubectl command reference)
Your PATH environment variable must include the required build tools, such as the Go binary and python.
You need to know how to create a pull request to a GitHub repository.
This involves creating your own fork of the repository. For more
information, see Work from a local clone.
10 - Advanced contributing
This page assumes that you understand how to
contribute to new content and
review others' work, and are ready
to learn about more ways to contribute. You need to use the Git command line
client and other tools for some of these tasks.
After you've been contributing to the Kubernetes documentation for a while, you
may have ideas for improving the Style Guide
, the Content Guide, the toolchain used to build
the documentation, the website style, the processes for reviewing and merging
pull requests, or other aspects of the documentation. For maximum transparency,
these types of proposals need to be discussed in a SIG Docs meeting or on the
kubernetes-sig-docs mailing list.
In addition, it can help to have some context about the way things
currently work and why past decisions have been made before proposing sweeping
changes. The quickest way to get answers to questions about how the documentation
currently works is to ask in the #sig-docs Slack channel on
kubernetes.slack.com
After the discussion has taken place and the SIG is in agreement about the desired
outcome, you can work on the proposed changes in the way that is the most
appropriate. For instance, an update to the style guide or the website's
functionality might involve opening a pull request, while a change related to
documentation testing might involve working with sig-testing.
Coordinate docs for a Kubernetes release
SIG Docs approvers
can coordinate docs for a Kubernetes release.
Each Kubernetes release is coordinated by a team of people participating in the
sig-release Special Interest Group (SIG). Others on the release team for a given
release include an overall release lead, as well as representatives from
sig-testing and others. To find out more about Kubernetes release processes,
refer to
https://github.com/kubernetes/sig-release.
The SIG Docs representative for a given release coordinates the following tasks:
Monitor the feature-tracking spreadsheet for new or changed features with an
impact on documentation. If the documentation for a given feature won't be ready
for the release, the feature may not be allowed to go into the release.
Attend sig-release meetings regularly and give updates on the status of the
docs for the release.
Review and copyedit feature documentation drafted by the SIG responsible for
implementing the feature.
Merge release-related pull requests and maintain the Git feature branch for
the release.
Mentor other SIG Docs contributors who want to learn how to do this role in
the future. This is known as "shadowing".
Publish the documentation changes related to the release when the release
artifacts are published.
Coordinating a release is typically a 3-4 month commitment, and the duty is
rotated among SIG Docs approvers.
Serve as a New Contributor Ambassador
SIG Docs approvers
can serve as New Contributor Ambassadors.
New Contributor Ambassadors welcome new contributors to SIG-Docs,
suggest PRs to new contributors, and mentor new contributors through their first
few PR submissions.
Responsibilities for New Contributor Ambassadors include:
After a new contributor has successfully submitted 5 substantive pull requests
to one or more Kubernetes repositories, they are eligible to apply for
membership
in the Kubernetes organization. The contributor's membership needs to be
backed by two sponsors who are already reviewers.
New docs contributors can request sponsors by asking in the #sig-docs channel
on the Kubernetes Slack instance or on the
SIG Docs mailing list.
If you feel confident about the applicant's work, you volunteer to sponsor them.
When they submit their membership application, reply to the application with a
"+1" and include details about why you think the applicant is a good fit for
membership in the Kubernetes organization.
Serve as a SIG Co-chair
SIG Docs members
can serve a term as a co-chair of SIG Docs.
Prerequisites
A Kubernetes member must meet the following requirements to be a co-chair:
Understand SIG Docs workflows and tooling: git, Hugo, localization, blog subproject
Approved by the SIG Docs community either directly or via lazy consensus.
Commit at least 5 hours per week (and often more) to the role for a minimum of 6 months
Responsibilities
The role of co-chair is one of service: co-chairs build contributor capacity, handle process and policy, schedule and run meetings, schedule PR wranglers, advocate for docs in the Kubernetes community, make sure that docs succeed in Kubernetes release cycles, and keep SIG Docs focused on effective priorities.
Responsibilities include:
Keep SIG Docs focused on maximizing developer happiness through excellent documentation
This dashboard is built using Google Looker Studio and shows information collected on kubernetes.io using Google Analytics 4 since August 2022.
Using the dashboard
By default, the dashboard shows all collected analytics for the past 30 days. Use the date selector to see data from a different date range. Other filtering options allow you to view data based on user location, the device used to access the site, the translation of the docs used, and more.
If you notice an issue with this dashboard, or would like to request any improvements, please open an issue.