Kubernetes extension points
Different ways to change the behavior of your Kubernetes cluster.
Kubernetes is highly configurable and extensible. As a result, there is rarely a need to fork or submit patches to the Kubernetes project code.
This guide describes the options for customizing a Kubernetes cluster. It is aimed at cluster operators who want to understand how to adapt their Kubernetes cluster to the needs of their work environment. Developers who are prospective Platform Developers or Kubernetes Project Contributors will also find it useful as an introduction to what extension points and patterns exist, and their trade-offs and limitations.
Customization approaches can be broadly divided into configuration, which only involves changing command line arguments, local configuration files, or API resources; and extensions, which involve running additional programs, additional network services, or both. This document is primarily about extensions.
Configuration files and command arguments are documented in the Reference section of the online documentation, with a page for each binary:
Command arguments and configuration files may not always be changeable in a hosted Kubernetes service or a distribution with managed installation. When they are changeable, they are usually only changeable by the cluster operator. Also, they are subject to change in future Kubernetes versions, and setting them may require restarting processes. For those reasons, they should be used only when there are no other options.
Built-in policy APIs, such as ResourceQuota, NetworkPolicy and Role-based Access Control (RBAC), are built-in Kubernetes APIs that provide declaratively configured policy settings. APIs are typically usable even with hosted Kubernetes services and with managed Kubernetes installations. The built-in policy APIs follow the same conventions as other Kubernetes resources such as Pods. When you use a policy APIs that is stable, you benefit from a defined support policy like other Kubernetes APIs. For these reasons, policy APIs are recommended over configuration files and command arguments where suitable.
Extensions are software components that extend and deeply integrate with Kubernetes. They adapt it to support new types and new kinds of hardware.
Many cluster administrators use a hosted or distribution instance of Kubernetes. These clusters come with extensions pre-installed. As a result, most Kubernetes users will not need to install extensions and even fewer users will need to author new ones.
Kubernetes is designed to be automated by writing client programs. Any program that reads and/or writes to the Kubernetes API can provide useful automation. Automation can run on the cluster or off it. By following the guidance in this doc you can write highly available and robust automation. Automation generally works with any Kubernetes cluster, including hosted clusters and managed installations.
There is a specific pattern for writing client programs that work well with
Kubernetes called the controller
pattern. Controllers typically read an object's .spec, possibly do things, and then
update the object's .status.
A controller is a client of the Kubernetes API. When Kubernetes is the client and calls out to a remote service, Kubernetes calls this a webhook. The remote service is called a webhook backend. As with custom controllers, webhooks do add a point of failure.
In the webhook model, Kubernetes makes a network request to a remote service. With the alternative binary Plugin model, Kubernetes executes a binary (program). Binary plugins are used by the kubelet (for example, CSI storage plugins and CNI network plugins), and by kubectl (see Extend kubectl with plugins).
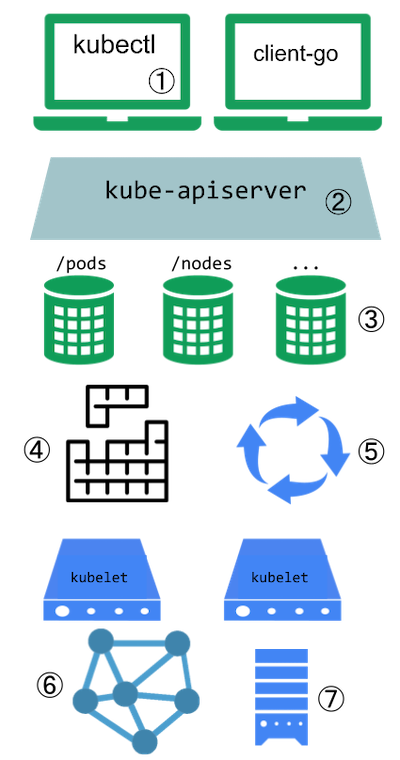
This diagram shows the extension points in a Kubernetes cluster and the clients that access it.
Kubernetes extension points
Users often interact with the Kubernetes API using kubectl. Plugins
customise the behaviour of clients. There are generic extensions that can apply to different clients,
as well as specific ways to extend kubectl.
The API server handles all requests. Several types of extension points in the API server allow authenticating requests, or blocking them based on their content, editing content, and handling deletion. These are described in the API Access Extensions section.
The API server serves various kinds of resources. Built-in resource kinds, such as
pods, are defined by the Kubernetes project and can't be changed.
Read API extensions to learn about extending the Kubernetes API.
The Kubernetes scheduler decides which nodes to place pods on. There are several ways to extend scheduling, which are described in the Scheduling extensions section.
Much of the behavior of Kubernetes is implemented by programs called controllers, that are clients of the API server. Controllers are often used in conjunction with custom resources. Read combining new APIs with automation and Changing built-in resources to learn more.
The kubelet runs on servers (nodes), and helps pods appear like virtual servers with their own IPs on the cluster network. Network Plugins allow for different implementations of pod networking.
You can use Device Plugins to integrate custom hardware or other special node-local facilities, and make these available to Pods running in your cluster. The kubelet includes support for working with device plugins.
The kubelet also mounts and unmounts volume for pods and their containers. You can use Storage Plugins to add support for new kinds of storage and other volume types.
If you are unsure where to start, this flowchart can help. Note that some solutions may involve several types of extensions.

Flowchart guide to select an extension approach
Plugins for kubectl are separate binaries that add or replace the behavior of specific subcommands.
The kubectl tool can also integrate with credential plugins
These extensions only affect a individual user's local environment, and so cannot enforce site-wide policies.
If you want to extend the kubectl tool, read Extend kubectl with plugins.
Consider adding a Custom Resource to Kubernetes if you want to define new controllers, application
configuration objects or other declarative APIs, and to manage them using Kubernetes tools, such
as kubectl.
For more about Custom Resources, see the Custom Resources concept guide.
You can use Kubernetes' API Aggregation Layer to integrate the Kubernetes API with additional services such as for metrics.
A combination of a custom resource API and a control loop is called the controllers pattern. If your controller takes the place of a human operator deploying infrastructure based on a desired state, then the controller may also be following the operator pattern. The Operator pattern is used to manage specific applications; usually, these are applications that maintain state and require care in how they are managed.
You can also make your own custom APIs and control loops that manage other resources, such as storage, or to define policies (such as an access control restriction).
When you extend the Kubernetes API by adding custom resources, the added resources always fall into a new API Groups. You cannot replace or change existing API groups. Adding an API does not directly let you affect the behavior of existing APIs (such as Pods), whereas API Access Extensions do.
When a request reaches the Kubernetes API Server, it is first authenticated, then authorized, and is then subject to various types of admission control (some requests are in fact not authenticated, and get special treatment). See Controlling Access to the Kubernetes API for more on this flow.
Each of the steps in the Kubernetes authentication / authorization flow offers extension points.
Authentication maps headers or certificates in all requests to a username for the client making the request.
Kubernetes has several built-in authentication methods that it supports. It can also sit behind an
authenticating proxy, and it can send a token from an Authorization: header to a remote service for
verification (an authentication webhook)
if those don't meet your needs.
Authorization determines whether specific users can read, write, and do other operations on API resources. It works at the level of whole resources -- it doesn't discriminate based on arbitrary object fields.
If the built-in authorization options don't meet your needs, an authorization webhook allows calling out to custom code that makes an authorization decision.
After a request is authorized, if it is a write operation, it also goes through Admission Control steps. In addition to the built-in steps, there are several extensions:
Device plugins allow a node to discover new Node resources (in addition to the builtin ones like cpu and memory) via a Device Plugin.
Container Storage Interface (CSI) plugins provide a way to extend Kubernetes with supports for new kinds of volumes. The volumes can be backed by durable external storage, or provide ephemeral storage, or they might offer a read-only interface to information using a filesystem paradigm.
Kubernetes also includes support for FlexVolume plugins, which are deprecated since Kubernetes v1.23 (in favour of CSI).
FlexVolume plugins allow users to mount volume types that aren't natively supported by Kubernetes. When you run a Pod that relies on FlexVolume storage, the kubelet calls a binary plugin to mount the volume. The archived FlexVolume design proposal has more detail on this approach.
The Kubernetes Volume Plugin FAQ for Storage Vendors includes general information on storage plugins.
Your Kubernetes cluster needs a network plugin in order to have a working Pod network and to support other aspects of the Kubernetes network model.
Network Plugins allow Kubernetes to work with different networking topologies and technologies.
Kubernetes v1.26 [stable]
The plugins can communicate with external services or use local files to obtain credentials. This way, the kubelet does not need to have static credentials for each registry, and can support various authentication methods and protocols.
For plugin configuration details, see Configure a kubelet image credential provider.
The scheduler is a special type of controller that watches pods, and assigns pods to nodes. The default scheduler can be replaced entirely, while continuing to use other Kubernetes components, or multiple schedulers can run at the same time.
This is a significant undertaking, and almost all Kubernetes users find they do not need to modify the scheduler.
You can control which scheduling plugins are active, or associate sets of plugins with different named scheduler profiles. You can also write your own plugin that integrates with one or more of the kube-scheduler's extension points.
Finally, the built in kube-scheduler component supports a
webhook
that permits a remote HTTP backend (scheduler extension) to filter and / or prioritize
the nodes that the kube-scheduler chooses for a pod.
This section covers extensions to your cluster that do not come as part as Kubernetes itself. You can use these extensions to enhance the nodes in your cluster, or to provide the network fabric that links Pods together.
CSI and FlexVolume storage plugins
Container Storage Interface (CSI) plugins provide a way to extend Kubernetes with supports for new kinds of volumes. The volumes can be backed by durable external storage, or provide ephemeral storage, or they might offer a read-only interface to information using a filesystem paradigm.
Kubernetes also includes support for FlexVolume plugins, which are deprecated since Kubernetes v1.23 (in favour of CSI).
FlexVolume plugins allow users to mount volume types that aren't natively supported by Kubernetes. When you run a Pod that relies on FlexVolume storage, the kubelet calls a binary plugin to mount the volume. The archived FlexVolume design proposal has more detail on this approach.
The Kubernetes Volume Plugin FAQ for Storage Vendors includes general information on storage plugins.
Device plugins allow a node to discover new Node facilities (in addition to the
built-in node resources such as cpu and memory), and provide these custom node-local
facilities to Pods that request them.
Network plugins allow Kubernetes to work with different networking topologies and technologies. Your Kubernetes cluster needs a network plugin in order to have a working Pod network and to support other aspects of the Kubernetes network model.
Kubernetes 1.35 is compatible with CNI network plugins.
Kubernetes (version 1.3 through to the latest 1.35, and likely onwards) lets you use Container Network Interface (CNI) plugins for cluster networking. You must use a CNI plugin that is compatible with your cluster and that suits your needs. Different plugins are available (both open- and closed- source) in the wider Kubernetes ecosystem.
A CNI plugin is required to implement the Kubernetes network model.
You must use a CNI plugin that is compatible with the v0.4.0 or later releases of the CNI specification. The Kubernetes project recommends using a plugin that is compatible with the v1.0.0 CNI specification (plugins can be compatible with multiple spec versions).
A Container Runtime, in the networking context, is a daemon on a node configured to provide CRI Services for kubelet. In particular, the Container Runtime must be configured to load the CNI plugins required to implement the Kubernetes network model.
Prior to Kubernetes 1.24, the CNI plugins could also be managed by the kubelet using the
cni-bin-dir and network-plugin command-line parameters.
These command-line parameters were removed in Kubernetes 1.24, with management of the CNI no
longer in scope for kubelet.
See Troubleshooting CNI plugin-related errors if you are facing issues following the removal of dockershim.
For specific information about how a Container Runtime manages the CNI plugins, see the documentation for that Container Runtime, for example:
For specific information about how to install and manage a CNI plugin, see the documentation for that plugin or networking provider.
In addition to the CNI plugin installed on the nodes for implementing the Kubernetes network
model, Kubernetes also requires the container runtimes to provide a loopback interface lo, which
is used for each sandbox (pod sandboxes, vm sandboxes, ...).
Implementing the loopback interface can be accomplished by re-using the
CNI loopback plugin.
or by developing your own code to achieve this (see
this example from CRI-O).
The CNI networking plugin supports hostPort. You can use the official
portmap
plugin offered by the CNI plugin team or use your own plugin with portMapping functionality.
If you want to enable hostPort support, you must specify portMappings capability in your
cni-conf-dir. For example:
{
  "name": "k8s-pod-network",
  "cniVersion": "0.4.0",
  "plugins": [
    {
      "type": "calico",
      "log_level": "info",
      "datastore_type": "kubernetes",
      "nodename": "127.0.0.1",
      "ipam": {
        "type": "host-local",
        "subnet": "usePodCidr"
      },
      "policy": {
        "type": "k8s"
      },
      "kubernetes": {
        "kubeconfig": "/etc/cni/net.d/calico-kubeconfig"
      }
    },
    {
      "type": "portmap",
      "capabilities": {"portMappings": true},
      "externalSetMarkChain": "KUBE-MARK-MASQ"
    }
  ]
}
Experimental Feature
The CNI networking plugin also supports pod ingress and egress traffic shaping. You can use the official bandwidth plugin offered by the CNI plugin team or use your own plugin with bandwidth control functionality.
If you want to enable traffic shaping support, you must add the bandwidth plugin to your CNI
configuration file (default /etc/cni/net.d) and ensure that the binary is included in your CNI
bin dir (default /opt/cni/bin).
{
  "name": "k8s-pod-network",
  "cniVersion": "0.4.0",
  "plugins": [
    {
      "type": "calico",
      "log_level": "info",
      "datastore_type": "kubernetes",
      "nodename": "127.0.0.1",
      "ipam": {
        "type": "host-local",
        "subnet": "usePodCidr"
      },
      "policy": {
        "type": "k8s"
      },
      "kubernetes": {
        "kubeconfig": "/etc/cni/net.d/calico-kubeconfig"
      }
    },
    {
      "type": "bandwidth",
      "capabilities": {"bandwidth": true}
    }
  ]
}
Now you can add the kubernetes.io/ingress-bandwidth and kubernetes.io/egress-bandwidth
annotations to your Pod. For example:
apiVersion: v1
kind: Pod
metadata:
  annotations:
    kubernetes.io/ingress-bandwidth: 1M
    kubernetes.io/egress-bandwidth: 1M
...
Kubernetes v1.26 [stable]
Kubernetes provides a device plugin framework that you can use to advertise system hardware resources to the Kubelet.
Instead of customizing the code for Kubernetes itself, vendors can implement a device plugin that you deploy either manually or as a DaemonSet. The targeted devices include GPUs, high-performance NICs, FPGAs, InfiniBand adapters, and other similar computing resources that may require vendor specific initialization and setup.
The kubelet exports a Registration gRPC service:
service Registration {
	rpc Register(RegisterRequest) returns (Empty) {}
}
A device plugin can register itself with the kubelet through this gRPC service. During the registration, the device plugin needs to send:
ResourceName it wants to advertise. Here ResourceName needs to follow the
extended resource naming scheme
as vendor-domain/resourcetype.
(For example, an NVIDIA GPU is advertised as nvidia.com/gpu.)Following a successful registration, the device plugin sends the kubelet the
list of devices it manages, and the kubelet is then in charge of advertising those
resources to the API server as part of the kubelet node status update.
For example, after a device plugin registers hardware-vendor.example/foo with the kubelet
and reports two healthy devices on a node, the node status is updated
to advertise that the node has 2 "Foo" devices installed and available.
Then, users can request devices as part of a Pod specification
(see container).
Requesting extended resources is similar to how you manage requests and limits for
other resources, with the following differences:
Suppose a Kubernetes cluster is running a device plugin that advertises resource hardware-vendor.example/foo
on certain nodes. Here is an example of a pod requesting this resource to run a demo workload:
---
apiVersion: v1
kind: Pod
metadata:
  name: demo-pod
spec:
  containers:
    - name: demo-container-1
      image: registry.k8s.io/pause:3.8
      resources:
        limits:
          hardware-vendor.example/foo: 2
#
# This Pod needs 2 of the hardware-vendor.example/foo devices
# and can only schedule onto a Node that's able to satisfy
# that need.
#
# If the Node has more than 2 of those devices available, the
# remainder would be available for other Pods to use.
The general workflow of a device plugin includes the following steps:
Initialization. During this phase, the device plugin performs vendor-specific initialization and setup to make sure the devices are in a ready state.
The plugin starts a gRPC service, with a Unix socket under the host path
/var/lib/kubelet/device-plugins/, that implements the following interfaces:
service DevicePlugin {
      // GetDevicePluginOptions returns options to be communicated with Device Manager.
      rpc GetDevicePluginOptions(Empty) returns (DevicePluginOptions) {}

      // ListAndWatch returns a stream of List of Devices
      // Whenever a Device state change or a Device disappears, ListAndWatch
      // returns the new list
      rpc ListAndWatch(Empty) returns (stream ListAndWatchResponse) {}

      // Allocate is called during container creation so that the Device
      // Plugin can run device specific operations and instruct Kubelet
      // of the steps to make the Device available in the container
      rpc Allocate(AllocateRequest) returns (AllocateResponse) {}

      // GetPreferredAllocation returns a preferred set of devices to allocate
      // from a list of available ones. The resulting preferred allocation is not
      // guaranteed to be the allocation ultimately performed by the
      // devicemanager. It is only designed to help the devicemanager make a more
      // informed allocation decision when possible.
      rpc GetPreferredAllocation(PreferredAllocationRequest) returns (PreferredAllocationResponse) {}

      // PreStartContainer is called, if indicated by Device Plugin during registration phase,
      // before each container start. Device plugin can run device specific operations
      // such as resetting the device before making devices available to the container.
      rpc PreStartContainer(PreStartContainerRequest) returns (PreStartContainerResponse) {}
}
GetPreferredAllocation() or PreStartContainer(). Flags indicating
the availability of these calls, if any, should be set in the DevicePluginOptions
message sent back by a call to GetDevicePluginOptions(). The kubelet will
always call GetDevicePluginOptions() to see which optional functions are
available, before calling any of them directly.The plugin registers itself with the kubelet through the Unix socket at host
path /var/lib/kubelet/device-plugins/kubelet.sock.
After successfully registering itself, the device plugin runs in serving mode, during which it keeps
monitoring device health and reports back to the kubelet upon any device state changes.
It is also responsible for serving Allocate gRPC requests. During Allocate, the device plugin may
do device-specific preparation; for example, GPU cleanup or QRNG initialization.
If the operations succeed, the device plugin returns an AllocateResponse that contains container
runtime configurations for accessing the allocated devices. The kubelet passes this information
to the container runtime.
An AllocateResponse contains zero or more ContainerAllocateResponse objects. In these, the
device plugin defines modifications that must be made to a container's definition to provide
access to the device. These modifications include:
DevicePluginCDIDevices feature gate
is enabled for both the kubelet and the kube-apiserver. This was added as an alpha feature in Kubernetes
v1.28, graduated to beta in v1.29 and to GA in v1.31.A device plugin is expected to detect kubelet restarts and re-register itself with the new
kubelet instance. A new kubelet instance deletes all the existing Unix sockets under
/var/lib/kubelet/device-plugins when it starts. A device plugin can monitor the deletion
of its Unix socket and re-register itself upon such an event.
There are cases when devices fail or are shut down. The responsibility of the Device Plugin
in this case is to notify the kubelet about the situation using the ListAndWatchResponse API.
Once a device is marked as unhealthy, the kubelet will decrease the allocatable count for this resource on the Node to reflect how many devices can be used for scheduling new pods. Capacity count for the resource will not change.
Pods that were assigned to the failed devices will continue be assigned to this device.
It is typical that code relying on the device will start failing and Pod may get
into Failed phase if restartPolicy for the Pod was not Always or enter the crash loop
otherwise.
Before Kubernetes v1.31, the way to know whether or not a Pod is associated with the failed device is to use the PodResources API.
Kubernetes v1.31 [alpha](disabled by default)By enabling the feature gate ResourceHealthStatus, the field allocatedResourcesStatus
will be added to each container status, within the .status for each Pod. The allocatedResourcesStatus
field
reports health information for each device assigned to the container.
For a failed Pod, or where you suspect a fault, you can use this status to understand whether
the Pod behavior may be associated with device failure. For example, if an accelerator is reporting
an over-temperature event, the allocatedResourcesStatus field may be able to report this.
You can deploy a device plugin as a DaemonSet, as a package for your node's operating system, or manually.
The canonical directory /var/lib/kubelet/device-plugins requires privileged access,
so a device plugin must run in a privileged security context.
If you're deploying a device plugin as a DaemonSet, /var/lib/kubelet/device-plugins
must be mounted as a Volume
in the plugin's PodSpec.
If you choose the DaemonSet approach you can rely on Kubernetes to: place the device plugin's Pod onto Nodes, to restart the daemon Pod after failure, and to help automate upgrades.
Previously, the versioning scheme required the Device Plugin's API version to match exactly the Kubelet's version. Since the graduation of this feature to Beta in v1.12 this is no longer a hard requirement. The API is versioned and has been stable since Beta graduation of this feature. Because of this, kubelet upgrades should be seamless but there still may be changes in the API before stabilization making upgrades not guaranteed to be non-breaking.
As a project, Kubernetes recommends that device plugin developers:
To run device plugins on nodes that need to be upgraded to a Kubernetes release with a newer device plugin API version, upgrade your device plugins to support both versions before upgrading these nodes. Taking that approach will ensure the continuous functioning of the device allocations during the upgrade.
Kubernetes v1.28 [stable]
In order to monitor resources provided by device plugins, monitoring agents need to be able to
discover the set of devices that are in-use on the node and obtain metadata to describe which
container the metric should be associated with. Prometheus metrics
exposed by device monitoring agents should follow the
Kubernetes Instrumentation Guidelines,
identifying containers using pod, namespace, and container prometheus labels.
The kubelet provides a gRPC service to enable discovery of in-use devices, and to provide metadata for these devices:
// PodResourcesLister is a service provided by the kubelet that provides information about the
// node resources consumed by pods and containers on the node
service PodResourcesLister {
    rpc List(ListPodResourcesRequest) returns (ListPodResourcesResponse) {}
    rpc GetAllocatableResources(AllocatableResourcesRequest) returns (AllocatableResourcesResponse) {}
    rpc Get(GetPodResourcesRequest) returns (GetPodResourcesResponse) {}
}
List gRPC endpointThe List endpoint provides information on resources of running pods, with details such as the
id of exclusively allocated CPUs, device id as it was reported by device plugins and id of
the NUMA node where these devices are allocated. Also, for NUMA-based machines, it contains the
information about memory and hugepages reserved for a container.
Starting from Kubernetes v1.27, the List endpoint can provide information on resources
of running pods allocated in ResourceClaims by the DynamicResourceAllocation API.
Starting from Kubernetes v1.34, this feature is enabled by default.
To disable, kubelet must be started with the following flags:
--feature-gates=KubeletPodResourcesDynamicResources=false
// ListPodResourcesResponse is the response returned by List function
message ListPodResourcesResponse {
    repeated PodResources pod_resources = 1;
}

// PodResources contains information about the node resources assigned to a pod
message PodResources {
    string name = 1;
    string namespace = 2;
    repeated ContainerResources containers = 3;
}

// ContainerResources contains information about the resources assigned to a container
message ContainerResources {
    string name = 1;
    repeated ContainerDevices devices = 2;
    repeated int64 cpu_ids = 3;
    repeated ContainerMemory memory = 4;
    repeated DynamicResource dynamic_resources = 5;
}

// ContainerMemory contains information about memory and hugepages assigned to a container
message ContainerMemory {
    string memory_type = 1;
    uint64 size = 2;
    TopologyInfo topology = 3;
}

// Topology describes hardware topology of the resource
message TopologyInfo {
        repeated NUMANode nodes = 1;
}

// NUMA representation of NUMA node
message NUMANode {
        int64 ID = 1;
}

// ContainerDevices contains information about the devices assigned to a container
message ContainerDevices {
    string resource_name = 1;
    repeated string device_ids = 2;
    TopologyInfo topology = 3;
}

// DynamicResource contains information about the devices assigned to a container by Dynamic Resource Allocation
message DynamicResource {
    string class_name = 1;
    string claim_name = 2;
    string claim_namespace = 3;
    repeated ClaimResource claim_resources = 4;
}

// ClaimResource contains per-plugin resource information
message ClaimResource {
    repeated CDIDevice cdi_devices = 1 [(gogoproto.customname) = "CDIDevices"];
}

// CDIDevice specifies a CDI device information
message CDIDevice {
    // Fully qualified CDI device name
    // for example: vendor.com/gpu=gpudevice1
    // see more details in the CDI specification:
    // https://github.com/container-orchestrated-devices/container-device-interface/blob/main/SPEC.md
    string name = 1;
}
cpu_ids in the ContainerResources in the List endpoint correspond to exclusive CPUs allocated
to a particular container. If the goal is to evaluate CPUs that belong to the shared pool, the List
endpoint needs to be used in conjunction with the GetAllocatableResources endpoint as explained
below:
GetAllocatableResources to get a list of all the allocatable CPUsGetCpuIds on all ContainerResources in the systemGetCpuIds calls from the GetAllocatableResources callGetAllocatableResources gRPC endpointKubernetes v1.28 [stable]
GetAllocatableResources provides information on resources initially available on the worker node. It provides more information than kubelet exports to APIServer.
GetAllocatableResources should only be used to evaluate allocatable
resources on a node. If the goal is to evaluate free/unallocated resources it should be used in
conjunction with the List() endpoint. The result obtained by GetAllocatableResources would remain
the same unless the underlying resources exposed to kubelet change. This happens rarely but when
it does (for example: hotplug/hotunplug, device health changes), client is expected to call
GetAllocatableResources endpoint.
However, calling GetAllocatableResources endpoint is not sufficient in case of cpu and/or memory
update and Kubelet needs to be restarted to reflect the correct resource capacity and allocatable.
// AllocatableResourcesResponses contains information about all the devices known by the kubelet
message AllocatableResourcesResponse {
    repeated ContainerDevices devices = 1;
    repeated int64 cpu_ids = 2;
    repeated ContainerMemory memory = 3;
}
ContainerDevices do expose the topology information declaring to which NUMA cells the device is
affine. The NUMA cells are identified using a opaque integer ID, which value is consistent to
what device plugins report
when they register themselves to the kubelet.
The gRPC service is served over a unix socket at /var/lib/kubelet/pod-resources/kubelet.sock.
Monitoring agents for device plugin resources can be deployed as a daemon, or as a DaemonSet.
The canonical directory /var/lib/kubelet/pod-resources requires privileged access, so monitoring
agents must run in a privileged security context. If a device monitoring agent is running as a
DaemonSet, /var/lib/kubelet/pod-resources must be mounted as a
Volume in the device monitoring agent's
PodSpec.
When accessing the /var/lib/kubelet/pod-resources/kubelet.sock from DaemonSet
or any other app deployed as a container on the host, which is mounting socket as
a volume, it is a good practice to mount directory /var/lib/kubelet/pod-resources/
instead of the /var/lib/kubelet/pod-resources/kubelet.sock. This will ensure
that after kubelet restart, container will be able to re-connect to this socket.
Container mounts are managed by inode referencing the socket or directory, depending on what was mounted. When kubelet restarts, socket is deleted and a new socket is created, while directory stays untouched. So the original inode for the socket become unusable. Inode to directory will continue working.
Get gRPC endpointKubernetes v1.34 [beta]
The Get endpoint provides information on resources of a running Pod. It exposes information
similar to those described in the List endpoint. The Get endpoint requires PodName
and PodNamespace of the running Pod.
// GetPodResourcesRequest contains information about the pod
message GetPodResourcesRequest {
    string pod_name = 1;
    string pod_namespace = 2;
}
To disable this feature, you must start your kubelet services with the following flag:
--feature-gates=KubeletPodResourcesGet=false
The Get endpoint can provide Pod information related to dynamic resources
allocated by the dynamic resource allocation API.
Starting from Kubernetes v1.34, this feature is enabled by default.
To disable, kubelet must be started with the following flags:
--feature-gates=KubeletPodResourcesDynamicResources=false
Kubernetes v1.27 [stable]
The Topology Manager is a Kubelet component that allows resources to be co-ordinated in a Topology
aligned manner. In order to do this, the Device Plugin API was extended to include a
TopologyInfo struct.
message TopologyInfo {
    repeated NUMANode nodes = 1;
}

message NUMANode {
    int64 ID = 1;
}
Device Plugins that wish to leverage the Topology Manager can send back a populated TopologyInfo struct as part of the device registration, along with the device IDs and the health of the device. The device manager will then use this information to consult with the Topology Manager and make resource assignment decisions.
TopologyInfo supports setting a nodes field to either nil or a list of NUMA nodes. This
allows the Device Plugin to advertise a device that spans multiple NUMA nodes.
Setting TopologyInfo to nil or providing an empty list of NUMA nodes for a given device
indicates that the Device Plugin does not have a NUMA affinity preference for that device.
An example TopologyInfo struct populated for a device by a Device Plugin:
pluginapi.Device{ID: "25102017", Health: pluginapi.Healthy, Topology:&pluginapi.TopologyInfo{Nodes: []*pluginapi.NUMANode{&pluginapi.NUMANode{ID: 0,},}}}
Here are some examples of device plugin implementations:
Custom resources are extensions of the Kubernetes API. Kubernetes provides two ways to add custom resources to your cluster:
Custom resources are extensions of the Kubernetes API. This page discusses when to add a custom resource to your Kubernetes cluster and when to use a standalone service. It describes the two methods for adding custom resources and how to choose between them.
A resource is an endpoint in the Kubernetes API that stores a collection of API objects of a certain kind; for example, the built-in pods resource contains a collection of Pod objects.
A custom resource is an extension of the Kubernetes API that is not necessarily available in a default Kubernetes installation. It represents a customization of a particular Kubernetes installation. However, many core Kubernetes functions are now built using custom resources, making Kubernetes more modular.
Custom resources can appear and disappear in a running cluster through dynamic registration, and cluster admins can update custom resources independently of the cluster itself. Once a custom resource is installed, users can create and access its objects using kubectl, just as they do for built-in resources like Pods.
On their own, custom resources let you store and retrieve structured data. When you combine a custom resource with a custom controller, custom resources provide a true declarative API.
The Kubernetes declarative API enforces a separation of responsibilities. You declare the desired state of your resource. The Kubernetes controller keeps the current state of Kubernetes objects in sync with your declared desired state. This is in contrast to an imperative API, where you instruct a server what to do.
You can deploy and update a custom controller on a running cluster, independently of the cluster's lifecycle. Custom controllers can work with any kind of resource, but they are especially effective when combined with custom resources. The Operator pattern combines custom resources and custom controllers. You can use custom controllers to encode domain knowledge for specific applications into an extension of the Kubernetes API.
When creating a new API, consider whether to aggregate your API with the Kubernetes cluster APIs or let your API stand alone.
| Consider API aggregation if: | Prefer a stand-alone API if: |
|---|---|
| Your API is Declarative. | Your API does not fit the Declarative model. |
You want your new types to be readable and writable using kubectl. |
kubectl support is not required |
| You want to view your new types in a Kubernetes UI, such as dashboard, alongside built-in types. | Kubernetes UI support is not required. |
| You are developing a new API. | You already have a program that serves your API and works well. |
| You are willing to accept the format restriction that Kubernetes puts on REST resource paths, such as API Groups and Namespaces. (See the API Overview.) | You need to have specific REST paths to be compatible with an already defined REST API. |
| Your resources are naturally scoped to a cluster or namespaces of a cluster. | Cluster or namespace scoped resources are a poor fit; you need control over the specifics of resource paths. |
| You want to reuse Kubernetes API support features. | You don't need those features. |
In a Declarative API, typically:
Imperative APIs are not declarative. Signs that your API might not be declarative include:
Use a ConfigMap if any of the following apply:
mysql.cnf or
pom.xml.Use a custom resource (CRD or Aggregated API) if most of the following apply:
kubectl; for example, kubectl get my-object object-name..spec, .status, and .metadata.Kubernetes provides two ways to add custom resources to your cluster:
Kubernetes provides these two options to meet the needs of different users, so that neither ease of use nor flexibility is compromised.
Aggregated APIs are subordinate API servers that sit behind the primary API server, which acts as a proxy. This arrangement is called API Aggregation(AA). To users, the Kubernetes API appears extended.
CRDs allow users to create new types of resources without adding another API server. You do not need to understand API Aggregation to use CRDs.
Regardless of how they are installed, the new resources are referred to as Custom Resources to distinguish them from built-in Kubernetes resources (like pods).
Avoid using a Custom Resource as data storage for application, end user, or monitoring data: architecture designs that store application data within the Kubernetes API typically represent a design that is too closely coupled.
Architecturally, cloud native application architectures favor loose coupling between components. If part of your workload requires a backing service for its routine operation, run that backing service as a component or consume it as an external service. This way, your workload does not rely on the Kubernetes API for its normal operation.
The CustomResourceDefinition API resource allows you to define custom resources. Defining a CRD object creates a new custom resource with a name and schema that you specify. The Kubernetes API serves and handles the storage of your custom resource. The name of the CRD object itself must be a valid DNS subdomain name derived from the defined resource name and its API group; see how to create a CRD for more details. Further, the name of an object whose kind/resource is defined by a CRD must also be a valid DNS subdomain name.
This frees you from writing your own API server to handle the custom resource, but the generic nature of the implementation means you have less flexibility than with API server aggregation.
Refer to the custom controller example for an example of how to register a new custom resource, work with instances of your new resource type, and use a controller to handle events.
Usually, each resource in the Kubernetes API requires code that handles REST requests and manages persistent storage of objects. The main Kubernetes API server handles built-in resources like pods and services, and can also generically handle custom resources through CRDs.
The aggregation layer allows you to provide specialized implementations for your custom resources by writing and deploying your own API server. The main API server delegates requests to your API server for the custom resources that you handle, making them available to all of its clients.
CRDs are easier to use. Aggregated APIs are more flexible. Choose the method that best meets your needs.
Typically, CRDs are a good fit if:
CRDs are easier to create than Aggregated APIs.
| CRDs | Aggregated API |
|---|---|
| Do not require programming. Users can choose any language for a CRD controller. | Requires programming and building binary and image. |
| No additional service to run; CRDs are handled by API server. | An additional service to create and that could fail. |
| No ongoing support once the CRD is created. Any bug fixes are picked up as part of normal Kubernetes Master upgrades. | May need to periodically pickup bug fixes from upstream and rebuild and update the Aggregated API server. |
| No need to handle multiple versions of your API; for example, when you control the client for this resource, you can upgrade it in sync with the API. | You need to handle multiple versions of your API; for example, when developing an extension to share with the world. |
Aggregated APIs offer more advanced API features and customization of other features; for example, the storage layer.
| Feature | Description | CRDs | Aggregated API |
|---|---|---|---|
| Validation | Help users prevent errors and allow you to evolve your API independently of your clients. These features are most useful when there are many clients who can't all update at the same time. | Yes. Most validation can be specified in the CRD using OpenAPI v3.0 validation. CRDValidationRatcheting feature gate allows failing validations specified using OpenAPI also can be ignored if the failing part of the resource was unchanged. Any other validations supported by addition of a Validating Webhook. | Yes, arbitrary validation checks |
| Defaulting | See above | Yes, either via OpenAPI v3.0 validation default keyword (GA in 1.17), or via a Mutating Webhook (though this will not be run when reading from etcd for old objects). |
Yes |
| Multi-versioning | Allows serving the same object through two API versions. Can help ease API changes like renaming fields. Less important if you control your client versions. | Yes | Yes |
| Custom Storage | If you need storage with a different performance mode (for example, a time-series database instead of key-value store) or isolation for security (for example, encryption of sensitive information, etc.) | No | Yes |
| Custom Business Logic | Perform arbitrary checks or actions when creating, reading, updating or deleting an object | Yes, using Webhooks. | Yes |
| Scale Subresource | Allows systems like HorizontalPodAutoscaler and PodDisruptionBudget interact with your new resource | Yes | Yes |
| Status Subresource | Allows fine-grained access control where user writes the spec section and the controller writes the status section. Allows incrementing object Generation on custom resource data mutation (requires separate spec and status sections in the resource) | Yes | Yes |
| Other Subresources | Add operations other than CRUD, such as "logs" or "exec". | No | Yes |
| strategic-merge-patch | The new endpoints support PATCH with Content-Type: application/strategic-merge-patch+json. Useful for updating objects that may be modified both locally, and by the server. For more information, see "Update API Objects in Place Using kubectl patch" |
No | Yes |
| Protocol Buffers | The new resource supports clients that want to use Protocol Buffers | No | Yes |
| OpenAPI Schema | Is there an OpenAPI (swagger) schema for the types that can be dynamically fetched from the server? Is the user protected from misspelling field names by ensuring only allowed fields are set? Are types enforced (in other words, don't put an int in a string field?) |
Yes, based on the OpenAPI v3.0 validation schema (GA in 1.16). | Yes |
| Instance Name | Does this extension mechanism impose any constraints on the names of objects whose kind/resource is defined this way? | Yes, such an object's name must be a valid DNS subdomain name. | No |
When you create a custom resource, either via a CRD or an AA, you get many features for your API, compared to implementing it outside the Kubernetes platform:
| Feature | What it does |
|---|---|
| CRUD | The new endpoints support CRUD basic operations via HTTP and kubectl |
| Watch | The new endpoints support Kubernetes Watch operations via HTTP |
| Discovery | Clients like kubectl and dashboard automatically offer list, display, and field edit operations on your resources |
| json-patch | The new endpoints support PATCH with Content-Type: application/json-patch+json |
| merge-patch | The new endpoints support PATCH with Content-Type: application/merge-patch+json |
| HTTPS | The new endpoints uses HTTPS |
| Built-in Authentication | Access to the extension uses the core API server (aggregation layer) for authentication |
| Built-in Authorization | Access to the extension can reuse the authorization used by the core API server; for example, RBAC. |
| Finalizers | Block deletion of extension resources until external cleanup happens. |
| Admission Webhooks | Set default values and validate extension resources during any create/update/delete operation. |
| UI/CLI Display | Kubectl, dashboard can display extension resources. |
| Unset versus Empty | Clients can distinguish unset fields from zero-valued fields. |
| Client Libraries Generation | Kubernetes provides generic client libraries, as well as tools to generate type-specific client libraries. |
| Labels and annotations | Common metadata across objects that tools know how to edit for core and custom resources. |
There are several points to be aware of before adding a custom resource to your cluster.
While creating a CRD does not automatically add any new points of failure (for example, by causing third party code to run on your API server), packages (for example, Charts) or other installation bundles often include CRDs as well as a Deployment of third-party code that implements the business logic for a new custom resource.
Installing an Aggregated API server always involves running a new Deployment.
Custom resources consume storage space in the same way that ConfigMaps do. Creating too many custom resources may overload your API server's storage space.
Custom resources are placed into storage based upon the the current storage version of the resource, defined in the CRD spec. Any update to a custom resource will use the currently defined storage version to store the resource. All other versions either need to have all the fields of that version or define conversions to work properly.
Aggregated API servers may use the same storage as the main API server, in which case the same warning applies.
CRDs always use the same authentication, authorization, and audit logging as the built-in resources of your API server.
If you use RBAC for authorization, most RBAC roles will not grant access to the new resources (except the cluster-admin role or any role created with wildcard rules). You'll need to explicitly grant access to the new resources. CRDs and Aggregated APIs often come bundled with new role definitions for the types they add.
Aggregated API servers may or may not use the same authentication, authorization, and auditing as the primary API server.
Kubernetes client libraries can be used to access custom resources. Not all client libraries support custom resources. The Go and Python client libraries do.
When you add a custom resource, you can access it using:
kubectlField Selectors let clients select custom resources based on the value of one or more resource fields.
All custom resources support the metadata.name and metadata.namespace field
selectors.
Fields declared in a CustomResourceDefinition
may also be used with field selectors when included in the spec.versions[*].selectableFields field of the
CustomResourceDefinition.
Kubernetes v1.32 [stable](enabled by default)The spec.versions[*].selectableFields field of a CustomResourceDefinition may be used to
declare which other fields in a custom resource may be used in field selectors.
The following example adds the .spec.color and .spec.size fields as
selectable fields.
apiVersion: apiextensions.k8s.io/v1
kind: CustomResourceDefinition
metadata:
  name: shirts.stable.example.com
spec:
  group: stable.example.com
  scope: Namespaced
  names:
    plural: shirts
    singular: shirt
    kind: Shirt
  versions:
  - name: v1
    served: true
    storage: true
    schema:
      openAPIV3Schema:
        type: object
        properties:
          spec:
            type: object
            properties:
              color:
                type: string
              size:
                type: string
    selectableFields:
    - jsonPath: .spec.color
    - jsonPath: .spec.size
    additionalPrinterColumns:
    - jsonPath: .spec.color
      name: Color
      type: string
    - jsonPath: .spec.size
      name: Size
      type: string
Field selectors can then be used to get only resources with a color of blue:
kubectl get shirts.stable.example.com --field-selector spec.color=blue
The output should be:
NAME       COLOR  SIZE
example1   blue   S
example2   blue   M
The aggregation layer allows Kubernetes to be extended with additional APIs, beyond what is offered by the core Kubernetes APIs. The additional APIs can either be ready-made solutions such as a metrics server, or APIs that you develop yourself.
The aggregation layer is different from Custom Resource Definitions, which are a way to make the kube-apiserver recognise new kinds of object.
The aggregation layer runs in-process with the kube-apiserver. Until an extension resource is
registered, the aggregation layer will do nothing. To register an API, you add an APIService
object, which "claims" the URL path in the Kubernetes API. At that point, the aggregation layer
will proxy anything sent to that API path (e.g. /apis/myextension.mycompany.io/v1/…) to the
registered APIService.
The most common way to implement the APIService is to run an extension API server in Pod(s) that run in your cluster. If you're using the extension API server to manage resources in your cluster, the extension API server (also written as "extension-apiserver") is typically paired with one or more controllers. The apiserver-builder library provides a skeleton for both extension API servers and the associated controller(s).
Extension API servers should have low latency networking to and from the kube-apiserver. Discovery requests are required to round-trip from the kube-apiserver in five seconds or less.
If your extension API server cannot achieve that latency requirement, consider making changes that let you meet it.
Alternatively: learn how to extend the Kubernetes API using Custom Resource Definitions.
Operators are software extensions to Kubernetes that make use of custom resources to manage applications and their components. Operators follow Kubernetes principles, notably the control loop.
The operator pattern aims to capture the key aim of a human operator who is managing a service or set of services. Human operators who look after specific applications and services have deep knowledge of how the system ought to behave, how to deploy it, and how to react if there are problems.
People who run workloads on Kubernetes often like to use automation to take care of repeatable tasks. The operator pattern captures how you can write code to automate a task beyond what Kubernetes itself provides.
Kubernetes is designed for automation. Out of the box, you get lots of built-in automation from the core of Kubernetes. You can use Kubernetes to automate deploying and running workloads, and you can automate how Kubernetes does that.
Kubernetes' operator pattern concept lets you extend the cluster's behaviour without modifying the code of Kubernetes itself by linking controllers to one or more custom resources. Operators are clients of the Kubernetes API that act as controllers for a Custom Resource.
Some of the things that you can use an operator to automate include:
What might an operator look like in more detail? Here's an example:
The most common way to deploy an operator is to add the Custom Resource Definition and its associated Controller to your cluster. The Controller will normally run outside of the control plane, much as you would run any containerized application. For example, you can run the controller in your cluster as a Deployment.
Once you have an operator deployed, you'd use it by adding, modifying or deleting the kind of resource that the operator uses. Following the above example, you would set up a Deployment for the operator itself, and then:
kubectl get SampleDB                   # find configured databases

kubectl edit SampleDB/example-database # manually change some settings
…and that's it! The operator will take care of applying the changes as well as keeping the existing service in good shape.
If there isn't an operator in the ecosystem that implements the behavior you want, you can code your own.
You also implement an operator (that is, a Controller) using any language / runtime that can act as a client for the Kubernetes API.
Following are a few libraries and tools you can use to write your own cloud native operator.